30 Day Satisfaction Guarantee Save Up to 60% Off Bicycles From BikesDirect.com
Assembly Help
BIKE INDUSTRY SECRET: It's Easy To Assemble Your Bike
Thank you for choosing
bikesdirect.com
We are sure you will get many years of pleasure from your bike!
If you have any questions about your bike, please email us at bikesdirectservice@gmail.com
Your bike either road bike, mountain bike, fatbike, 29er bicycle, full suspension or cruiser or other type of bicycle comes
approx up to 80 to 90 percent assembled and then boxed at the factory for shipment
If you are familiar with bicycle assembly, most take about 15 to 20 minutes with brake, shifter, derailleur adjustment and some wheel truing. Some of the higher-end bikes and triathlon bicycles may take a bit longer for assembly and tuning. It is normal for wheels to require some minor truing. It is normal for hydraulic disc rotors and brakes to need bleeding/adjustment.Even parts that arrived installed need to be checked/adjusted.
At THIS Link to see sample assembly instructions and a video. Check out the videos below:
PLEASE
SCROLL DOWN TO THE BOTTOM OF THE PAGE
FOR HELPFUL VIDEO INSTRUCTIONS ON
GENERAL ASSEMBLY STEPS OF A ROAD BIKE
Bikes are so easy to assemble. Eleven Year old customer Jeremy assembled his own bike and made a video while he did it and then sent it to us. Assemble Your Own Bike, Save even more money and have more fun.
Save money and Assemble your own bike Get up to 60% Off Bicycle Toolkits to assemble your bike At THIS Link
Bikes are easy to assemble. Cruisers for example take most customers less than 5 minutes. It takes longer to remove the packaging
One of our customers made the video below assembling their Motobecane mountain bike. It's easy and fun to save money assembling your own bike.
One of our customers made the video below assembling their Gravity Fat bike. It's easy and fun to save money assembling your own bike.
Questions or missing parts? Contact bikesdirectservice@gmail.com :)
Another happy customer made the video below on how to assemble their Motobecane 29er mountain bike. It's easy and fun to save money assembling your own bicycle.
If you feel unsure about putting it together, please you take it to your local bike shop for final assembly, tuning and safety checks. All parts of the bicycle require proper tuning and tightening of all parts prior to every ride and inclusive of parts that arrive pre-installed.
>Here are some general guidelines
for setup:
General Assembly Instructions for Mountain Bikes /Comfort Bicycles
NOTE: PLEASE TIGHTEN YOUR LOCKRINGS, CRANKS, PEDALS ETC BEFORE AND AFTER EVERY RIDE. Stripped threads, cranks, pedals etc are due to those parts not being tightened enough by the rider and are not covered by warranty
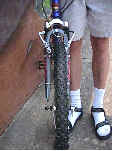
1) Place
the wheel into the fork mounts and tighten the quick release lever.
(refer to owners manual), or tighten the nuts on both sides of the
wheel. Be sure the wheel is centered. The best way to do this is to set
your bike on the ground, holding the bike straight up and the wheel
should center. (figure 1) Be sure the Quick Release is closed and snug.
(figures 2 & 3)
Figure 1
Figure 2
Figure 3
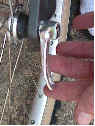
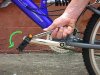
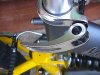
2) Attach the brake wire if unattached. (Figure 4)
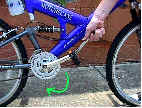
3) Screw
in the pedals. (figures 5 and 6) Note that there is a right and left
pedal marked on the threaded end of each pedal. (this corresponds to
the right and left sides as you are sitting on the mountain bike) The pedals
thread counter-clockwise on the left and clockwise on the right side.
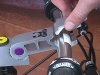
Tighten them snuggly with a 15mm wrench or an adjustable spanner
(crescent wrench). Be
sure not to cross thread and strip out the crank arm! Be sure to tighten the cranks properly.
Left Pedal
Right
Pedal
Figure 5
Figure 6
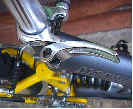
4)
Clamp and center the handlebar into the stem if it has been removed.
(figure 7) Tighten all bolts evenly. If the entire stem has been
removed, slide it into the headset and tighten allen head screw at the
top. This will require either a 5mm or 6mm allen wrench.
Figure 9
5)
Insert seatpost into seat tube and tighten seat clamp. (figures 8
& 9) For proper seatpost height… as you sit on the mountain bike with the ball of your foot on the pedal, you should have a slight
bend in your knee.
NOTE: PLEASE TIGHTEN YOUR LOCKRINGS, CRANKS, PEDALS ETC BEFORE AND AFTER EVERY RIDE. Stripped threads, cranks, pedals etc are due to those parts not being tightened enough by the rider and are not covered by warranty
Figure 8
Figure 9
6)
Be
sure that any nuts or bolts that may have come loose in shipping are
snug. It is also good policy to make sure your bike is properly
adjusted prior to every ride. Make sure cranks and pedals are properly
tightened as well as all other part. Stripped threads on pedals/cranks are due to riding them loose.
The videos below are for general reference. Always make sure all parts are tightened to manufacturer's specifications
Tighten both pedals with a fixed or adjustable wrench Bikesdirect.com will assume no
responsibility for improper assembly
General Assembly for Mountain bikes, Road Bicycles / Threadless Stem, Headset Adjustment
Mechanic Matt Shows How to Assemble and Tune Bicycles
Easy How to Adjust Threadless Aheadset
Easy How to Adjust Bicycle Front Derailleur
Easy How to Adjust Bicycle Rear Derailleur
It's not too hard to work on your own bike. Be it a road bike, mountain bike, comfort bike or even cruiser bike. You
can get the the full version of the Mechanic Matt video on cd and dvd PLUS a tool
kit at a great sale price (Check THIS LINK for info on the ToolKit and Video) and check out www.parktool.com for a
very complete online reference on bike maintenance and repairs. If you
don't feel confident working on your bike, please visit your local
professional bike shop These videos are for general reference. Always make sure all parts are tightened to manufacturers specifications
Tighten both pedals with a fixed or adjustable wrench Bikesdirect.com will assume no
responsibility for improper assembly
Protect your
investment as you have saved up to 60% off List Price with Bikesdirect.com's Factory Direct prices.
Please see the manufacturers' website for full warranty details (beyond 30 days of purchase) For Example: Shimano parts please go to Shimano.com, SRAM parts go to SRAM.com
Within 30 days, Email bikesdirectservice@gmail.com for proper claims procedures
Please do not pay a 3rd party to work on your bike or purchase repair parts until after you have given us a chance to make things right. In rare instances of problems, we can often save you time and money. Shipping Damage within 7 days of delivery, Email bikesdirectbikes@aol.com
Please Immediately Inspect your purchase upon delivery.
Shipping Damages noted after 7 days cannot be submitted for claim.
Please retain all packaging and send photos if possible.
Note: Costs of parts purchased without giving us a chance to make things right are not reimbursable or covered.
Labor Costs, Assembly, packing, shipping costs are not covered by warranty.
Wear and tear parts like chains, bearings, wires, tubes, tires, paint/decals, crossed/stripped threads on cranks,
pedals etc and broken derailleur hangers are not covered by warranty as these are user/maintenance issues.
Cosmetic issues are not covered such as stains, scratches, chips, tears etc. Damages due to impact, accident,
road/trail hazards are not covered. At their option, some manufacturers may require the whole bicycle
be
submitted for warranty inspection.
BikesDirect.com is Customer Certified by BizRate Thousands and thousands of happy customers love Bikesdirect.com on BizRate.
Go Through The Link in the BizRate Certified banner to the right. See reviews from real customers