Discover why 2026 is shaping up to be the year of smart E-bikes. This infographic explains how battery intelligence, built-in GPS, and advanced connectivity are transforming navigation, safety, and personalization. Learn how commuters and riders benefit from smarter energy use, reduced range anxiety, and a more confident, connected riding experience.
For years, bike fitting worshipped exact angles: knee-over-pedal by the plumb bob, elbows at tidy degrees, stems slammed because pros did it. The result was often a fast-looking bike that felt twitchy after 40 minutes and punishing after 90. Modern bike fit flips the script. Instead of making your body serve a geometry chart, it tunes contact points and posture to your mobility, riding goals, and terrain. Numbers still matter—they’re guardrails, not handcuffs. What counts is whether you can breathe deeply, steer lightly, and put down power without discomfort from the first ten minutes to the last ten miles.
To make this practical, we’ll compare how modern bike fit plays out on three distinct platforms you can buy today—an endurance-leaning carbon road bike, a flat-bar city/fitness bike, and an all-road/gravel bike—so you can see how the same principles adapt to different ride styles.
The new fit priorities: posture, pressure, and predictability
Feel-first fit asks three questions. First, posture: can you see the road easily and breathe without shrugging your shoulders? Second, pressure: are weight and contact pressures spread so hands, sit bones, and feet feel supported rather than pinched? Third, predictability: does the bike steer where your eyes go, without micro-corrections?
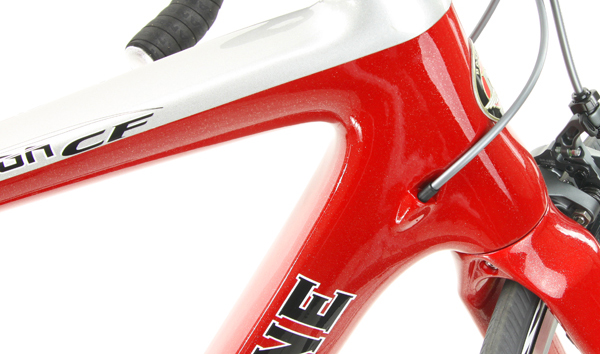
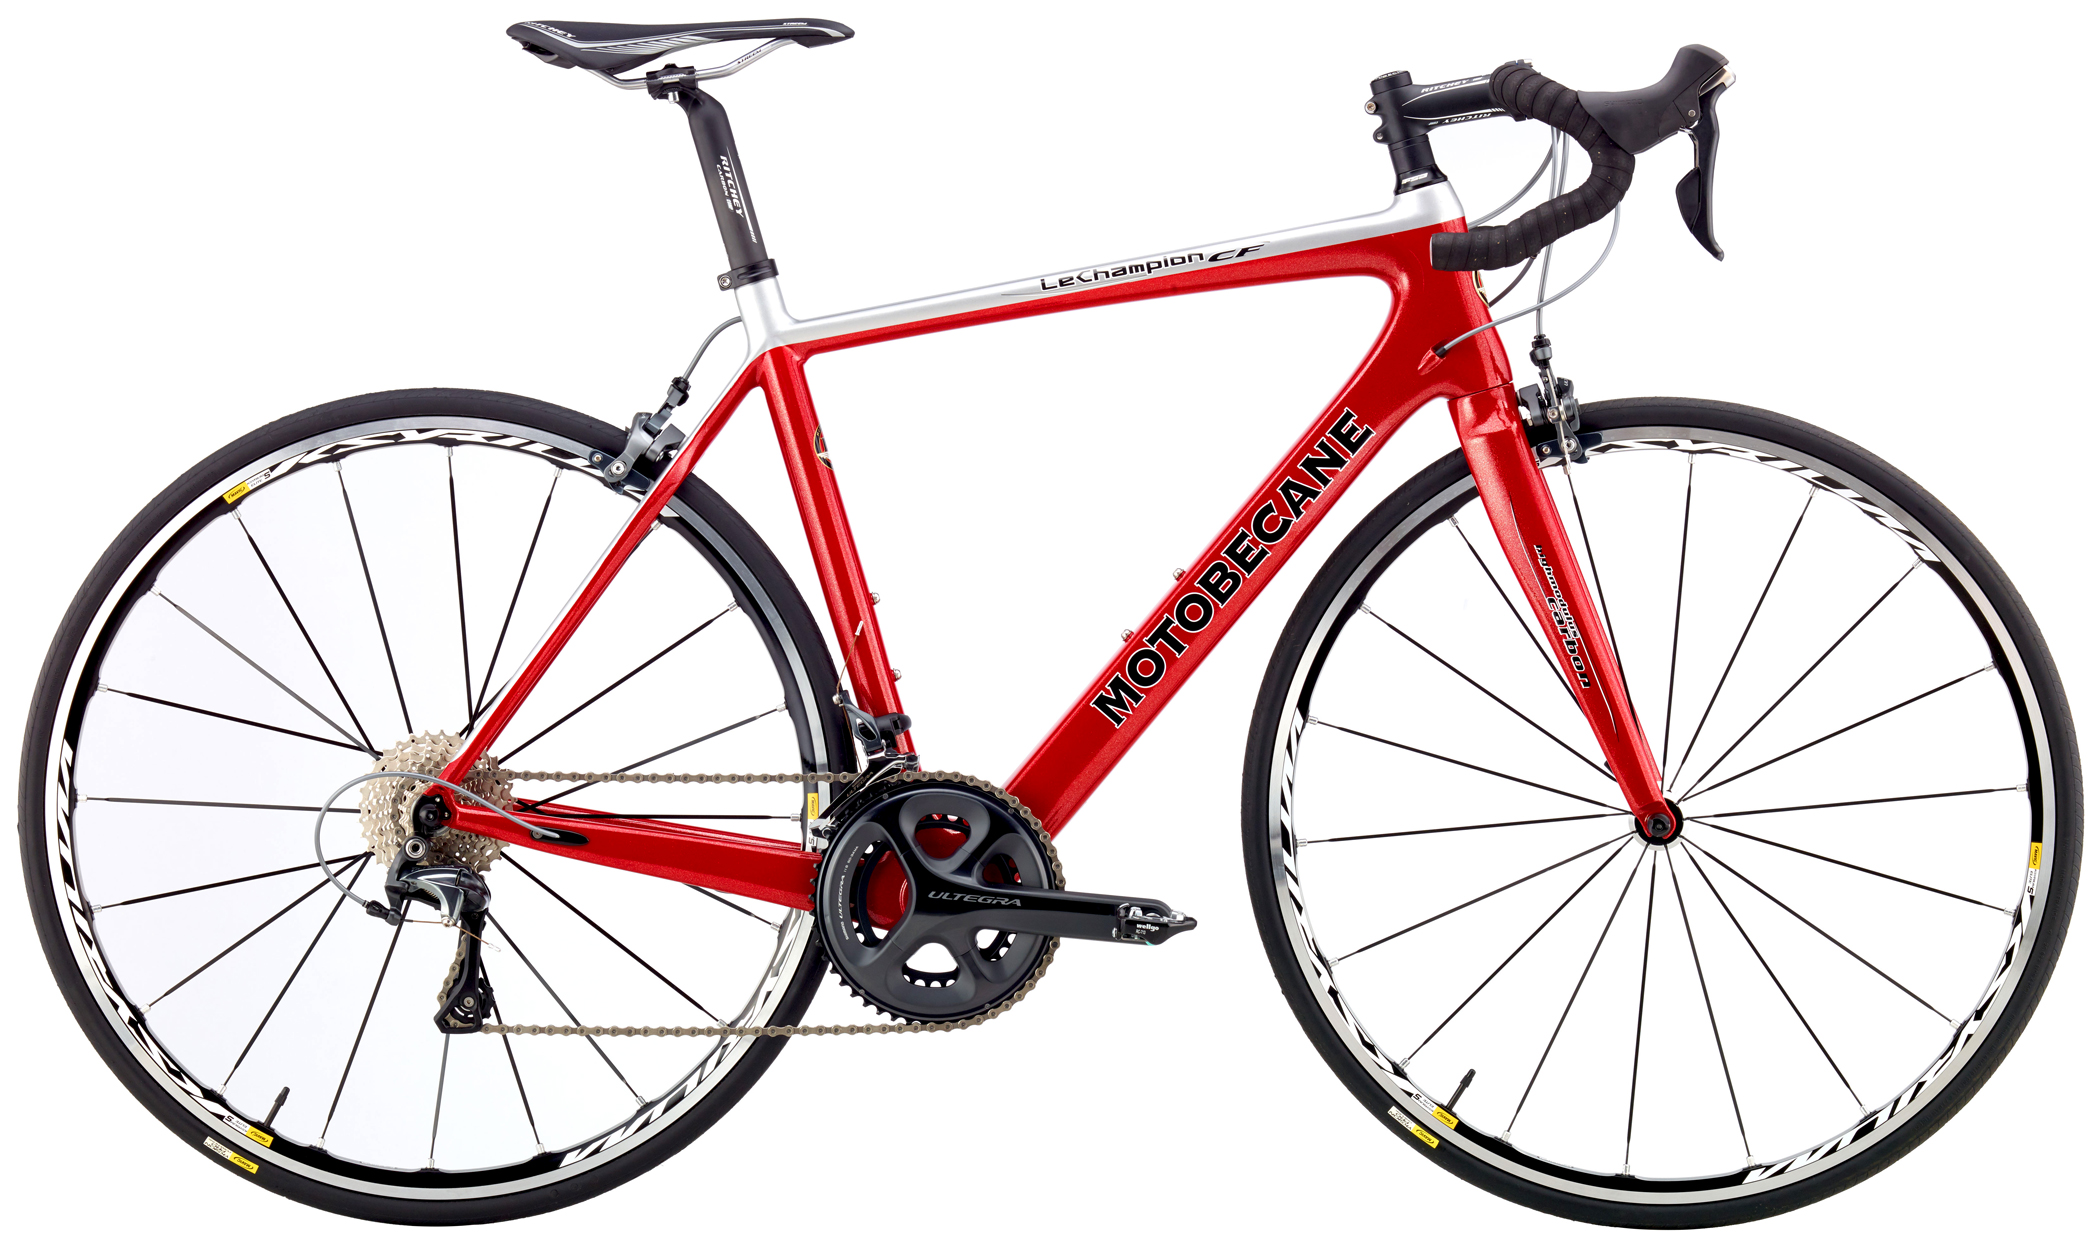
On the Le Champion CF LTD, a taller stack and modest reach encourage a chest-open posture with soft elbows. That keeps breathing deep and core engaged on long road rides. The Avenue FXD Disc supports an upright stance for traffic awareness and lower-back ease, ideal for commutes and fitness loops. The Gravel X3 Disc adds tire volume and a slightly longer wheelbase, helping you stay relaxed as surfaces change. Different bikes, same goal: a stable torso with relaxed hands and a pelvis that’s supported—not hunting around the saddle every minute.
Saddle position: where comfort starts (and injury prevention, too)
Classic advice set saddle height by heel-on-pedal or fixed knee angles. Modern bike fit still respects those ranges but refines them by feel. You want a smooth knee path with no hip rock and power that arrives early in the downstroke, not awkwardly late. Most riders land near a 25–40° knee angle at the bottom of the stroke, but adaptation comes first: if your hamstrings or lower back are tight, slightly lowering the saddle (or moving it a touch forward) can stabilize your pelvis and unlock comfortable cadence.
On the Le Champion CF LTD, a millimeter or two can be the difference between all-day calm and creeping hamstring tug. On the Avenue FXD Disc, a hair lower position paired with a slightly more forward saddle often helps starts and stops feel confident in traffic. On the Gravel X3 Disc, keep height conservative to preserve traction when seated over rough patches; stability equals speed on chattery gravel.
Saddle tilt follows the same rule: level is the starting point; micro-tilt by half-degree steps. Numb hands? Your pelvis may be sliding forward—lift the nose a whisper. Pressure at the front? Drop the nose slightly so pelvic tilt is neutral. Small changes, big relief.
Bars and cockpit: breathing room over bravado
A generation ago, “slammed and long” signaled speed. Today, fit prioritizes breathing room and light hands. For drop bars, look for a position where you can spend most time on the hoods with a soft elbow bend and a neutral wrist. If you need to shrug or lock your elbows to reach, the cockpit is too long or too low. On Le Champion CF LTD, adding a spacer or choosing a compact-reach bar can transform comfort without sacrificing pace. On Gravel X3 Disc, shallow-flare bars improve control on loose surfaces while maintaining neutral wrists. The Avenue FXD Disc’s flat bar benefits from a modest rise and gentle backsweep; those few degrees take strain out of wrists and shoulders in start-stop city flow.
Bar width has evolved, too. For road and all-road, many riders now prefer slightly narrower bars to reduce frontal area and shoulder strain, provided the chest still feels open. For flat-bars, avoid overly wide stances that load the wrists; let steering come from the core, not tension in your hands.
Cranks, cleats, and the quiet lower body
Shorter crank trends aren’t fashion—they reduce hip closure at the top of the stroke, improve breathing, and cut knee shear for many riders. If you’ve felt pinched at the top or struggle to spin smoothly, a 2.5–5 mm shorter crank can be a revelation, especially on endurance frames like Le Champion CF LTD. Cleat placement follows comfort and stability: start a bit farther back (toward mid-foot) than you think, align with your natural foot angle, and let your knees track without forcing them “straight.” The goal is quiet knees under load. On the Gravel X3 Disc, a forgiving cleat float helps as terrain tilts and cadence varies. On the Avenue FXD Disc, if you ride in everyday shoes, choose pedals with a broad, grippy platform and set saddle a shade lower for stable starts.
Tire volume and pressure: fit’s secret ally
Fit isn’t only contact points. Tire volume and pressure shape how your body experiences the bike. The Le Champion CF LTD shines with 28–32 mm tires at realistic pressures; that “quiet road” sensation reduces hand clench and shoulder fatigue, which keeps posture tidy. The Avenue FXD Disc thrives on 32–38 mm; calmer feedback lets you steer from your core instead of white-knuckling over cracks and paint. The Gravel X3 Disc is built for 38–45 mm tubeless; lower pressures smooth washboard and let your hips stay still, which stabilizes knee tracking and power.
If a fit feels almost right but not quite, check pressures. Over-inflated tires masquerade as a “cockpit problem” by putting buzz into your hands and lower back. Drop a few PSI and re-assess before chasing stems and spacers.
A feel-first setup plan for each platform
On Le Champion CF LTD, begin with a comfort-endurance posture: hoods as the home base, bar drop that keeps your chest open, and a saddle height that favors a smooth knee path over a maximal extension. Test on real roads with light surges. If hands load up late in rides, raise the bars a touch or rotate them slightly to bring the hoods higher.
On Avenue FXD Disc, aim for heads-up control: a modest bar rise and backsweep, levers set close for easy one-finger braking, and a saddle position that enables calm, seated starts. Keep the reach short enough that shoulder checks are second nature.
On Gravel X3 Disc, bias toward stability: a slightly shorter reach and a hair higher bar than your road position, shallow-flare drops for leverage, and saddle height set for traction and cadence on uneven surfaces. Let the bike absorb chatter so your hips stay quiet.
The ten-minute parking-lot test (modern bike fit in action)
Take an Allen key set and do three short loops. First loop: note any hand pressure or neck craning—if present, raise the bars 5–10 mm or shorten reach 5 mm and ride again. Second loop: watch your knees from above; if they sweep out or you’re rocking, lower the saddle 2–3 mm or slide it slightly forward. Third loop: add a handful of hard efforts; if you scoot on the saddle, fine-tune tilt by half-degree. Lock in the changes, then ride 30–40 minutes on familiar roads and re-check only what still talks back. This is modern bike fit: iterative, simple, guided by feel, with numbers validating comfort rather than dictating it.
When to consider a different size (or bike)
If your fit requires extreme stems, maximum spacers, or saddle rails slammed to one end, the frame-rider match is off. An endurance frame like Le Champion CF LTD will usually accommodate a wide range of riders who want comfort and speed. If traffic visibility and everyday clothes matter more, the Avenue FXD Disc’s geometry may suit your lifestyle better than forcing a road bike upright. If your favorite routes keep detouring onto dirt, the Gravel X3 Disc’s stability will feel “right” with fewer cockpit contortions.
Fit the rider first, then the numbers—BikesDirect can help
The future of road bike fitting isn’t anti-data; it’s pro-rider. Start with how you breathe, steer, and support your weight. Use numbers as sanity checks, not shackles. The Le Champion CF LTD, Gravity Avenue FXD Disc, and gravel bike X3 Disc each make that approach easy in their own way: endurance calm for long road days, upright control for daily miles, and stable versatility for mixed terrain. Tell BikesDirect about your mobility, routes, and ride goals, and they’ll translate “modern bike fit” into a setup you can hold for hours—without numb hands, tight hips, or wandering knees. If you’d like a short list of sizes, stems, bars, saddles, and tire pressures tailored to your body and terrain,contact BikesDirect and get a feel-first configuration that’s fast because it’s comfortable—and comfortable because it fits you.
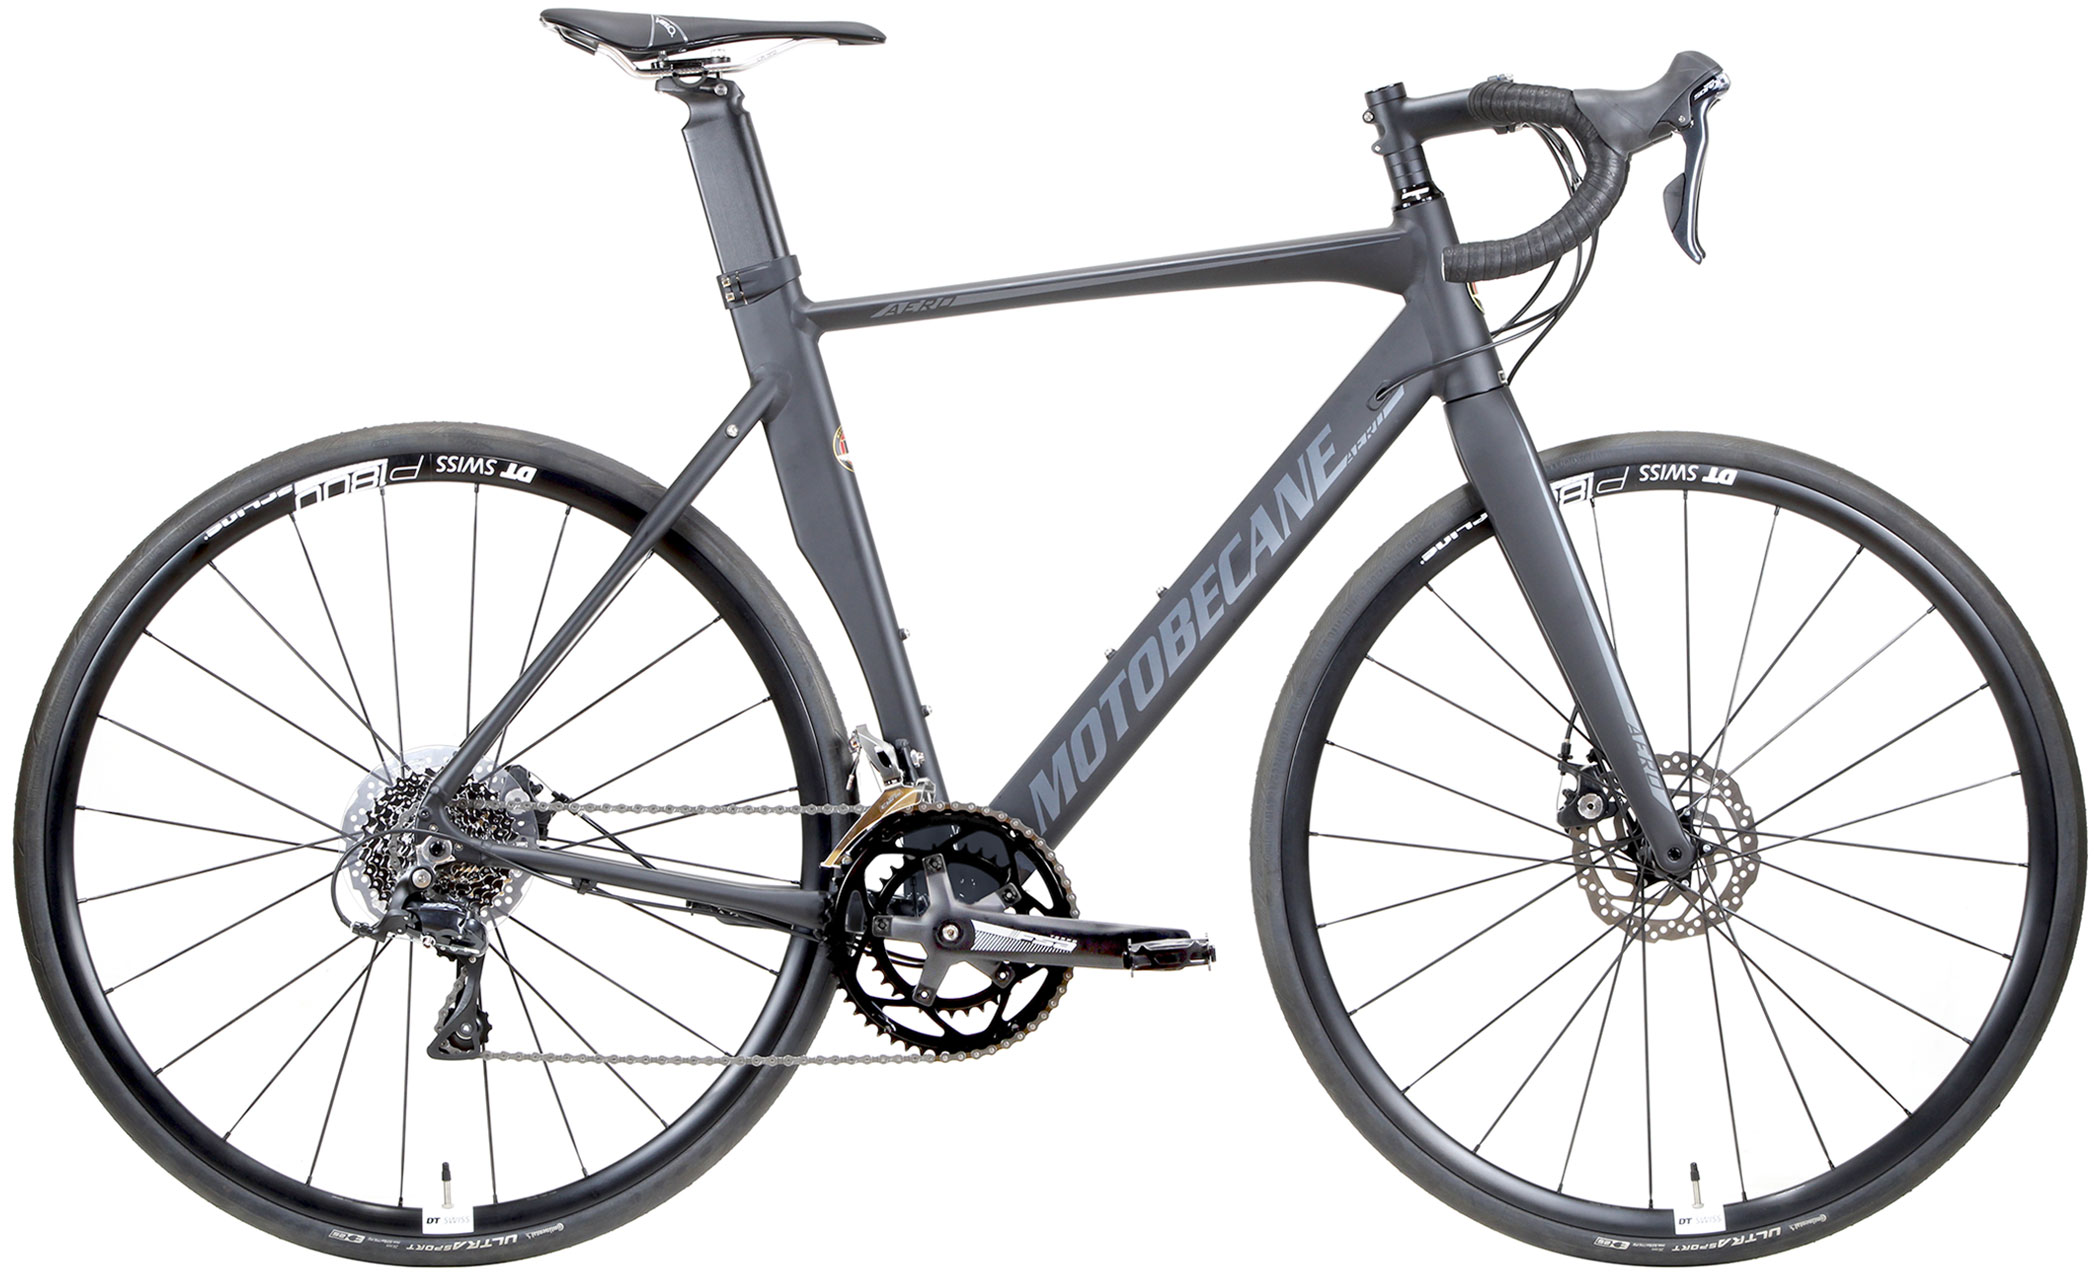
Fuel strategy isn’t one-size-fits-all. Your position, rolling resistance, and terrain dictate power output—and that dictates what, when, and how much to eat and drink. To turn advice into something practical, we’re comparing cycling nutrition guides across three distinct long-ride bikes: an endurance-calm carbon road bike, an aero-leaning road setup, and a gravel/all-road machine for mixed surfaces. You’ll see how we adjust carbs, fluids, and electrolytes to match the effort each platform invites.
The reference bikes are the Motobecane Le Champion CF LTD (endurance carbon), the Motobecane Fast Aero Road Elite Disc (aero road), and the Motobecane Gravel X3 Disc (all-road/gravel). You can explore them here:Le Champion CF LTD,Fast Aero Road Elite Disc, andGravel X3 Disc.
The big picture: simple rules that actually work
Three principles anchor this guide. First, carbs power performance; most weekend riders under-fuel early and fade late. Second, hydration and sodium guard the engine; cramps and brain fog are often fluid/electrolyte problems, not fitness problems. Third, timing beats tinkering; set a schedule that’s easy to remember and stick to it even when you “feel fine.”
We’ll keep numbers conservative and easy to implement, then show how to tweak for pace and terrain.
The Le Champion CF LTD positions you a touch taller, accepts 28–32 mm tires, and encourages smooth pedaling. That “calm speed” profile means fewer spikes and a heart rate that hovers in aerobic zones. For most riders, this supports a straightforward fueling plan.
Night before: Aim for a normal dinner with balanced carbs—pasta, rice, potatoes—plus protein and veg. Skip experiments. Hydrate until urine runs pale, not clear.
Pre-ride (90–30 minutes out): 60–90 g carbs total, split however you tolerate—toast and banana, rice cakes with honey, or a simple drink mix. Sip 300–500 ml fluid.
On the bike: Target 40–60 g carbs per hour and 400–600 ml fluid per hour, adjusting up in heat. Use simple, repeatable units: one bottle with 20–30 g carbs plus one small chew or half a bar every 30 minutes. Include 300–600 mg sodium per hour via mix or tablets when it’s warm.
Why it works here: The bike’s smoothness reduces surges, so your stomach cooperates. Tire volume and posture lower overall stress, which means your gut stays online for digestion. If you finish with gas in the tank, step up to 60–75 g/h on future rides.
After: Within 30–60 minutes, add 20–30 g protein and 60–90 g carbs—yogurt and granola, a rice bowl, or chocolate milk plus a sandwich. Rehydrate to normal thirst and include some salt.
Plan B: Aero road (Fast Aero Road Elite Disc) — higher tempo, more surges
Pre-ride: Bump carbs to the higher end—80–100 g in the 90 minutes before rollout. A low-fiber option reduces gut friction at speed.
On the bike: Start early—within the first 15 minutes. Target 60–90 g carbs per hour, ideally as mixed sources (glucose + fructose blends) to increase absorption. Keep fluids 500–750 ml per hour with 500–800 mg sodium in heat or if you see salt streaks on kit. If you hate eating at pace, push more carbs into bottles with isotonic mixes and top up with small chews every 20–30 minutes.
Why it works here: The aero bike encourages “pulls” and surges out of corners; fueling early prevents the downward spiral where you under-eat, slow down, and then struggle to catch up.
After: Same protein target (20–30 g), but prioritize carbs quickly—fruit + cereal + milk, or rice with eggs and soy. Keep sipping electrolytes if the ride was hot.
Plan C: Gravel/all-road (Gravel X3 Disc) — variable surfaces and cadence
Mixed terrain changes cadence and body position constantly. You may stand more, absorb bumps with your core, and fight washboard. That raises overall cost even at modest speeds and can reduce appetite.
Pre-ride: Choose easy, low-fiber carbs and arrive with a bottle already half-finished. Consider a small, salty snack to kickstart thirst.
On the bike: Use an alarm every 15 minutes as a nudge. Aim 50–70 g carbs per hour and 500–700 ml fluid per hour with 600–900 mg sodium when it’s hot or dusty. Carry a mix of textures: soft chews for rough sections, a gel near climbs when chewing is awkward, and a small, real-food bite (rice bar, fig bar) each hour to keep the stomach happy. Lower tire pressure reduces whole-body shake and helps digestion—comfort is nutrition.
After: Rehydrate more deliberately; dust and dry air hide sweat loss. Protein stays 20–30 g, carbs 60–90 g, plus a salty element to speed recovery.
Troubleshooting: what goes wrong and how to fix it
You bonk despite eating. You started too late or under-hydrated. Front-load the first hour next time and put carbs in bottles if chewing at speed fails you. Cramps mid-ride. Increase sodium and fluids per hour, and check that your bottles actually match your plan. Don’t rely on sips “when thirsty” in heat. Gut slosh. Slow down for five minutes, switch to smaller, more frequent sips, and avoid stacking a bar and a full-strength bottle at once. On future rides, reduce fiber the morning of. No appetite after. Liquid calories count—smoothies with yogurt, fruit, and oats fit easily when solids don’t.
How the bike influences fueling logistics
On the Le Champion CF LTD, upright comfort and calm handling make it easy to unwrap food and drink regularly. Mount two bottles and stash a top-tube bag to keep reach short. On the Fast Aero Road Elite Disc, your head is down more often. Pre-open wrappers, favor bottle-based carbs, and use shallow, frequent sips to avoid big gulps before corners. On the Gravel X3 Disc, bars and bags are your friends: a small frame bag prevents dropped snacks on bumpy sectors, and wider tires at realistic pressures keep your hands steady enough to eat.
A simple, repeatable weekend template
Friday evening: Normal dinner; pack the bike; fill bottles and label them “Hour 1 / Hour 2 / Water.”
Ride day: Eat 60–100 g carbs in the 90 minutes before, depending on the bike/pace. Start fueling within 15 minutes. Keep to your per-hour plan even when you “don’t feel hungry yet.”
Post-ride hour: Protein 20–30 g, carbs 60–90 g, electrolytes if it was hot. Later, a balanced meal. Log what worked.
Match fueling to your bike and route, then make it a habit
The right nutrition plan is the one you’ll follow automatically. Endurance carbon rewards steady, early fueling; aero road needs higher hourly carbs and bottle-based calories; gravel asks for alarms, variety, and a comfort-first setup so your gut stays online. Tell us your weekend routes, speeds, and where fueling usually falls apart—first climbs, mid-ride lulls, or hot finishes—and we’ll help you choose the bike setup and storage that makes your nutrition plan effortless. To compare the Le Champion CF LTD, Fast Aero Road Bike Elite Disc, and gravel bike X3 Disc—and to get a simple checklist for bottles, bags, and mixes—contact our team and we’ll tailor a long-ride kit that keeps you strong from mile one to the last turn home.
You finally decide it’s time for a serious bike. You open a few tabs, land on a sleek road bike, then a tough-looking mountain bike, and pretty soon every spec sheet is shouting the same phrase: mechanical vs hydraulic disc brakes.
If you are like most new riders, you know disc brakes are “better” than old-school rim brakes, but the difference between mechanical and hydraulic feels like alphabet soup. One system seems cheaper and simpler. The other sounds more advanced and powerful. Which do you actually need for your riding, your budget, and your confidence on the road or trail?
Let’s slow things down, just like a good brake should. This guide breaks the technology into plain language, then connects it to real-world riding on everything from a commuter hybrid bike to a snow-ready fat bike.
The Basics: What Disc Brakes Actually Do Differently
Both mechanical and hydraulic disc brakes use a metal rotor attached to the wheel hub and brake pads mounted in a caliper. When you squeeze the lever, the pads clamp the rotor and slow the wheel.
Compared with rim brakes, disc systems move the braking surface away from the tire sidewall. That simple shift gives you more consistent braking in wet weather, better control on long descents, and less wear on your rims. For riders who push a gravel bike down washboard dirt or hammer a mountain bike through rock gardens, that consistency is a big deal.
Where things get interesting is how the lever force travels from your hand to the rotor. That’s where the mechanical vs hydraulic disc brakes question really starts.
How Mechanical Disc Brakes Work
Mechanical disc brakes use a steel cable, just like rim brakes. When you pull the lever, the cable moves and the caliper squeezes the pads onto the rotor.
Because the whole system is mechanical, you can see and understand nearly every part at a glance. Cable tension is easy to adjust with barrel adjusters. Swap in new pads, tighten a bolt, re-center the caliper, and you are usually good to go.
For many riders starting out on a hybrid bike or entry-level road bike, mechanical discs hit a sweet spot: disc-brake performance without a big jump in price. They are especially attractive if you enjoy doing your own basic maintenance or live far from a bike shop.
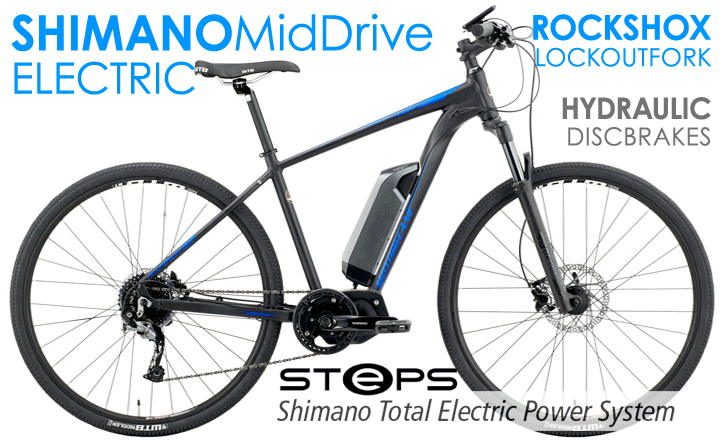
How Hydraulic Disc Brakes Work
Hydraulic systems replace the cable with a sealed hose filled with mineral oil or brake fluid. When you squeeze the lever, a piston pushes the fluid, which transfers force to pistons in the caliper, clamping the pads against the rotor.
The key advantage is leverage. A small squeeze at the lever can generate a lot of pressure at the caliper, giving you strong braking with much less hand effort. The fluid also self-adjusts as pads wear, keeping the lever feel consistent over time.
Hydraulics shine in demanding riding: aggressive trail runs on a mountain bike, loaded bikepacking on a gravel bike, or steep winter descents on a studded fat bike. That stronger, more predictable braking translates directly into confidence when conditions are sketchy.
Stopping Power and Modulation: How They Feel On The Trail
When riders compare mechanical vs hydraulic disc brakes, they usually care about two things: raw stopping power and modulation.
Stopping power is how quickly the system can bring you to a halt. Hydraulics usually win here. Because of the fluid leverage and multiple pistons, hydraulic calipers can clamp the rotor harder for the same hand input. It is like having more “gears” in your braking.
Modulation is the control between full-speed and locked-up. Imagine feathering the brakes on a loose descent, adding just enough pressure to scrub speed without skidding. Hydraulic systems tend to offer a smoother ramp of power as you pull the lever, so you can fine-tune grip on gravel, wet pavement, or roots.
Mechanical brakes can still deliver strong stopping power, especially paired with good rotors and quality pads. On an all-round hybrid bike or casual beach cruiser, they feel more than adequate. You just have to pull the lever a bit harder, and small changes in power can feel less precise than on hydraulics.
Maintenance and Reliability: Who Wants To Wrench?
Maintenance is where the decision often flips, especially for new riders.
Mechanical disc brakes are straightforward. The cable stretches over time, so you occasionally adjust tension or turn a barrel adjuster to bring the pads closer. When the cable housing corrodes or frays, you replace it with basic tools. On a commuter road bike or family mountain bike, a confident home mechanic can handle nearly everything.
Hydraulics demand a bit more precision. Because the system is sealed, there are no exposed cables to rust, but the fluid can absorb air or moisture. Every so often, the system needs a bleed: you connect hoses, push fresh fluid through, and expel bubbles. Once you understand the process, it is not mysterious, but it does require the right kit and a bit of patience. Many riders prefer to have a shop do this service.
In terms of reliability, both systems are tough when properly set up. Mechanical brakes are easier to limp home if something goes wrong; worst case, a cable can be tied off or replaced on the side of the trail. Hydraulic hoses, once damaged, are harder to fix mid-ride. That is why some long-distance touring riders still favor mechanical discs, even on rugged routes that would otherwise benefit from hydraulic feel.
Cost And Value: Where Your Money Actually Goes
On entry-level and midrange bikes, brake type is often a good shorthand for how the manufacturer allocated the budget.
Because mechanical components cost less to produce, bikes with cable-actuated discs often invest savings elsewhere: a lighter frame, better drivetrain, or upgraded wheels. A starter hybrid bike with mechanical discs might come in under a similar big-box model while still offering name-brand components and a more thoughtfully designed frame.
Hydraulic disc brakes raise the price, but you are paying for more than just power. You are buying a lighter lever action, better modulation, and a consistent feel in all conditions. On a performance-oriented mountain bike or fast endurance road bike, those differences add up on long rides and challenging terrain.
When you compare individual models side by side, it helps to think about where you will notice the upgrade most. If your longest ride is a relaxed cruise along the boardwalk on a beach cruiser, mechanical discs make a lot of financial sense. If you dream of technical descents or long gravel epics, hydraulics start to look like cheap insurance.
Weather, Terrain, And Riding Style: Matching Brakes To Real Life
Brakes do not exist in isolation; they work together with tire choice, frame design, and the surfaces you ride.
If your reality is wet commutes, gravel shoulders, and surprise potholes, you care about consistent engagement more than sheer downhill power. A well-set mechanical disc on a gravel bike or upright hybrid bike will feel predictable in rain and grit, especially with wider tires to smooth the ride.
If you plan to push the limits on singletrack or bike park features, hydraulic discs on a capable mountain bike come into their own. You can brake later into corners, control speed with one-finger inputs, and stay relaxed on long descents instead of death-gripping the bar.
Winter riders and sandy-beach explorers often choose a fat bike. Those huge tires already create massive grip, but add in hydraulic discs, and you have a setup that can brake confidently even when rims are coated in slush or salt. For milder climates and mixed-use paths, mechanical discs on a fat bike still offer plenty of control without overcomplicating the build.
The Learning Curve: Feel, Setup, And Confidence
Another overlooked aspect of mechanical vs hydraulic disc brakes is how they help a new rider grow skills.
Mechanical systems encourage you to learn the basics of setup. You become familiar with pad alignment, cable tension, and rotor rub. That knowledge pays off every time you hear a faint scraping sound and know exactly what to tweak. For riders who enjoy understanding their machine, mechanical discs are a great classroom.
Hydraulics teach a different lesson: subtle braking. Because small lever inputs produce noticeable changes in deceleration, you quickly learn to modulate with one finger and shift your weight rather than grabbing a handful. Off-road, that translates into fewer skids and more balanced, controlled riding. On pavement, it means smoother stops and better traction in panic situations.
Neither learning curve is “better,” but one may fit your personality. If you love the idea of wrenching in the garage on a rainy evening, mechanical discs might make you happy. If you just want the bike to disappear beneath you and perform flawlessly, hydraulics will feel like a gift.
Long-Term Ownership: Upgrades And Future-Proofing
When you buy your first serious bike, you are not just buying the next six months. You are buying a platform for years of riding and upgrades.
Mechanical disc brake bikes are easy to upgrade incrementally. You can swap to compressionless housing for a firmer feel, move to larger rotors for more stopping power, or upgrade calipers while keeping the same levers. Parts are widely compatible and relatively inexpensive.
Hydraulic systems can also be upgraded, but it is usually more efficient to choose a higher-level group from the start. Once you have integrated shifters and levers on a drop-bar road bike or gravel bike, changing brake brands later can mean a bigger overhaul. The flip side is that a good hydraulic system can feel “future-proof” for many riders; you simply replace pads and rotors as they wear and enjoy consistent performance year after year.
So, Which System Should New Riders Choose?
Here is the honest answer: there is no single winner in the mechanical vs hydraulic disc brakes debate. There is only the system that matches your riding life right now.
If your focus is value, simplicity, and all-weather reliability for commuting, fitness rides, or casual family outings, cable-actuated discs are hard to beat. On a quality hybrid bike, beach cruiser, or entry-level mountain bike, they give you modern stopping power without stretching your budget. You learn basic maintenance, stay in control, and still enjoy a huge upgrade over rim brakes.
If your heart is set on technical trails, fast descents, or long mixed-terrain adventures, hydraulics earn their keep quickly. The added power and modulation let you ride harder with less fatigue. On performance-oriented models built for aggressive riding, the entire frame, fork, and wheel package is usually designed around the expectation of hydraulic braking.
Whichever option you lean toward, remember that good braking is about the whole system: quality rotors, fresh pads, and properly bedded-in surfaces. A well-maintained mechanical setup can outperform a neglected hydraulic system, and vice versa. Take the time to set your brakes up correctly, and they will reward you every ride.
Ready To Choose Your First Disc-Brake Bike?
If you are still weighing mechanical vs hydraulic disc brakes, the best next step is to connect the theory to specific bikes. Look at how brake choice interacts with frame material, tire clearance, and your preferred riding style.
Maybe you picture yourself cruising rail trails and neighborhood streets on a comfortable hybrid bike. Maybe you cannot stop daydreaming about exploring forest roads on a gravel bike, hammering club rides on a sleek road bike, or floating over winter trails on a fat bike. Whatever your vision, there is a disc-brake setup that fits it.
When you are ready to turn that vision into a real bike in your garage, browse the full selection of disc-equipped models at Bikesdirect.com. By selling straight to riders, we skip the retail markup and pack more performance into every price point, from entry-level commuters to advanced trail machines. As you compare specs, pay close attention to the brake type on each model, then match it to the kind of rides you actually plan to take: daily commutes, weekend group rides, family boardwalk spins, or big adventure missions. That way, you are not just buying brakes; you are buying confidence every time you roll out of the driveway.
Take your time, explore the options, and imagine how solid, predictable braking will feel on your very first ride. When you find the bike that fits your budget, your terrain, and your goals, you will know you chose the right side in the mechanical vs hydraulic disc brakes debate—not because someone told you which was best, but because you understand how the system works for you.
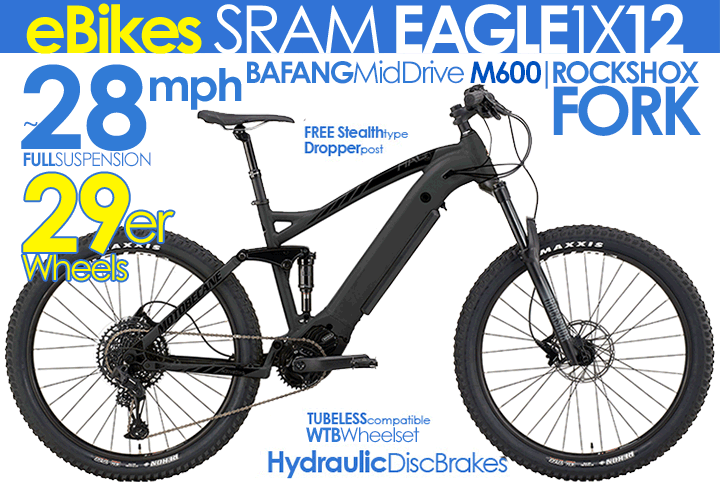
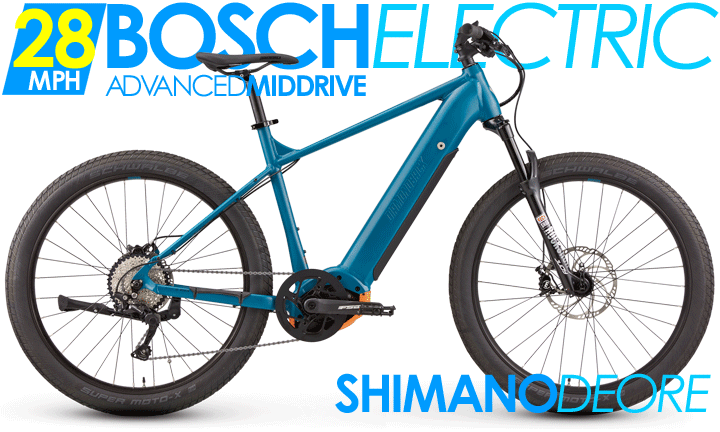
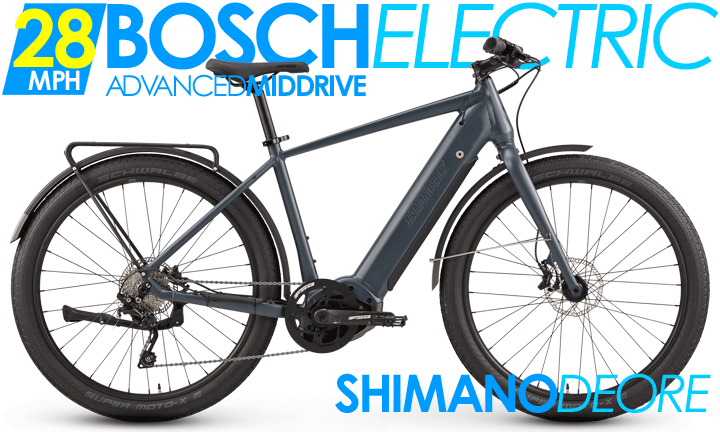
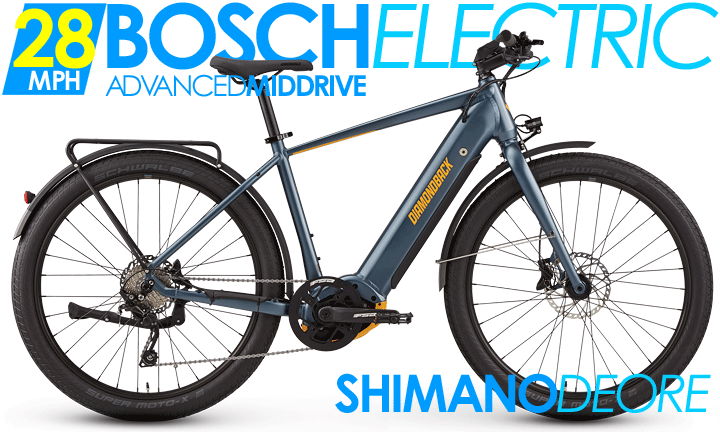
“Future bicycle technology” often sounds abstract—AI this, IoT that. The most useful way to understand where hybrid bikes are headed is to ride it today. So we’re treating three smart, urban-focused e-bikes as living previews of the next five years and comparing them like products you can buy right now. You’ll see how connectivity, assist intelligence, safety systems, and serviceability translate into daily gains for commuting, errands, and weekend explorations—and what to expect in future bicycle technology.
Our three reference points are the Diamondback Union 2, the Diamondback Union 1, and the Diamondback Response—three flavors of modern e-commuters that already embed the trends reshaping the category. Explore them here:Union 2,Union 1, andResponse.
Assist intelligence: from “power on” to ride-aware support
The biggest shift in e-bike feel is how the motor chooses to help. Early systems were binary: tap the button, get a surge. Modern torque-sensing units read your pedal force dozens of times per second and blend in power so you still feel like you. On a route with rolling grades and traffic cues, that nuance is everything. The Union 2 and Union 1 focus on that calm, predictable ramp—no lurch off the line, no empty lag when you need to thread a gap. The Response takes the same principle into rougher, mixed-surface use, where seamless assist keeps your weight balanced over uneven patches rather than pitching you forward.
This ride-aware support is the foundation for the next wave—AI-assisted profiles that learn your habits. In the near term, expect “adaptive eco” modes that quietly stretch range on tailwinds or dial up support when you consistently arrive late to a meeting on Tuesdays. The hardware in these Diamondback platforms is already tuned for smooth blending; firmware is where future wins stack up.
Connectivity: batteries, diagnostics, and anti-theft that actually help
Connectivity has matured from novelty apps to useful tools. The obvious win is range confidence—knowing, not guessing, you’ll make it home. Union-series connectivity focuses on simple status you’ll check routinely: charge state, estimated range based on recent riding, and service reminders. The next step—already trickling into premium lines—is over-the-air updates for motor tuning and battery management. That will feel like your phone’s OS update, but with tangible ride effects: a smoother torque curve, smarter regen on long descents, or quicker wake-from-sleep at lights.
Anti-theft is growing up, too. Expect tighter integration with location services and tamper alerts that matter in busy bike racks. We’re already seeing “movement detected” pings and lockout features that render the assist unusable if a bike is powered without the owner’s credential. The Union and Response frameworks are designed to accept those integrations as the ecosystem standardizes.
Progress in safety is incremental but compounding. Integrated lighting is moving toward automotive-style beam shaping: cutoffs that light the road without dazzling, and day-flash patterns that stand out against urban clutter. The Union models are lighting-ready by design; riders typically mount a compact, road-legit headlight and a high-placement rear. Over the next five years, expect DIN-style standards for brightness and patterns to spread from Europe, making “good” lights more consistent across brands.
Braking is already “the new normal”: hydraulic discs with consistent lever feel in rain and better pad compounds for longevity. The Response’s spec leans into that for mixed surfaces, where tire grip can vary by the meter. Combine predictable braking with bigger urban tires at honest pressures and you get the magic safety cocktail: shorter stops, straighter lines, and calmer hands.
Batteries: chemistry, longevity, and smart charging
Battery gains are less about headline capacity and more about usable cycles and smarter management. The near-term future is improved cell chemistry paired with BMS logic that reduces stress: charging that slows at high percentages, storage modes that preserve health when you travel, and temperature-aware safeguards. For riders, this translates into multi-year reliability and fewer range surprises in winter. The Union 2 and Union 1 emphasize easy, routine charging workflows; the Response’s mixed-surface intent benefits from the same predictability when you stretch routes off pavement.
We expect “fleet thinking” to filter down—analytics that show you which assist modes, speeds, and stop patterns age your pack faster, then suggest tweaks. The hardware is there; software will surface those insights in plain language.
Drivetrains and maintenance: toward cleaner, quieter, easier
Another future-ready shift is the move from oily chains to belt drives and sealed gear hubs on more urban bikes. That change reduces weekly fuss, keeps pant legs clean, and pairs perfectly with e-assist torque. While our three Diamondback references use conventional drivetrains, the chassis decisions—frame stiffness, dropout design, hub spacing—are increasingly made with future upgradability in mind. Expect more commuter lines to add belt-ready frames, even when they ship with chains for price accessibility.
Digital maintenance is the wildcard. We’re already seeing simple service logs in companion apps. The next evolution is guided troubleshooting: “That click is likely pad rub; loosen caliper bolts, squeeze lever, retighten to X Nm.” For riders without a home workshop, that’s time back every month.
Frames, materials, and integration: lighter without fragility
Weight reductions will be real but modest; urban e-bikes prioritize durability. The bigger gains are where grams disappear—rotational mass and accessory sprawl. Expect slimmer, stiffer wheel builds and cleaner cable paths, with mounts that disappear when unused but accept racks, child seats, and fenders without creaks. Union-series frames already take this seriously: plenty of mounts, tidy routing, and geometry that stays predictable when you add cargo. The Response extends that thinking to harsher terrain, where a quiet bike becomes a safe bike because you can hear the city around you.
Which future fits which rider today?
Choose the Diamondback Union 2 if you want the most refined road-mannered assist and an urban package that feels “finished” now, with clear upgrade paths for lighting and software features as they arrive. Choose the Union 1 if your routes are shorter or flatter and you want the same predictability at a friendlier price; you still get the smooth torque-sensing ride and the daily-driver calm that makes e-commuting stick. Choose the Response if your city miles include rough connectors, canal paths, or steep cut-throughs; its stance and component picks are built for surfaces that change under you while the motor keeps your rhythm even.
How we expect the next five years to play out
Assist gets more adaptive. The bike learns your week and quietly optimizes support to hit your arrival times with comfortable battery margin.
Connectivity gets more useful. Over-the-air tweaks become routine; anti-theft blends alerts with genuine immobilization.
Safety becomes standardized. Headlight cutoffs and day-flash norms make visibility less of a lottery; wet-brake performance converges upward.
Maintenance gets guided. Apps turn anxious noises into simple, confidence-building fixes—or tell you exactly what to ask a mechanic.
Urban spec shifts cleaner. Belts and hubs move downmarket; mounts and racks integrate better; tires get wider by default because comfort is control.
The future should feel calmer, not just faster
Good tech fades into the background and delivers reliable, predictable rides. That’s the through-line across Union 2, Union 1, and Response: smooth assist that respects your inputs, components chosen for real city surfaces, and frames prepared for accessories you’ll actually use. If you want help deciding which setup matches your streets, hills, and weekly range, we’ll map your routes to the right spec today and keep an eye on the upgrades that matter tomorrow. Tell us how you ride and what must never go wrong—launches at busy lights, rainy descents, late-evening returns—and we’ll build a shortlist that’s future-ready without future-shock. To compare sizes, features, and pricing side-by-side,contact our team and we’ll configure a hybrid bike or gravel bike that feels like tomorrow while solving your commute today.
Learn how to start bikepacking on a budget with practical tips for choosing the right bike, affordable gear, simple route planning, and multi-day ride preparation. This infographic shows how anyone can enjoy bikepacking adventures without overspending, with helpful insights from an Online bike store USA for beginners and explorers alike.
On a sunny Saturday morning not too long ago, I walked past a row of shiny bicycles outside a big box retailer. A bright tag on a simple, entry-level model read $649.99. The bike looked decent from a distance, but the closer I got, the more corners I could see had been cut. Basic rim brakes, heavy steel frame, and a drivetrain better suited for a garage sale than daily riding.
Right next to it, a customer was asking a store associate if they could help choose a size. After a long pause, the reply was: “I’m not really sure. I just work with electronics.”
For many riders, that’s the experience when shopping in traditional stores. What looks affordable at first often comes with compromises on durability, performance, and long-term value.
The Big Difference: Direct Pricing vs Retail Markups
When buying a hybrid bike, most shoppers want the same thing: something comfortable, reliable, and versatile enough for fitness rides, commuting, and weekend adventures.
The challenge is that brick-and-mortar retail stores add layers of markup long before the bike hits the sales floor. Those extra costs aren’t about performance — they’re about overhead.
Bikesdirect removes that overhead by selling directly to riders. The result is a surprising contrast:
A $550 hybrid from a big box store might include low-end parts and heavy frames, while a Bikesdirect hybrid at the same price point often includes:
Lightweight aluminum frames
Disc brakes (including hydraulic options)
Better gearing for hills
Name-brand tires and components
Riders get more value per dollar because the budget goes into performance, not display lighting or floor space.
Example Models That Show the Value
To understand the real differences, look at the bikes themselves.
A model like the Motobecane Mirage sells in big box retail at an entry-level price, but a performance upgrade from Bikesdirect with disc brakes is often available for less.
Take the Swift Flatbar series, a popular commuter favorite with tuned geometry and quality drivetrain. On shelves elsewhere, bikes with similar parts regularly retail at $700–$900.
But the Swift DLX comes in under $600 and includes features most big box hybrids never touch.
The difference shows up during the first mile: smooth shifting, better power transfer, more confidence downhill.
Frame Quality Is the Real Secret
A hybrid can look basic at first glance, but the frame tells the truth. Cheaper retail-store bikes often rely on heavy hi-ten steel. It may be affordable, but riders notice the weight quickly, especially if they climb hills or lift the bike onto a rack.
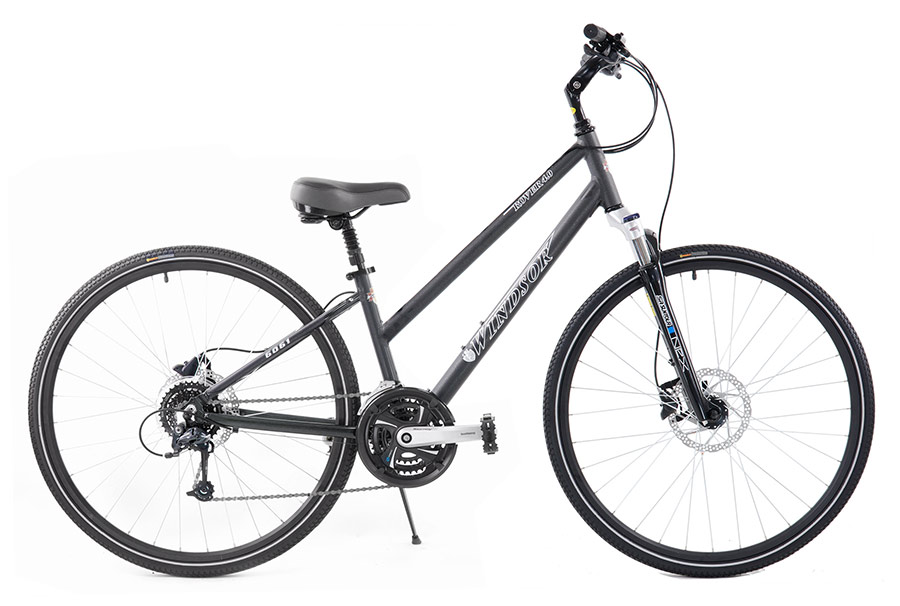
Bikesdirect hybrid models usually use lighter aluminum, including high-end tubesets found on performance platforms. The Windsor Rover, for example, brings comfort-first geometry with modern brake upgrades.
Every one of these models reflects the concept behind a hybrid bike: efficiency on pavement, comfort on paths, and room for accessories.
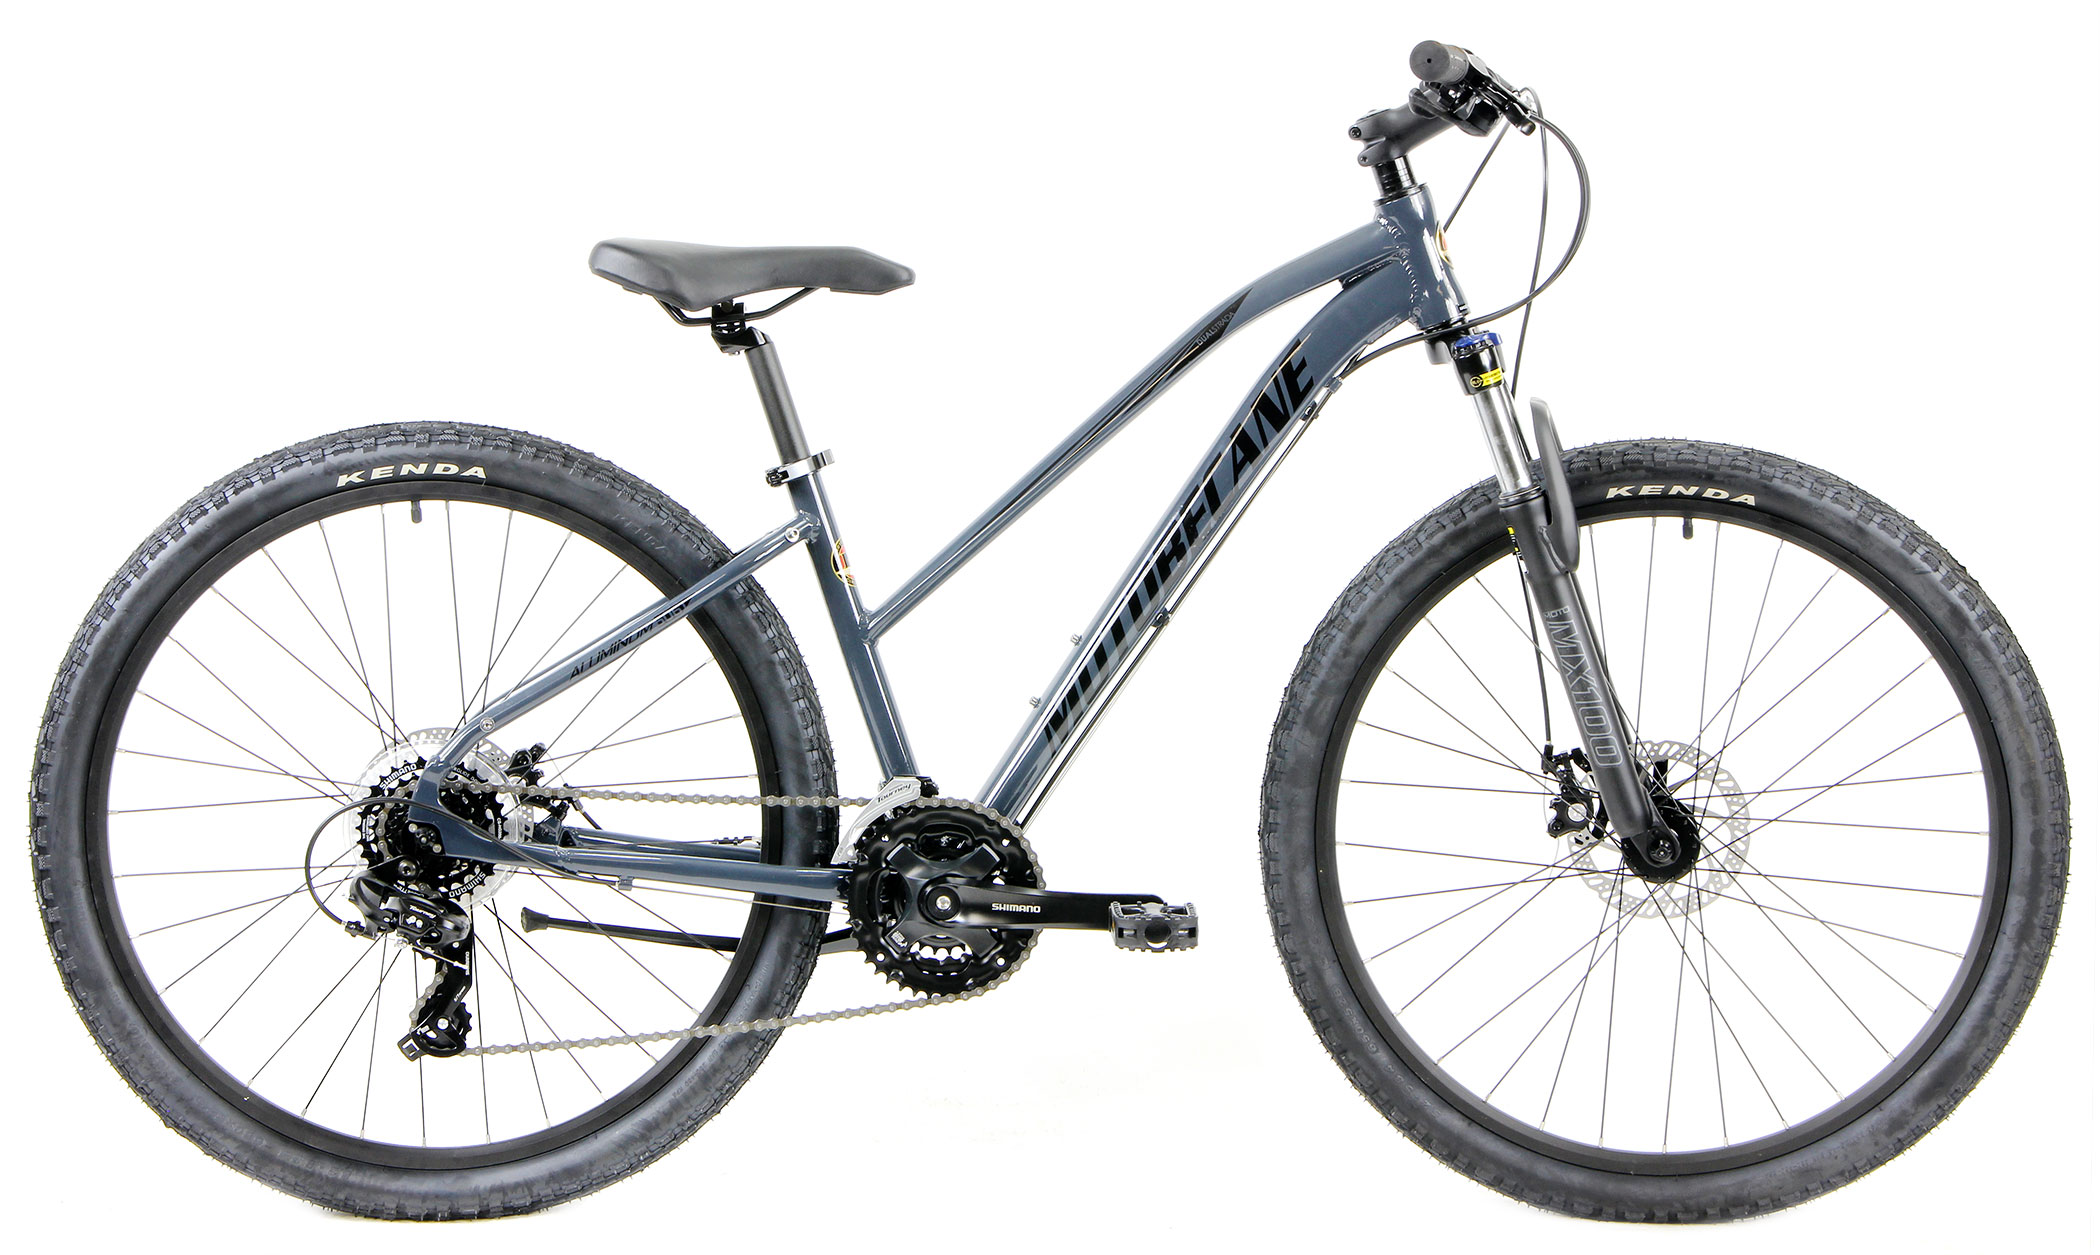
The Dual Strada ST proves that a step-through frame doesn’t mean compromised performance — it simply makes riding more inviting.
Component Choices That Matter Over Time
The heart of this hybrid bike price comparison is component longevity.
Once riders start using their bikes regularly, cheap parts wear quickly. Brake levers get sticky, cables stretch, and gears click under load. Upgrades become expensive.
Many Bikesdirect hybrids come with:
Shimano drivetrains
True alloy rims
Double-wall wheelsets
Disc brakes on most builds
A model like the Dual Strada Comp even offers hydraulic disc brakes — something you almost never find under $600 at physical retail.
Hydraulic performance transforms daily riding: effortless stopping in rain, smooth modulation on descents, and minimal hand fatigue.
More Versatility for Real Riding
Hybrid riders don’t want a specialist bike. They want one machine that handles fitness, errands, commuting, and exploration.
That’s why so many riders compare hybrids to other platforms:
A gravel bike gives confidence on dirt roads. A road bike offers speed and long-distance efficiency. A fat bike rules snow and sand. A beach cruiser keeps coastal riding fun and relaxed. A mountain bike tackles wilderness trails.
Hybrids blend parts of all these categories. They keep tires fast enough for pavement, add comfort positioning, and allow upright riding that feels natural for new riders.
The Elite Adventure 29er handles mixed terrain thanks to bigger wheels and surprisingly confident handling. At under $600, it’s a platform that carries riders past pavement and into something new.
Where the Savings Actually Come From
The conversation isn’t about cutting corners — it’s about eliminating unnecessary ones. No membership fees, no sales floor, no showroom. Just bikes.
When the budget isn’t spent on retail overhead, it goes into:
Stronger wheels
Better drivetrains
Higher-quality frames
Longer-lasting brakes
Riders get more for less because the business model puts performance first.
Buying Confidence With Better Value
Many beginners worry that an affordable hybrid means compromise. In practice, the opposite is true. Bikesdirect hybrids give riders confidence from day one because the bike simply works. It shifts cleanly, holds lines, and stops when needed.
That confidence leads to more miles, more fitness, more fun — and fewer regrets.
A customer can buy a bike today without wondering if the brake levers will need upgrading next season. That reliability is worth more than the price tag.
The easiest way to see the difference is to ride one. Bikesdirect has hundreds of hybrid models ready to ship, including step-through frames, disc brake options, and versatile 29er builds. It only takes a few minutes to compare features and pricing online, and many bicycles that would cost $700–$900 elsewhere fall under $600 here. Riders who want more value from their next purchase will find it when they start with Bikesdirect.com.
Short city trips are a poor match for cars: stop-and-go traffic, parking hunts, and tiny distances that devour time. Cargo bike commuting wins by launching cleanly with weight, stopping straight in rain, staying stable at walking speed, and carrying loads low and tight. To show how that feels on real streets, we compare three routes to “errand-proof” riding: a value flat-bar commuter, a route-flexible all-road bike, and an e-assist utility platform.
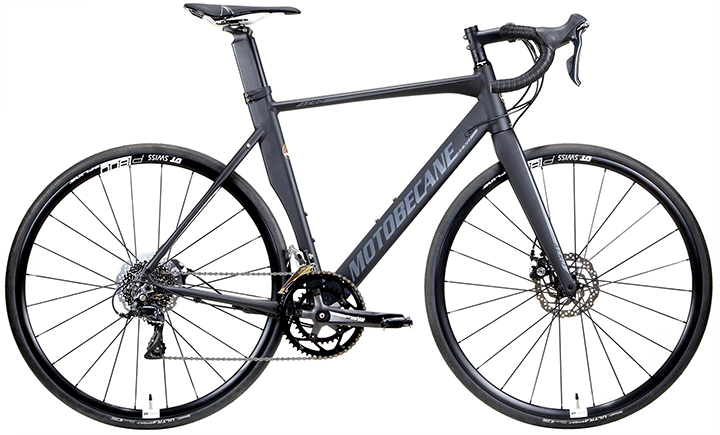
Motobecane Gravel X3 Disc (All-Road/Gravel) — longer wheelbase, 38–45 mm tire room, lots of mounts:Gravel X3 Disc
Motobecane Elite eAdventure (E-Assist Utility) — torque-sensing assist for hills, headwinds, heavy loads:Elite eAdventure
Load Handling & Mounts: Carry More, Sway Less
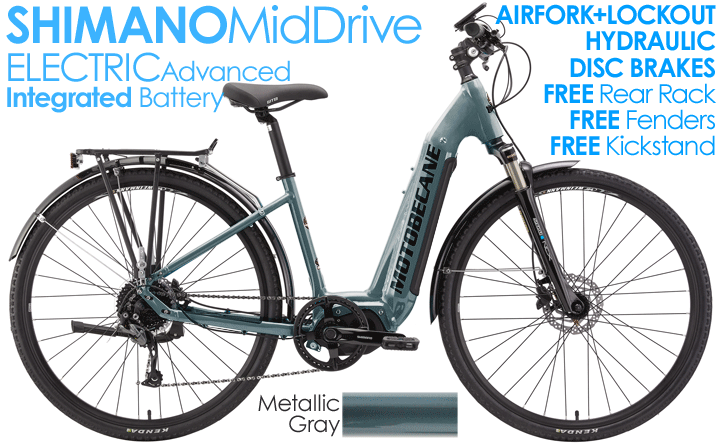
Avenue FXD Disc
Rear rack and twin panniers fit neatly; 32–38 mm tires keep steering composed. For two-bag grocery trips and clustered errands inside six miles, it’s effortlessly practical.
Gravel X3 Disc
Multiple frame and fork mounts stabilize front platforms or low-rider panniers. The longer wheelbase and wider tires tame asymmetric or bulky loads—hardware store runs, odd-shaped parcels, market crates.
Elite eAdventure
E-assist normalizes 20–30 kg payloads. With a rated child seat and stout rear rack, school runs and steep blocks stop being scheduling gambles.
Low-Speed Stability & Maneuvering
Avenue feels planted yet nimble weaving through parked cars. Gravel X3 is calmest at walking pace, especially with front loads; big tires track steadily over seams and cobbles. eAdventure wins uphill restarts with cargo—assist eliminates the wobbly first pedal stroke.
Braking, Wet or Dry
All three use disc brakes for predictable power in rain. Avenue is straightforward to keep aligned after wheel removal. Gravel X3 gains a traction bonus from wider rubber, shrinking stopping distances on grit. eAdventure remains linear at assisted speeds when descending with weight.
Comfort = Control: Tires and Pressure
Avenue FXD Disc
At rider-appropriate PSI, 32–38 mm tires turn chatter into background texture and keep corner entrances precise, not tentative.
Gravel X3 Disc
Tubeless 40 mm at modest pressure smooths alley cobbles, tram tracks, and broken shoulders. With front load, the bike still points where you look.
Elite eAdventure
Keep volume generous; add a few PSI with fully loaded panniers to prevent squirm while preserving wet grip. The motor’s smoothness reduces over-gripping the bars on climbs.
Speed, Range & Time Certainty
Avenue is quick off lights and perfect for stacked errands over short distances. Gravel X3 may be slightly slower on pristine pavement but faster overall if your route uses park paths and cut-throughs. eAdventure provides the most consistent arrival times across wind and hills; you charge like a phone and leave each day with margin.
Real Errands, How They Feel
Groceries (≈20 lb): Avenue carries low and tight; steering stays precise even across damp paint. Gravel X3 glides the back-alley shortcut without rattling jars. eAdventure makes the uphill home trip conversational instead of labored.
School Run (child seat + backpack): Avenue prefers gentle starts. Gravel X3 remains steady during curbside remounts. eAdventure smooths launches in chaotic drop-off windows and keeps cadence even on inclines.
Hardware Store (long + heavy items): Avenue straps diagonally across the rack—ride conservatively and keep weight centered. Gravel X3 distributes volume with a front platform plus rear panniers. eAdventure offsets awkward mass so braking stays predictable.
Setup Tips That Multiply Ease and Safety
Mount loads low and symmetric; two panniers beat one bulging tote. Add 3–6 PSI over your solo baseline when carrying cargo, but keep enough suppleness for wet grip. Use a bright headlight aimed slightly down, a high-mount pulsing taillight, and reflective ankle bands for motion visibility. Full-coverage fenders keep braking and drivetrains cleaner—especially important when stopping distances matter.
Ownership & Running Costs
Avenue is the lowest-cost pathway to reliable errands: universal spares, easy DIY maintenance, and a short accessory list to go fully “car-replacement.” Gravel X3 expands route freedom; tubeless reduces flats, mounts future-proof your carry system. eAdventure has the highest sticker price but the lowest schedule stress; electricity costs are tiny, and many riders report they ride more days because assist flattens the hard parts.
Which One Fits Your Life?
Apartment living, mostly flat trips, value first: Avenue FXD Disc. Suburban cut-throughs, winter grit, or frequent mixed-surface shortcuts: Gravel X3 Disc with 40 mm tubeless and full fenders. Steep neighborhoods, multiple kid activities, or bulk shopping on a timetable: Elite eAdventure with a rated child seat, stout rack, and bright lights.
Replace Two Errands This Week—We’ll Configure the Right Bike to Do It
Cargo cycling sticks when the bike is stable at walking speed, brakes straight in rain, and carries weight without wobble. Each of these platforms delivers that core experience in a different way: Avenue solves daily trips with minimal fuss; Gravel Bike X3 opens calmer, traffic-free routes; eAdventure restores time certainty on hills and headwinds. Tell BikesDirect your streets, loads, and time windows—we’ll match racks, tires, and fit so your first two errands become the easiest rides of your week. Ready to compare road bike sizes and accessories?Contact BikesDirect for a tailored shortlist and pricing.
The first time you ride a truly smart e-bike, it feels like the moment cycling steps into the future. Instead of simply providing assist when you pedal, the bike responds to how you ride, learns your habits, monitors energy use, and connects seamlessly to your phone. For many cyclists, that moment turns an ordinary ride into something intuitive and almost alive. In 2026, this feeling becomes mainstream as the industry moves toward a new era of connected, adaptive, and intelligent riding.
With rapid advancements in sensors, onboard computers, and app-based integration, smart e-bikes in 2026 represent more than a trend. They signal a fundamental shift for commuters, fitness riders, and adventure cyclists who want precision, convenience, and performance built into every mile. These e-bikes take what riders love about a traditional hybrid bike, road bike, or mountain bike and amplify it with real intelligence.
This year marks a turning point, and here is what riders should know.
Smart Technology Is Becoming the Standard for New Riders
A smart e-bike is more than an electric bike with an app attached. It is a machine designed to interact with your riding style through sensors, connectivity, and data-driven performance enhancements. Riders can monitor battery health, track maintenance intervals, customize motor output, and even activate anti-theft systems directly from their phones.
These features do not just add convenience. They fundamentally reshape how cyclists plan, ride, and evaluate their performance. Commuters gain confidence through real-time route tracking and predictive battery ranges. Fitness riders enjoy detailed analytics similar to high-end cycling computers. Off-road riders can fine-tune assistance levels for climbs, loose gravel, and rough terrain.
Cyclists transitioning from a traditional gravel bike or hybrid bike often describe the shift as going from analog to smart. The feel remains familiar, but the responsiveness becomes more refined.
Battery Intelligence Is Eliminating Range Anxiety
One of the biggest reasons riders hesitated with earlier e-bikes was uncertainty about range. Smart e-bikes eliminate that fear. Today’s systems use real-time data to analyze speed, incline, wind resistance, rider weight, and motor usage to predict exactly how far you can go before a charge is needed.
This evolution is transforming how riders explore. Instead of guessing, cyclists receive dynamic range projections that adjust instantly as conditions change. Improved thermal management prevents overheating, and adaptive power output provides smoother, more consistent assistance on difficult climbs.
For riders who take their mountain bike deep into wooded trails or push their gravel bike across mixed terrain, these battery improvements bring new freedom. The ability to ride farther with confidence opens routes that were once too unpredictable for e-assist bikes.
Regenerative braking, better energy cells, and faster charging complete the picture, making 2026 the most advanced year for e-bike battery design.
Integrated GPS Is Transforming Navigation and Safety
GPS integration has quietly become one of the most powerful features driving the adoption of smart e-bikes in 2026. Instead of relying solely on external devices, riders now access built-in mapping and navigation that syncs directly with the bike’s onboard system.
These tools help with route planning, performance tracking, and energy management. Riders can plan a scenic coastal route for a beach cruiser ride, a scenic ridge climb for a mountain bike, or a smooth commute using real-time efficiency data.
Beyond navigation, safety innovations are becoming even more impressive. Smart e-bikes now offer crash detection, automated emergency alerts, integrated lights that respond to speed or braking, and anti-theft GPS beacons that notify riders instantly if the bike moves unexpectedly.
For urban riders, these upgrades deliver peace of mind. For adventure riders—especially those who take a fat bike into remote environments—these tools offer added security during long excursions.
Connectivity Creates a More Personalized Riding Experience
Connectivity is the defining characteristic of smart cycling in 2026. The ability to pair your bike with apps, smartwatches, and training platforms turns every ride into a personalized experience.
Riders can customize pedal assist levels, acceleration curves, and even motor feel. Performance data such as cadence, heart rate zone tracking, elevation gain, and power output help cyclists build targeted training plans.
This level of personalization appeals to riders across all categories. Commuters optimize efficiency on their daily routes, fitness riders push performance goals, and adventurers gain clarity on how their bikes react across varying terrains.
A smart e-bike still feels like cycling. The difference is that the bike works with you. Whether coasting along the beach on a beach cruiser, climbing hills on a mountain bike, or cruising city paths on a hybrid bike, every moment becomes more intuitive.
Commuters Benefit the Most from the Smart Bike Revolution
Commuting has always been one of the strongest cases for e-bikes, and smart technology elevates that experience dramatically. With advanced navigation, improved security, and intelligent energy use, smart e-bikes simplify day-to-day travel.
Riders can check battery status while drinking morning coffee, load their ideal commute route, and receive alerts about optimal charging habits. Software updates improve bike performance over time, and maintenance reminders ensure reliability throughout the year.
For cyclists currently commuting on a traditional road bike or hybrid bike, this shift can be transformative. Smart e-bikes reduce stress, shorten travel times, and turn daily rides into smooth, predictable experiences.
Adventure Cyclists Gain New Tools for Exploration
While commuters benefit daily, adventure cyclists experience the most dramatic performance upgrades. Riders using a gravel bike, fat bike, or mountain bike equipped with smart systems can access route-specific assistance, elevation forecasts, and terrain-adaptive power control.
Offline GPS mode makes backcountry navigation safer. Intelligent motor output ensures riders conserve energy on long climbs. Enhanced waterproofing expands the range of conditions these bikes can handle.
The combination of electric assist and smart navigation is fueling the rise of e-bike packing, a hybrid of adventure cycling and lightweight touring. Riders explore deeper, ride longer, and experience trails once out of reach.
Why 2026 Is the Tipping Point
Technology, affordability, and rider expectations are converging. Manufacturers are prioritizing connectivity and intelligence as baseline features rather than luxury add-ons. More cyclists—from casual riders to explorers—are demanding bikes that adapt, communicate, and optimize performance.
Cycling will always be about movement, rhythm, and freedom. Smart technology does not replace that feeling; it enhances it. It helps riders discover new routes, track progress, and ride with confidence in any environment.
2026 is simply the year when the bike truly becomes part of the journey.
Start Your Next Ride with Confidence
If you are ready to explore the next generation of riding, now is the perfect time to discover how smart technology can elevate your experience. Visit Bikesdirect.com today to compare models, explore performance options, and find a bike that matches your goals for adventure or commuting.
If riders argue about one number more than gear inches or rim depth, it’s tire width. In 2025, the “right” width isn’t just fashion, it’s physics you can feel. Wider casings at honest pressures can roll faster on real roads, corner with more security, and reduce fatigue, while too-wide or too-narrow pairings can sabotage handling and speed. In this guide we break down what 28 mm, 32 mm, and 40 mm actually do beneath you; how rim width, casing construction, and tubeless pressure interact; why your routes and body weight matter; and how to choose a width that transforms your everyday rides. We’ll ground the advice in real bikes from our lineup, from road to gravel to flat-bar fitness, so you can see how the numbers translate on the path, the lane, and the long Sunday loop.
We’ll use “road” to mean primarily paved rides, “all-road” for pavement plus light gravel, and “gravel” for mixed surfaces where unpaved miles are a feature, not a surprise. The headline: 28 mm is still the aero-friendly racer’s friend, 32 mm is the modern endurance sweet spot for many riders, and 40 mm is the control-and-comfort king for mixed terrain. But the best choice depends on your roads, your speed, and your frame and rim.
Why Width Matters More Than Ever
Three changes reshaped the tire discussion:
Rough real-world surfaces. Chipseal, patched lanes, brick, and frost cracks dominate everyday routes. On these surfaces, “impedance losses”, energy absorbed by your body and bike, often exceed pure hysteretic rolling losses inside the tire. A wider tire at lower pressure reduces those losses and can be faster than a narrow, high-pressure tire.
Wider rims. Modern internal rim widths support larger casings in a rounder profile. A round profile keeps the contact patch centered and the sidewalls working efficiently, improving grip and predictable cornering.
Tubeless. Removing inner tubes reduces friction inside the tire and allows lower pressures with less risk of pinch flats. Sealant quietly closes micro punctures so you keep rolling.
Put together, these make 28–40 mm tires viable and quick across far more bikes and routes than even a few years ago.
The Feel of 28 vs 32 vs 40, In Plain Language
28 mm: snappy, aero-friendly, and precise. On good pavement at moderate-to-high speeds, 28s feel lively. They still benefit from lower pressures than “old school” norms, but their smaller air volume gives a firmer ride over rough patches. On long, smooth rides or fast group efforts, 28s hold speed without feeling sluggish, especially on aero-leaning road bikes that pair with mid-depth wheels.
32 mm: calm speed. The extra air volume softens chatter, keeps traction over broken surfaces, and reduces fatigue without feeling slow. For most endurance road riders and commuters on imperfect tarmac, 32s hit the best balance: fast enough in a paceline, forgiving enough at 6 p.m. into a headwind, and confidence-boosting in rain.
40 mm: control and comfort unlocked. On chipseal, rough shoulders, towpaths, and light gravel, 40s maintain momentum where narrow tires ping and skip. Cornering feels planted, braking distances shrink in the wet, and you can explore cut-throughs and backroads without route anxiety. They’re not just for gravel bikes; many “all-road” and even some endurance frames now clear 40s.
Real Bikes That Bring the Width Debate to Life
We design our complete bikes around modern tire reality, so the frame and wheel choices you make keep options open:
A carbon endurance road platform like the Motobecane Le Champion CF LTD accepts modern tire sizes that make 28s and 32s both viable depending on your routes and priorities. Check it here:Le Champion CF LTD.
If you want carbon smoothness plus electronic precision on wet or rolling routes, the Immortal Disc Team Di2 is a natural home for 28s in summer and 32s for shoulder seasons:Immortal Disc Team Di2.
Riders who live on flatter terrain or love “hold speed” efforts can enjoy 28s on a fast platform such as the Fast Aero Road Elite Disc, while still stepping up to 30–32 mm for rougher centuries:Fast Aero Road Elite Disc.
For mixed-surface curiosity or outright gravel bike fun, the Gravel X3 Disc is built to make 38–45 mm shine on wider rims at tubeless pressures:Gravel X3 Disc.
Prefer flat-bar comfort with fitness pace and commuter practicality? The Gravity Avenue FXD Disc pairs brilliantly with 32–38 mm for city calm and weekend loops:Avenue FXD Disc.
These frames accept sensible width ranges, so you can change character by swapping tires rather than whole bikes.
Rim Pairing: Why Internal Width and Tire Width Must Get Along
The tire’s shape decides much of its feel. On too-narrow rims, a wide tire “lightbulbs,” making cornering vague. On too-wide rims, a narrow tire can square off, losing comfort and risking pinch at realistic pressures.
As a rule of thumb:
Road tires 28–32 mm are happiest on rims with ~19–23 mm internal width.
All-road/gravel tires 38–45 mm shine on ~23–25+ mm internal width.
That range yields a round profile, consistent sidewall support, and a contact patch that stays centered when you lean. If you’re unsure, match the middle: a 21–23 mm internal road rim plays well with 28–32; a 23–25 mm internal gravel rim loves 38–45.
Pressure: The Number That Makes or Breaks Your Choice
Pressure is where width pays off, or gets wasted. The goal is to run the lowest pressure that still supports cornering and protects rims. Too high, and the bike chatters, skips on painted lines, and beats you up; too low, and it wallows in turns or risks rim strikes.
Because pumps and gauges vary, treat these as starting points for tubeless setups, adjusting by 1–2 PSI at a time:
28 mm road: • ~60–70 PSI (riders ~55–70 kg) • ~65–80 PSI (riders ~70–85 kg) • ~75–90 PSI (riders ~85–100 kg)
32 mm endurance: • ~45–55 PSI (55–70 kg) • ~50–65 PSI (70–85 kg) • ~60–75 PSI (85–100 kg)
40 mm all-road/gravel: • ~28–34 PSI (55–70 kg) • ~32–38 PSI (70–85 kg) • ~36–44 PSI (85–100 kg)
Run tubes? Add ~5–8 PSI. Ride smoother roads? You might creep 2–3 PSI higher; ride coarse chipseal or light gravel? Drop a touch. The correct pressure is the one that makes the ride quiet in your hands while staying composed in corners.
Rain and cold adjustments
Lower grip in wet conditions isn’t about magic compounds alone. Drop 2–3 PSI to improve conformity on slick paint and manhole covers. Cold weather stiffens casings; check pressure immediately before rolling, not the night before.
Rolling Resistance vs. “Suspension” Losses: Why Wider Can Be Faster
Classic rolling resistance tests on glass-smooth drums favored narrow, high-pressure tires. Real roads aren’t drums. When the surface is rough, energy gets lost in you, your muscles and soft tissues, because the bike is shaking you. Wider tires at lower pressures reduce that shake, lowering total losses. That’s why riders often see equal or better speeds on 32s compared to 25s on rough pavement at the same effort. Similarly, 40s on hardpack gravel can roll astonishingly well because they keep momentum through washboard instead of bouncing on top.
The caveat: at very high speeds on truly smooth pavement, narrower can still win aerodynamically. That’s where 28s paired to mid-depth rims on a fast bike still make perfect sense, particularly for race-leaning riders.
Cornering and Braking Confidence
Width shapes the size and stability of the contact patch. With correct pressure, a 32 will feel more forgiving mid-corner than a 28, letting you carry speed through imperfect lines. A 40 at proper PSI gives remarkable bite on dusty shoulders and wet chipseal, and it shortens braking distances by keeping the tire keyed into the surface rather than skittering. If you’ve ever flinched over a surprise patch of fresh gravel in a turn, you’ll appreciate the extra margin of wider casings.
Aerodynamics: Matching Tire and Rim
A tire wider than the external rim can disturb clean airflow, eroding some of the aero benefit of deep wheels. Modern rims often aim for an external width slightly wider than the tire’s true measured width to maintain a smooth shape. On many mid-depth road rims, a labeled 28 measures ~29–30 mm, still a good match. On very wide, modern aero rims, a 30–32 can pair acceptably, especially for endurance priorities. For 40 on gravel, aero is secondary to control and stability, but some gravel rims are now shaped to keep airflow polite at mixed speeds.
If your routine is 18–22 mph in the wind, we’ll help you pick a rim-tire combo that keeps aero honest. If your routine is multi-surface exploration, we’ll keep the focus on stability and comfort first.
Frame Clearance and Reality Checks
Not every frame clears every width. Measure with your wheels. A safe rule is at least 3–4 mm of clearance each side under load, more if you ride mud or gravel. Brakes, stays, seat tube cutouts, and fenders all constrain choices. The good news: many endurance road frames now clear 32 easily, and all-road/gravel frames take 40 without drama. Our product pages list clearances so you can match the width you want to the bike that makes it simple, whether that’s the Le Champion CF LTD for 28/32 flexibility, the Fast Aero Road Elite Disc for aero with modern tire room, the Immortal Disc Team Di2 for foul-weather precision, the Gravel X3 Disc for 40+ ease, or the Avenue FXD Disc for comfy, quick flat-bar commuting.
Tubeless vs. Tubes: Which Suits Which Width?
Wider, lower-pressure tires benefit the most from tubeless: fewer pinch flats, lower pressures with security, and automatic sealing of small punctures. For 28 at higher pressures, tubeless still brings comfort and puncture benefits, but quality latex tubes can be fine for riders who prefer simplicity. For 32 and 40, tubeless is our default recommendation for daily calm and fewer roadside delays.
Hooked vs. hookless rims matter here. Hookless road setups require compatible tires and careful pressure discipline. We’ll help you interpret the labels and select a combo that’s both quick and safe.
Use-Case Playbook: Which Width Wins Where?
Fast group rides on decent pavement (road race vibe). Choose 28 mm for aero alignment and lively feel, especially on a platform like the Fast Aero Road Elite Disc. If your roads are rougher, a fast 30–32 can match speed with more stamina.
Endurance centuries, gran fondos, mixed pavement quality. Choose 32 mm tubeless on a calm endurance bike such as the Le Champion CF LTD or Immortal Disc Team Di2. You’ll descend with less tension and finish fresher.
Commute on patched city streets with surprise grit. Choose 32–38 mm on a flat-bar fitness bike like the Avenue FXD Disc. Lower pressure takes the sting out of seams; disc brakes and volume improve wet safety.
All-road exploration, pavement, towpaths, light gravel. Choose 38–40 mm on an all-road frame like the Gravel X3 Disc. Start around 34–38 PSI tubeless and adjust. Your world of route options expands.
Gravel with loose corners and washboard. Choose 40–45 mm if the frame clears it. Stability and traction outweigh notional drag. Keep pressures low enough to hook up, high enough to avoid rim strikes.
Wet Weather and Winter: Width as a Safety Feature
When roads glisten, a wider contact patch pays immediate dividends. 32s at slightly reduced PSI stick better over paint and steel. 40s at gravel-appropriate pressures make damp hardpack manageable. Pair width with good rubber compounds and clean braking surfaces. In winter, check pressure at the door, cold air shrinks PSI, and consider a hair lower pressure for grip.
Common Mistakes, and How We Fix Them
Over-inflation. The most frequent culprit behind harsh rides and “mystery” slipping on paint. If your bike chatters over pebbly tarmac, drop 3–5 PSI and test the same section.
Mismatched rim and tire widths. A 40 on a very narrow rim can feel vague; a 28 on an extra-wide rim can feel wooden. We’ll match your tire to your rim so the profile stays round and predictable.
Ignoring clearance. That “it almost fits” rub becomes a crisis in mud or under hard cornering. We’ll confirm clearance with your real wheels and preferred pressures.
Choosing width by fashion. Start with routes and comfort goals. If your “problem” is fatigue after 90 minutes, 32 might fix it better than chasing deeper rims or a lighter frame. If your “problem” is explorability, 40 is a key that unlocks new loops.
How Width Interacts with Wheels and Frames You Already Own
Upgrading tires can feel like upgrading the bike. On a mid-depth carbon wheelset, moving from 28 → 32 may boost comfort and confidence with negligible speed loss on ordinary roads. On a stout alloy wheelset, moving from 32 → 40 on an all-road frame changes your world of routes more than any drivetrain tweak. And on a fast road frame, staying at 28 but dialing pressure realistically can be the cheapest speed you ever buy.
If you’re picking a complete bike with width flexibility baked in, we built the Le Champion CF LTD to run 28s for club rides and 32s for late-season centuries. The Immortal Disc Team Di2 thrives with both widths when conditions turn wet. The Fast Aero Road Elite Disc stays honest with aero but accepts modern rubber. The Gravel X3 Disc wears 40 like a uniform. The Avenue FXD Disc makes 32–38 the city-friendly default.
A Simple, Repeatable Setup Routine
Measure your rims’ internal width so you choose a tire that forms a round profile.
Start pressures from our band and adjust in 1–2 PSI steps. Ten minutes of A/B riding beats guessing.
Go tubeless for 32–40 mm if possible; refresh sealant every few months.
Align brakes and check clearances with wheels under load. Spin through the gears, stand, and rock the bike to confirm no rub.
Log your “golden numbers.” When a combo feels magic, write down front/rear PSI, temperature, and route. Replicate it next time.
Decision Framework: Choose by Route, Feel, and Flexibility
If your average ride is paved, brisk, and you prize aero sharpness, choose 28, especially on a fast bike like Fast Aero Road Elite Disc, and commit to pressure discipline.
If your average ride mixes good and mediocre pavement, or you value finishing fresh as much as top speed, choose 32, the sweet spot on Le Champion CF LTD or Immortal Disc Team Di2.
If your average ride includes rough shoulders, backroads, or purposeful gravel, choose 40, the happy place on Gravel X3 Disc, and enjoy new lines on familiar maps.
If commuting and fitness share calendar space, a flat-bar platform like Avenue FXD Disc with 32–38 makes every errand calmer and every loop more inviting.
Tire width isn’t a personality test; it’s a tool. 28 mm rewards aero-honest speed on smooth roads. 32 mm delivers calm, efficient pace across the imperfect realities most of us ride. 40 mm unlocks control and route freedom far beyond pavement. All three can be fast when paired with the right rim and pressure, but only one will be fast for you on your roads with your goals.
Tell us about your surfaces, your typical speeds, and how you want your bike to feel in the first ten minutes and the last ten miles. We’ll match width, rim, and pressure to your reality, and point you to the complete bike that keeps your options open as seasons and routes change, whether that’s the Le Champion CF LTD, Immortal Disc Team Di2, Fast Aero Road Elite Disc, Gravel Bike X3 Disc, or Avenue FXD Disc road bikes.
Ready to dial your ride with the right width?Contact our team and we’ll turn numbers on a sidewall into everyday speed, comfort, and confidence.