This infographic explains gravel bikes as versatile, do-it-all machines designed for pavement, paths, and backroads. It highlights what gravel bikes are built for, how to choose the right setup without overthinking, and where they fit into everyday riding—covering comfort, tire choice, gearing, and real-world riding conditions.
Shopping for an easy, confidence-building bike can take you in two very different directions: the laid-back simplicity of a beach cruiser, or the big-tire confidence of a fat bike. On paper, both look “comfortable” because both put a lot of rubber on the ground and both can feel stable at low speeds. In practice, they’re built for different kinds of comfort—and different kinds of riding.
This beach cruiser vs fat bike comparison breaks down the real differences in posture, tire width, ride feel, and best-use scenarios so you can choose the bike that matches how you’ll actually ride.
The Quick Summary: Which One Fits Your Life?
If your rides are mostly local and relaxed—neighborhood loops, errands, short commutes, and casual weekend cruising—comfort usually means a natural upright posture and easy handling. That’s where the beach cruiser shines.
If you ride in conditions where traction is unpredictable—soft sand, snow, loose dirt, chunky gravel, or rough terrain—and you want maximum grip and stability, capability becomes the priority. That’s where the fat bike earns its reputation.
Neither is “better.” They’re just built to solve different problems.
Riding Posture: Upright Ease vs Neutral Control
Beach cruiser posture: relaxed by design
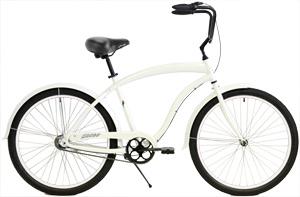
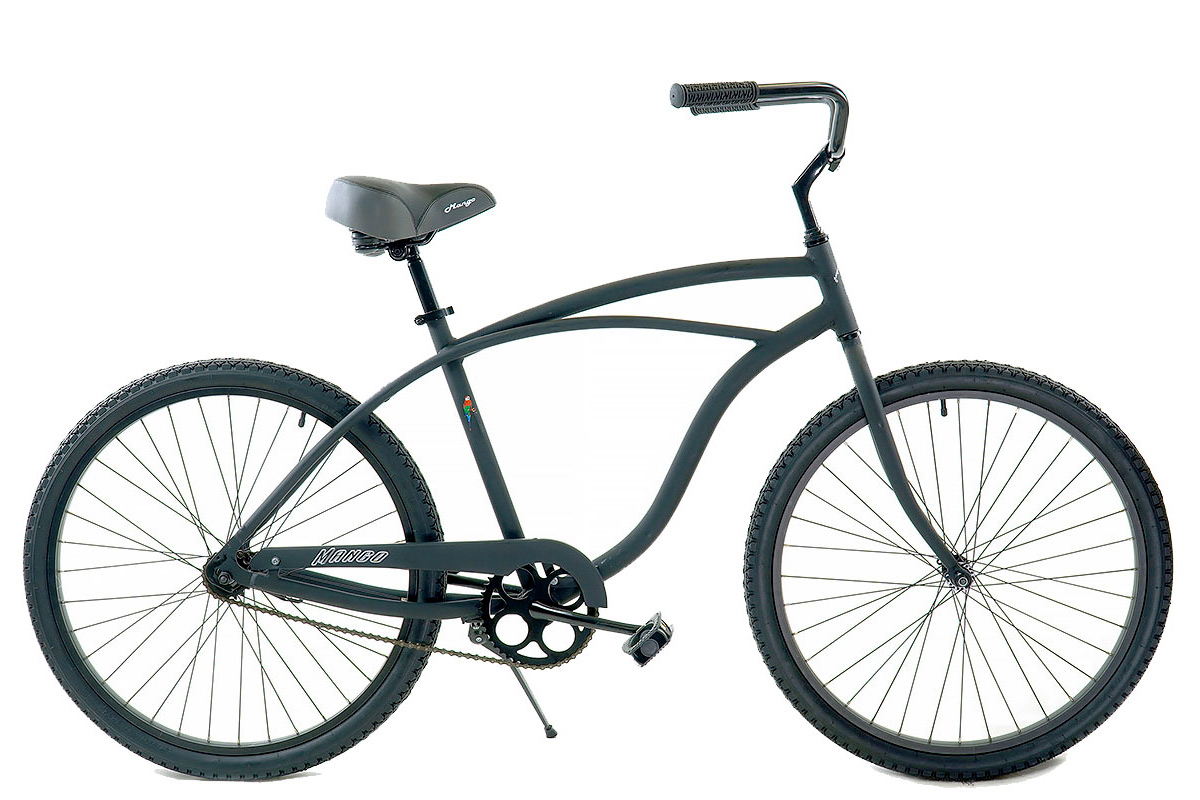
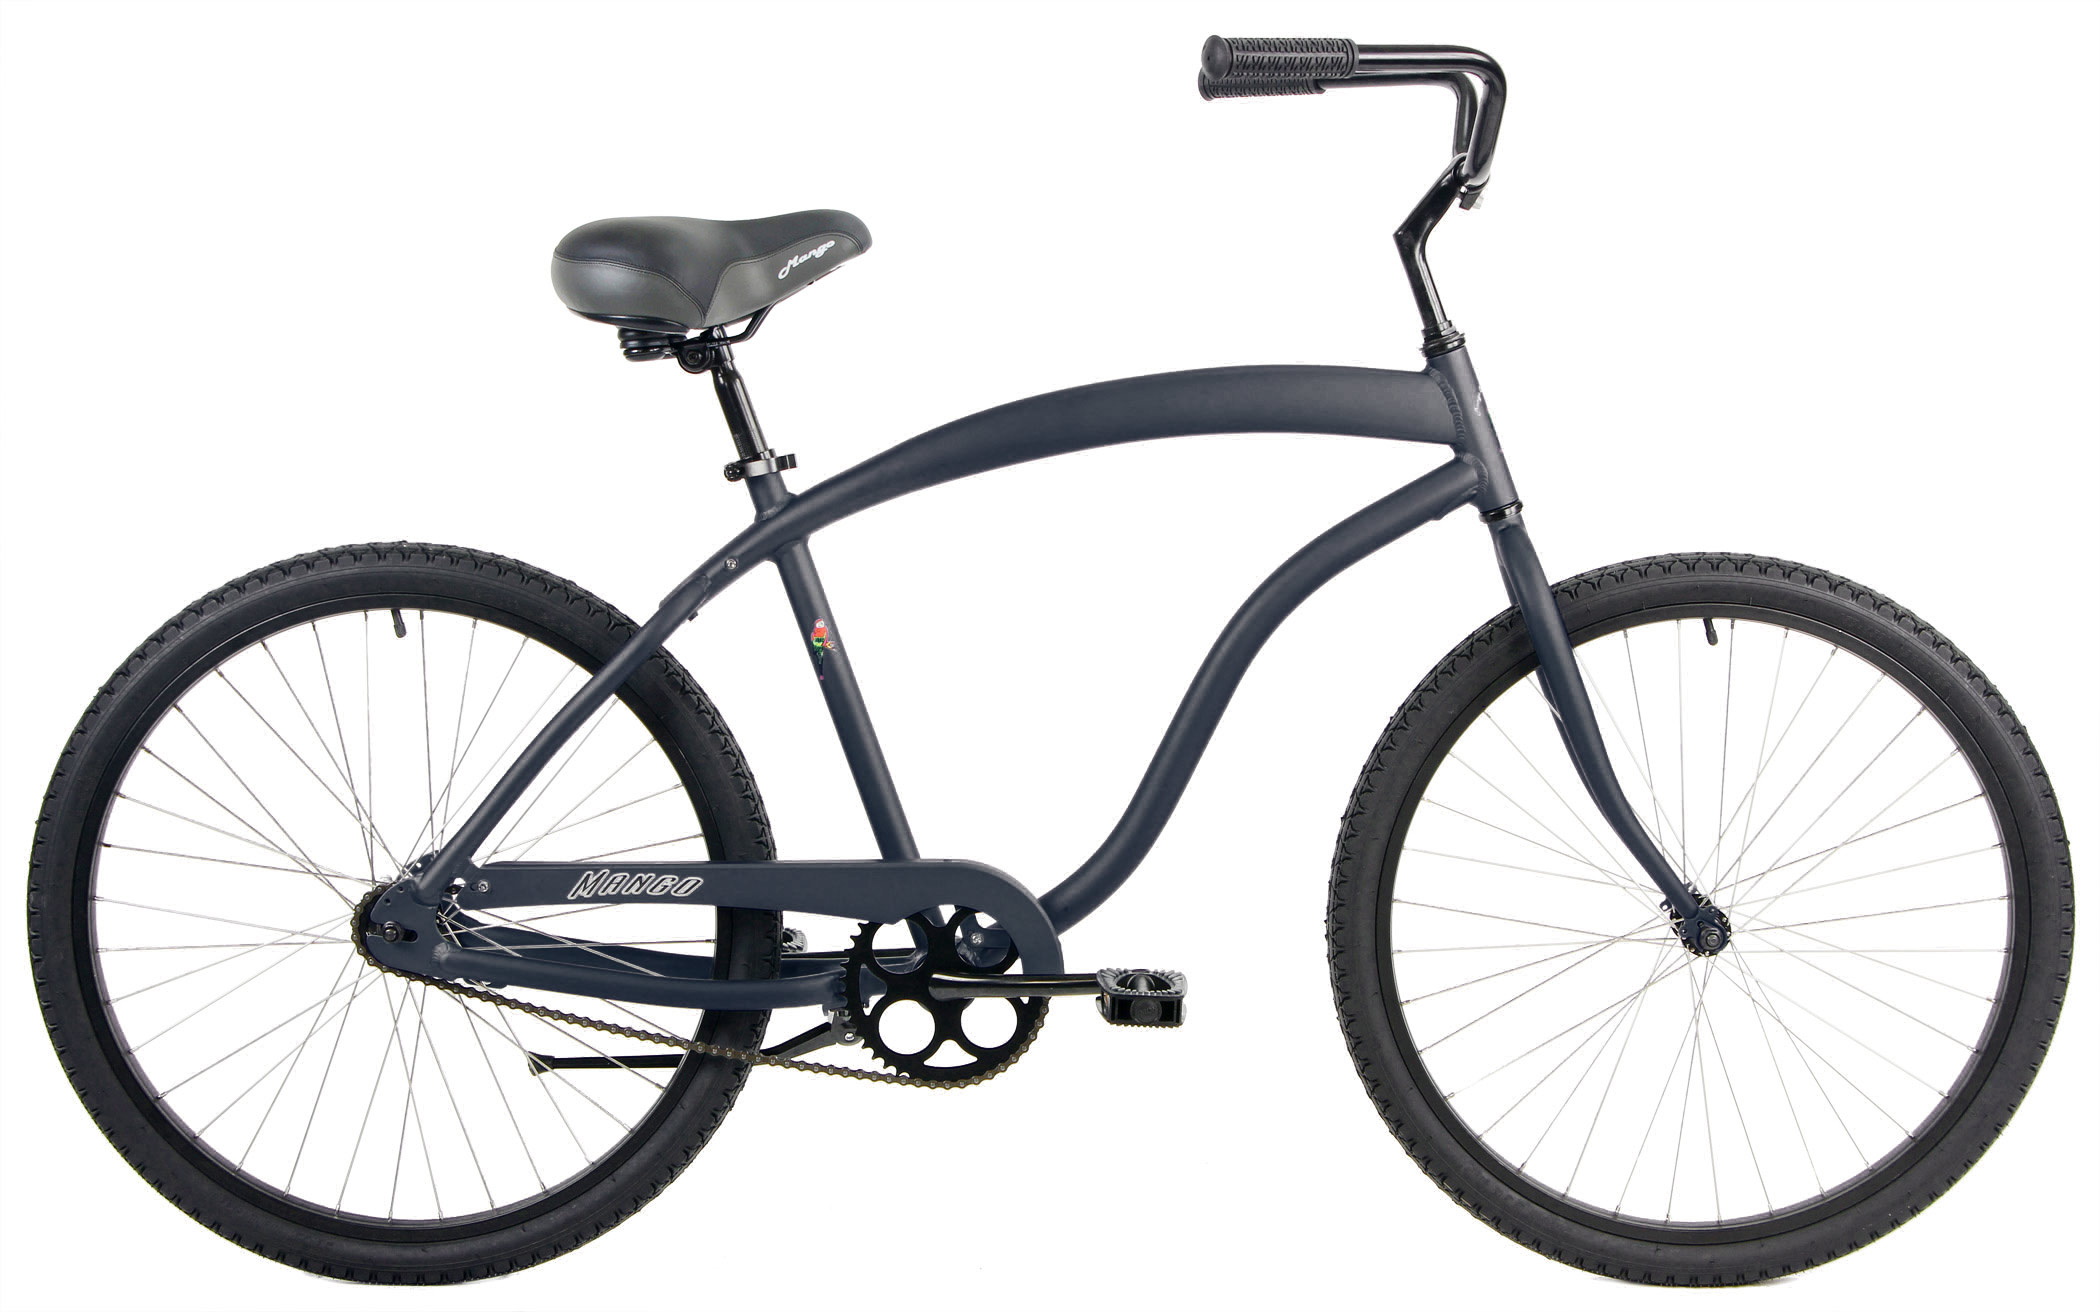
Cruisers are built around an upright, easy position that keeps your shoulders relaxed, your head up, and your wrists comfortable. The steering is typically calm and forgiving, and the bike feels intuitive if you’re riding in normal clothes and you’re stopping frequently.
This is why cruisers feel so approachable for adults who want low-stress riding. A cruiser invites slow rides, casual trips, and comfort-first routine miles.
If that’s your priority, BikesDirect’s Mango lineup is a strong reference point for what modern cruisers are meant to feel like:
Fat bikes vary, but most are designed to handle rough surfaces and low-traction conditions. The posture tends to be more “neutral control” than pure upright lounging. You’ll often feel like you’re positioned to steer and manage big tires through uneven terrain, rather than sitting fully upright for a leisurely roll.
That difference matters. If your main goal is relaxed comfort on smooth streets, a cruiser posture is often the winner. If your goal is stability in challenging conditions, fat bike posture supports that kind of control.
Tire Width: The Real Difference Most Riders Feel Immediately
Tires are where these two categories diverge most dramatically.
Cruiser tires: comfort through moderation
Cruiser tires are usually wider than typical road tires, but they’re not extreme. They’re designed to roll smoothly on pavement while taking the edge off cracks, seams, and rough patches. That means you get a softer feel without turning every ride into a workout.
This is “comfort for everyday surfaces.” It works for neighborhood streets, paved paths, and casual commuting.
Fat bike tires: capability through maximum flotation
Fat bike tires are designed to stay in place on soft or loose terrain. The added width creates flotation and grip in conditions where a normal tire would sink or slip. That’s why fat bikes are popular for sand and snow, and why they feel so stable on loose surfaces.
The trade-off is rolling resistance. On pavement, big tires can feel slower and heavier, especially over longer distances. Many riders love that stability, but if your riding is mostly on smooth roads, the extra tire can feel like more work than you need.
Comfort Isn’t Just “Soft”: It’s How the Bike Matches Your Routes
Here’s a useful way to think about comfort:
Cruiser comfort = relaxed posture + easy rolling on pavement
Fat bike comfort = stability + traction in unpredictable terrain
If your “comfort problem” is related to body position (neck, shoulders, wrists) or you want a calmer ride at casual speeds, a beach cruiser tends to solve it better.
If your “comfort problem” is fear of slipping, sinking, or losing control on loose surfaces, a fat bike tends to solve it better.
Best-Use Scenarios: Which Bike Wins Where?
Choose a beach cruiser if you want:
Short rides, errands, neighborhood cruising
An upright posture that feels natural immediately
Easy handling in stop-start situations
A low-stress bike you’ll actually use frequently
Cruisers are also great if you’re returning to riding and want to rebuild consistency without discomfort. The Mango options linked above are excellent examples of cruiser setups that prioritize everyday rideability.
Choose a fat bike if you want:
Sand, snow, or consistently loose terrain
Maximum traction and stability off pavement
A bike that thrives when routes are rough or unpredictable
A “go anywhere” mindset, even if it’s slower on pavement
If your routes are mostly paved with occasional dirt paths, a fat bike can be overkill. But if you truly ride soft, loose terrain regularly, it can feel like the perfect tool.
What About “Mixed Riding”? Consider This Middle Ground
A lot of riders are choosing between these categories because they want comfort and versatility. If your riding is mixed—streets, paths, rough pavement, and occasional hardpack—there’s a strong argument for a different style entirely: a hybrid bike or a gravel bike.
A hybrid can provide you with upright comfort and practical versatility without requiring extreme tires.
A gravel-style setup can provide efficiency and stability across pavement and paths, eliminating the rolling resistance of a fat bike.
If you’re in that “mostly pavement but sometimes rough” zone, those middle options often deliver the best balance.
Comfort vs Capability Comes Down to Your Real Routes
The beach cruiser is the comfort choice when comfort means relaxed posture, easy handling, and enjoyable everyday riding on normal streets and paths. The fat bike is the capability choice when capability means traction and stability in loose, soft, unpredictable terrain.
If your goal is to ride more often, run errands, and enjoy low-stress cruising, a beach cruiser setup—like the Mango cruisers available through BikesDirect—will usually be the best match. If your goal is to ride sand, snow, or rough terrain where flotation and grip matter most, a fat bike is hard to beat.
If you want help choosing the right category and a bike that fits your riding style, pleasecontact us.
Most riders remember the first time a bike surprised them—not with speed, but with how smooth it felt. The road was rough, the pavement imperfect, yet the bike seemed to float instead of rattle. That experience rarely comes down to frame material or fancy components. More often, it’s wheel size quietly doing the heavy lifting. When it comes to bike wheel size comfort, diameter matters far more than many cyclists realize, especially for everyday riding across mixed surfaces.
Speed tends to dominate conversations about wheels, but comfort is what keeps riders pedaling longer, riding more often, and enjoying the journey. Understanding how wheel size affects ride quality can help cyclists choose bikes that feel right instead of just looking right on paper.
Why Wheel Size Influences Comfort So Much
At its core, wheel diameter determines how easily a bike rolls over imperfections. Larger wheels approach bumps at a shallower angle, which reduces the jolt transferred to the rider. Smaller wheels hit those same bumps more abruptly, sending sharper feedback through the frame.
This isn’t theory—it’s physics at work on every crack, curb edge, and patch of gravel. Tire volume and pressure matter too, but wheel size sets the foundation for how forgiving a bike feels before suspension or tire width even enters the conversation.
The Comfort Advantage of Larger Diameter Wheels
Larger wheels maintain momentum more easily and smooth out uneven surfaces. That’s why many riders describe bikes with bigger wheels as calmer or more stable, even at moderate speeds.
On a road bike, 700c wheels dominate not because they’re trendy, but because they balance efficiency and comfort. They roll cleanly over small imperfections and reduce fatigue during long rides. Even though road bikes prioritize speed, riders often notice comfort benefits first.
This same principle carries into other categories where ride quality matters more than outright acceleration.
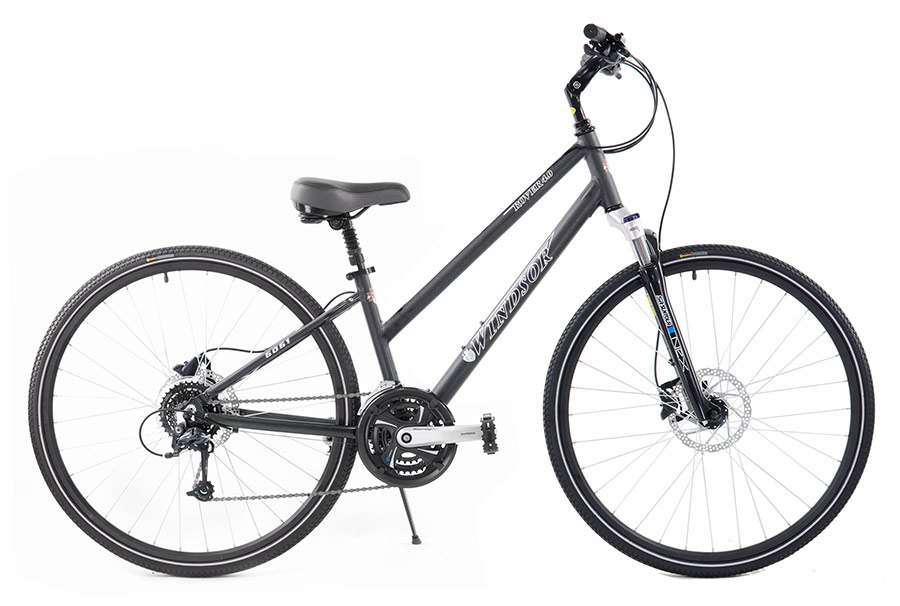
How Wheel Size Shapes Everyday Hybrid Comfort
Hybrid bikes are designed for versatility, so comfort plays a central role. Most modern hybrid bike models use 700c wheels similar to road bikes, but with wider tires and lower pressures. That combination creates a forgiving ride that absorbs cracks, expansion joints, and light gravel without feeling sluggish.
For commuters and fitness riders, this wheel size strikes an ideal balance. The bike feels stable and predictable, reducing strain on hands, wrists, and lower back over repeated rides. In daily use, this comfort advantage often matters more than minor speed differences.
Gravel Bikes and the Comfort of Rolling Over Chaos
Gravel riding exposes wheel size benefits immediately. Loose surfaces, washboard roads, and unpredictable terrain punish small wheels. A gravel bike typically uses 700c or slightly smaller 650b wheels, depending on design intent.
Here, comfort becomes adjustable. Larger 700c wheels excel at smoothing long stretches of rough gravel, while 650b wheels paired with wider tires add cushioning and traction. Both prioritize comfort over speed, but they do so in slightly different ways. Riders often choose based on terrain rather than fitness level.
Mountain Bikes: When Diameter Dictates Confidence
Mountain biking may seem like a suspension-first conversation, but wheel size still plays a massive role. The shift from 26-inch wheels to 27.5 and 29-inch wheels transformed how trail bikes feel.
A mountain bike with 29-inch wheels rolls over roots and rocks with less drama, offering smoother momentum and improved stability. Riders feel less pitched forward on obstacles, which reduces fatigue and builds confidence.
Smaller wheels remain popular for maneuverability, but for comfort-focused trail riders, larger diameters often win. The ride feels calmer, especially on longer or rougher routes.
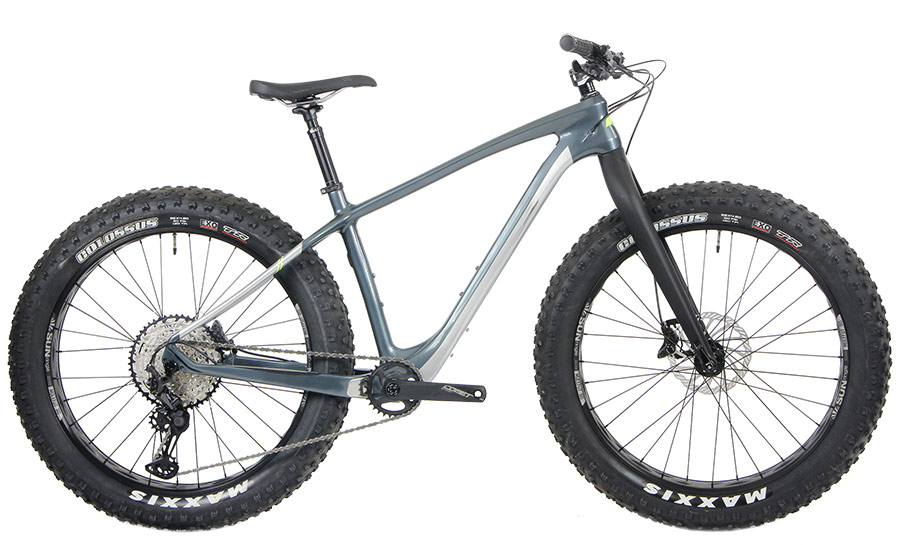
Fat Bikes and the Ultimate Comfort Formula
If comfort had a visual representation, it would probably look like a fat bike. While tire width steals the spotlight, wheel diameter still contributes significantly to ride feel.
Fat bikes use large-diameter wheels combined with massive tires run at low pressure. This setup creates unmatched shock absorption on sand, snow, and broken terrain. The wheel size helps maintain forward motion while the tires smooth out everything beneath them.
Speed takes a back seat here, but comfort and control take center stage—exactly what many riders want in extreme conditions.
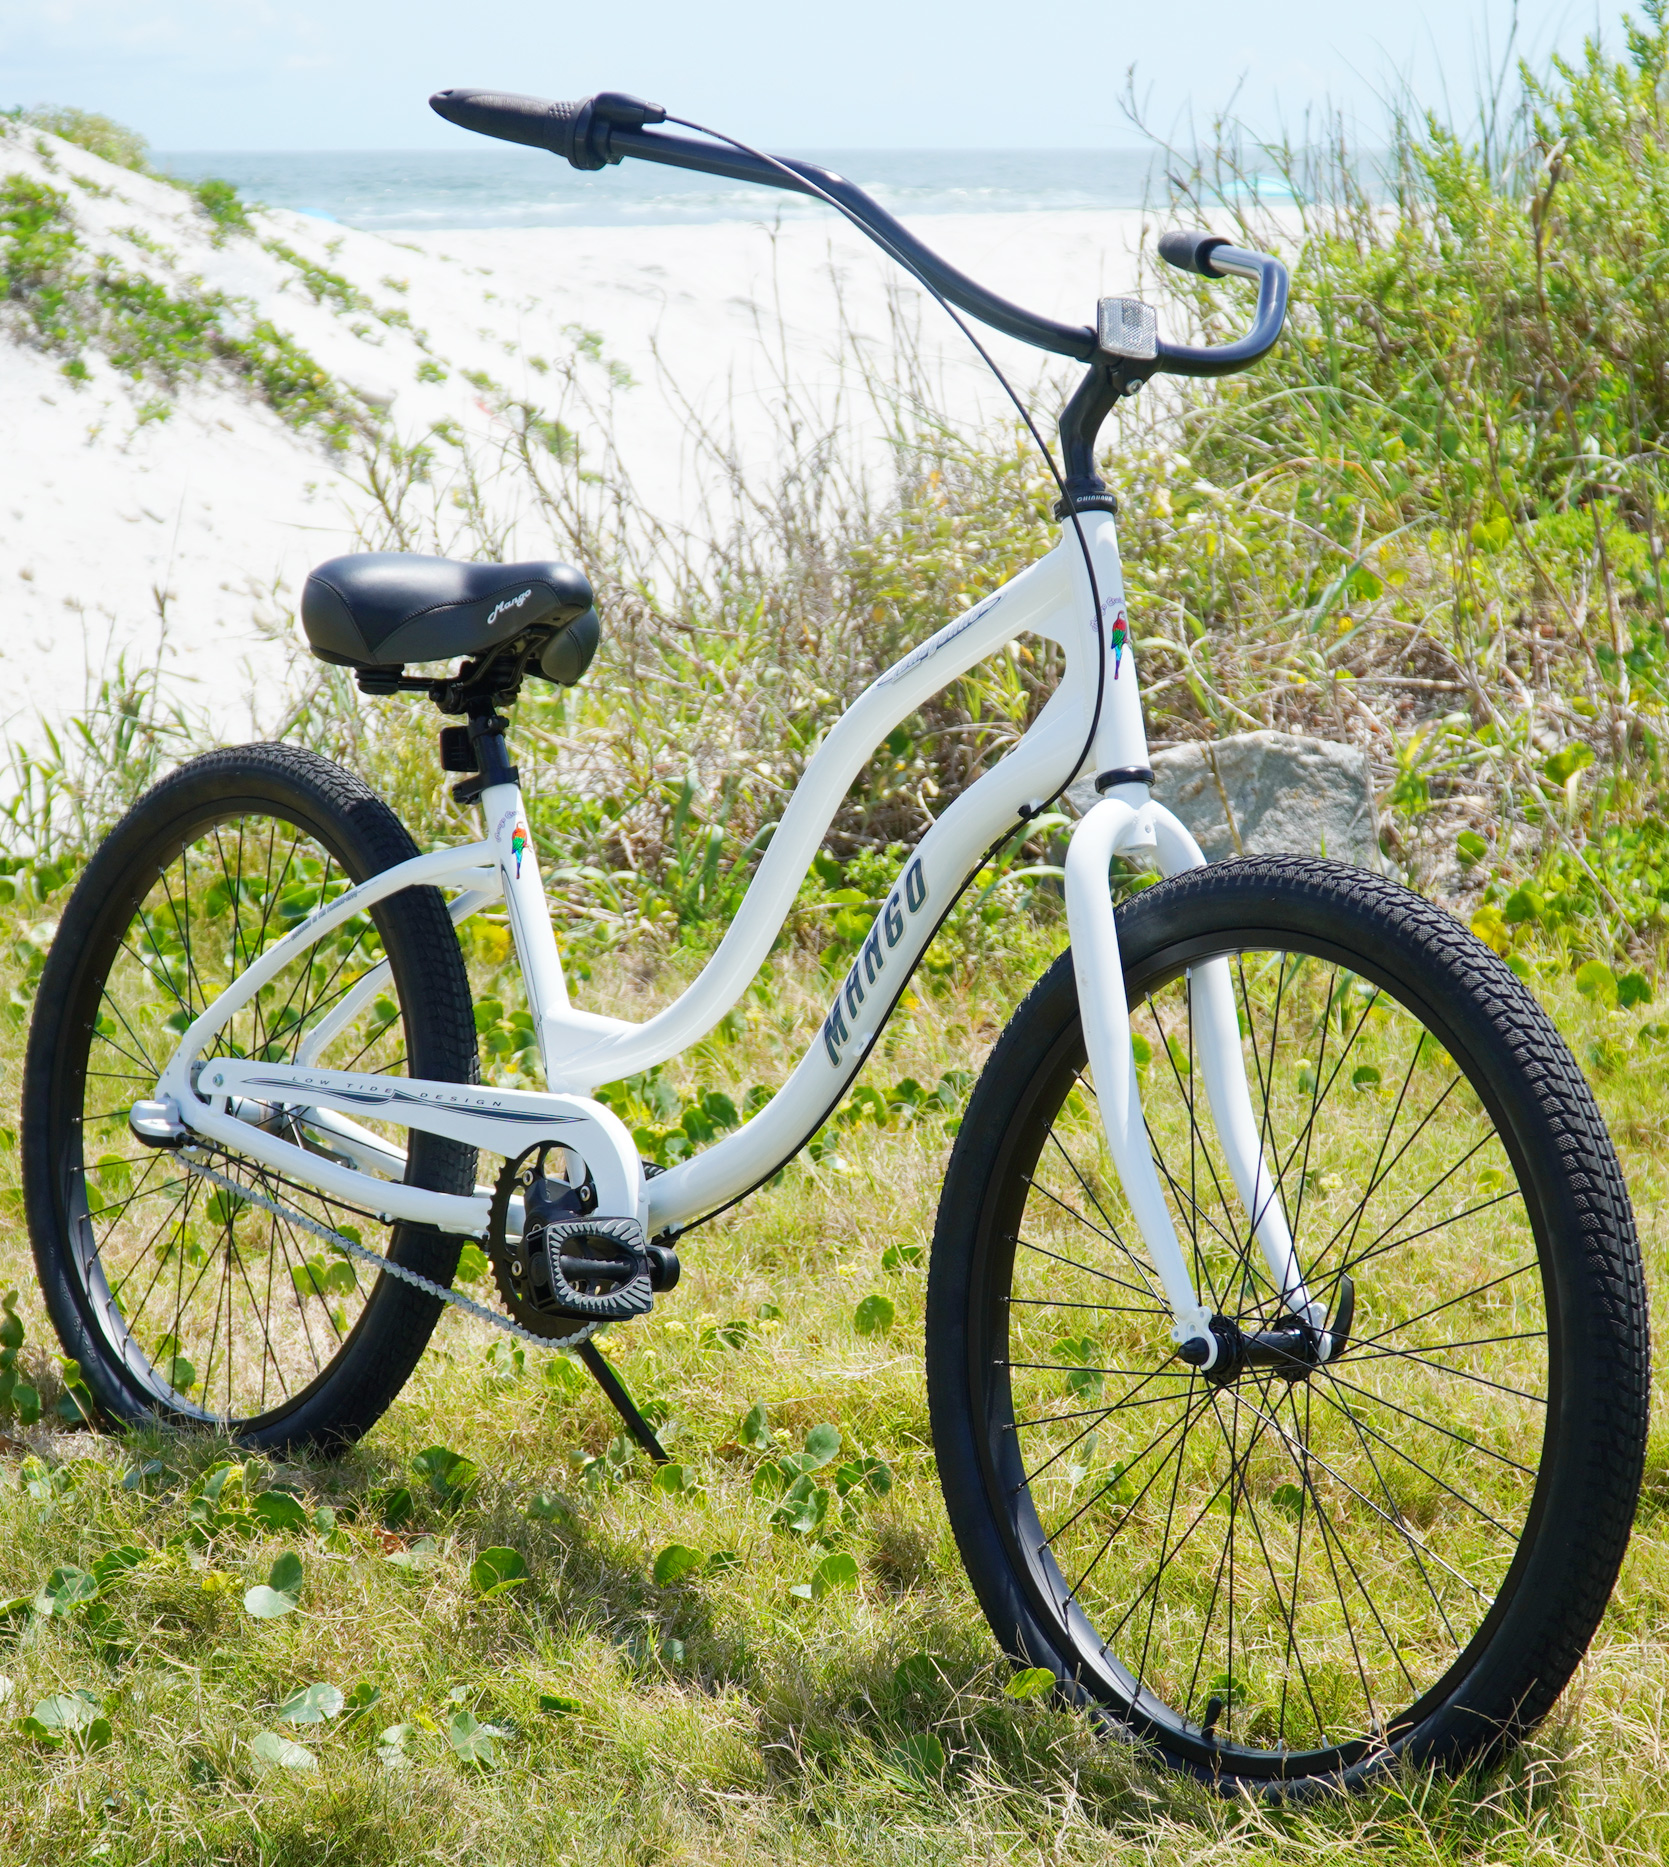
Beach Cruisers and the Comfort-First Mindset
Comfort doesn’t always involve technical terrain. A beach cruiser is built around relaxed geometry and forgiving wheels. Many cruisers use 26-inch wheels, which may be smaller than modern road or hybrid wheels but are paired with wide, cushioned tires.
This combination softens bumps at low speeds and keeps handling predictable. For casual riding along boardwalks or neighborhood streets, the comfort equation prioritizes ease and stability over efficiency.
Smaller wheels respond more quickly to steering input, which can feel lively and fun. In urban environments with frequent stops and tight turns, that responsiveness has value.
Comfort suffers only when the wheel size doesn’t match the terrain or usage. A smaller wheel on rough pavement transmits more vibration. On smooth surfaces, it can feel perfectly fine. This is why wheel size choices should reflect where and how the bike will be ridden, not just rider height or trends.
Tire Size and Pressure Complete the Comfort Picture
Wheel diameter sets the stage, but tires finish the performance. Wider tires at lower pressure amplify the comfort benefits of larger wheels. Narrow, high-pressure tires reduce comfort regardless of diameter.
The key takeaway for bike wheel size comfort is synergy. Wheel size, tire width, and pressure work together. Choosing a bike with the right wheel diameter allows riders to fine-tune comfort later through tires without changing the entire setup.
Comfort Keeps Riders Riding
Speed impresses on short rides. Comfort determines longevity. Riders who feel less beaten up ride farther, more often, and with greater confidence. Wheel size quietly shapes that experience every mile.
When bikes feel forgiving instead of punishing, cycling becomes part of daily life rather than an occasional challenge.
The Bottom Line on Wheel Size and Comfort
Wheel size isn’t about chasing marginal gains. It’s about shaping how a bike feels beneath you. Larger wheels smooth the ride, reduce fatigue, and increase confidence across most riding styles. Smaller wheels offer agility but demand smoother surfaces to stay comfortable.
Choosing the right diameter ensures the bike supports your body instead of fighting it. That’s the real advantage of understanding bike wheel size comfort.
Find Your Smoothest Ride at Bikesdirect.com
Comfort starts with the right foundation. At Bikesdirect.com, explore bikes designed with wheel sizes that match how you actually ride—whether that’s long pavement miles, mixed gravel routes, relaxed cruising, or trail adventures. Choose a bike that absorbs bumps, reduces fatigue, and keeps every ride enjoyable instead of exhausting. When your wheels work with the terrain, comfort follows naturally, mile after mile.
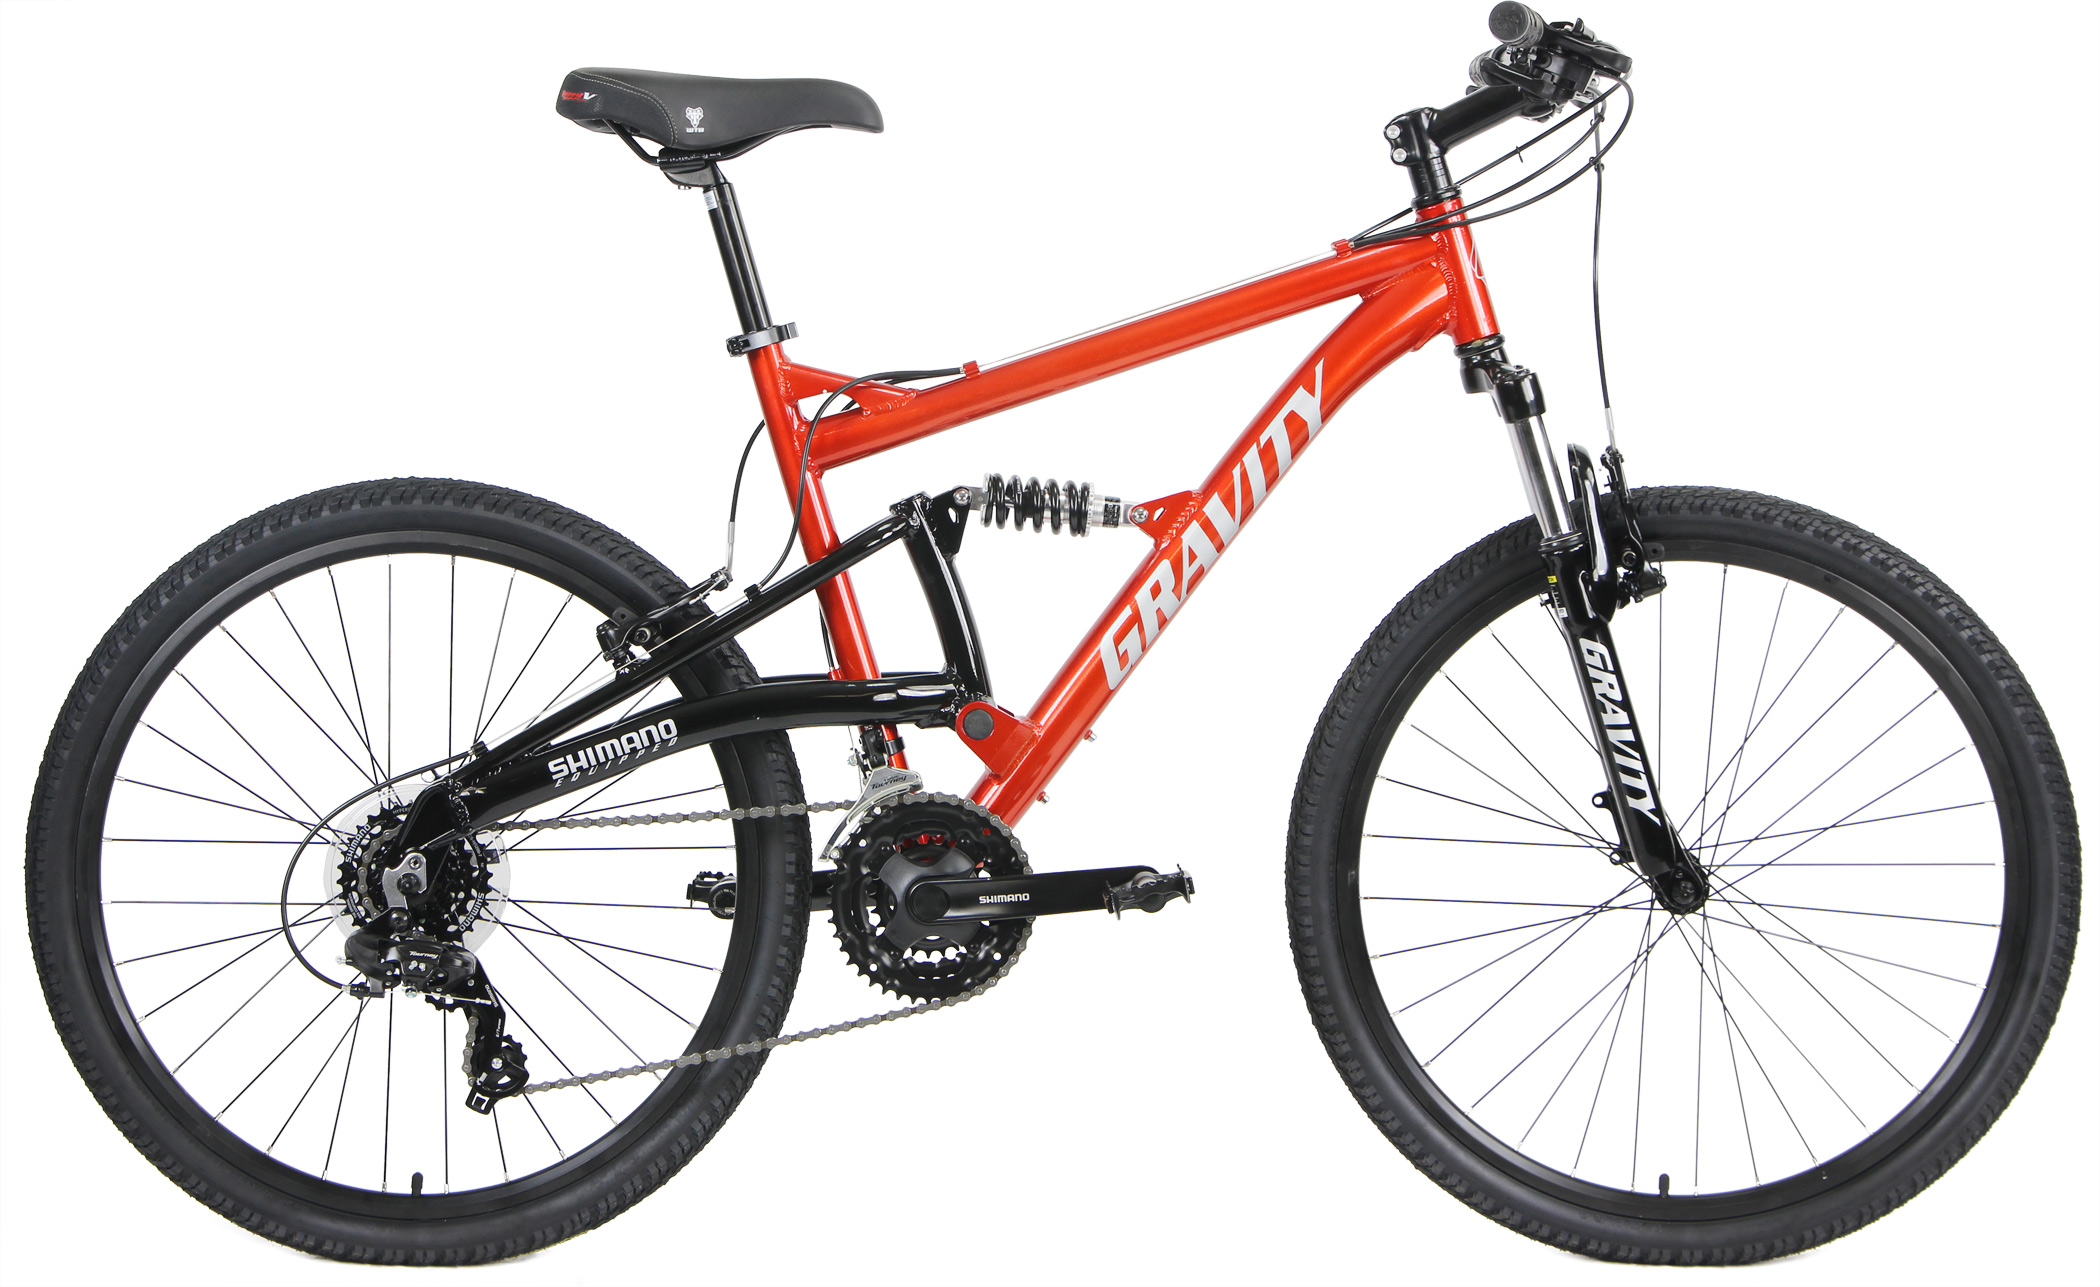
Buying one of today’s entry-priced mountain bikes can feel like stepping into a maze of buzzwords: “hydroformed,” “long travel,” “trail geometry,” “hydraulic,” “1x,” “29er,” “27.5,” and a dozen more. Then you see the price tags. Under $600? For a real mountain bike?
Here’s the honest truth after two decades of building, tuning, and riding bikes: $600 is enough to get a legitimately fun, capable mountain bike—if you understand where the money goes and choose the right compromises. It’s also enough to buy the wrong bike if you expect $2,000 performance from $300 parts.
In this guide, we’ll do a practical mountain bike price comparison focused on what matters long-term: frames, forks, drivetrains, brakes, wheels, and how each choice affects durability, maintenance, and upgrade potential. We’ll use a few clear examples from our lineup at BikesDirect—then give you a framework you can apply to any bike in this price range.
The $600 reality check: where your money actually goes
At this price point, you’re not paying for carbon layups, air forks, or 12-speed wide-range drivetrains. You’re paying for five core areas that define how the bike rides and how long it stays enjoyable:
Suspension (fork quality; and if full suspension, the rear shock + pivots)
Brakes (V-brakes vs mechanical discs vs hydraulic discs)
Drivetrain (how it shifts under load, gear range, replacement cost)
Wheels/tires (rim strength, hub quality, tire size and traction)
Here’s the key tradeoff under $600:
If you spend more on suspension (especially rear suspension), you usually spend less on brakes, drivetrain, and wheels.
If you spend more on brakes (hydraulic discs), you often keep the drivetrain more basic (commonly 3×7/21-speed).
If you want the best long-term value, prioritize frame, brakes, and wheels first, then suspension.
That’s why a smart budget hardtail can outlive (and out-perform) a bargain full-suspension bike on many trails.
The three tiers of under-$600 mountain bikes (and what to expect)
Tier 1: $200–$300 — “Real bike, real trails… with realistic expectations”
This is the category where bikes stop being toy-store throwaways and start being legitimate bicycles you can tune, maintain, and ride for years. But you’re making compromises: heavier components, simpler drivetrains, and basic brakes.
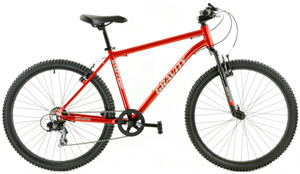
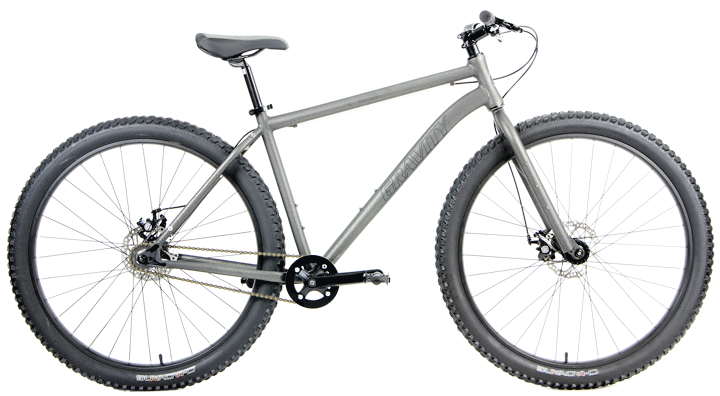
A solid example is the Gravity BaseCamp V 7spd, which comes in at $229.95 and focuses on fundamentals: an aluminum frame, front suspension, Shimano 7-speed shifting, and V-brakes.
What your money really gets here:
A true 6061 aluminum frame (not “mystery metal”)
Entry-level suspension fork to take the edge off bumps
Simple, inexpensive-to-maintain shifting
Strong value if your riding is parks, dirt paths, mellow singletrack, and neighborhood adventures
What you’re not getting:
High-end braking power
Modern wide-range gearing
Lightweight wheels/hubs
Suspension that feels smooth on fast, rough trails
This tier is best when you want maximum value and minimal complexity.
Here’s the fork in the road (pun intended). Under $450, bikes typically go one of two directions:
Full suspension with basic parts
Hardtail with notably better brakes and trail readiness
Option A: Full suspension comfort on a budget
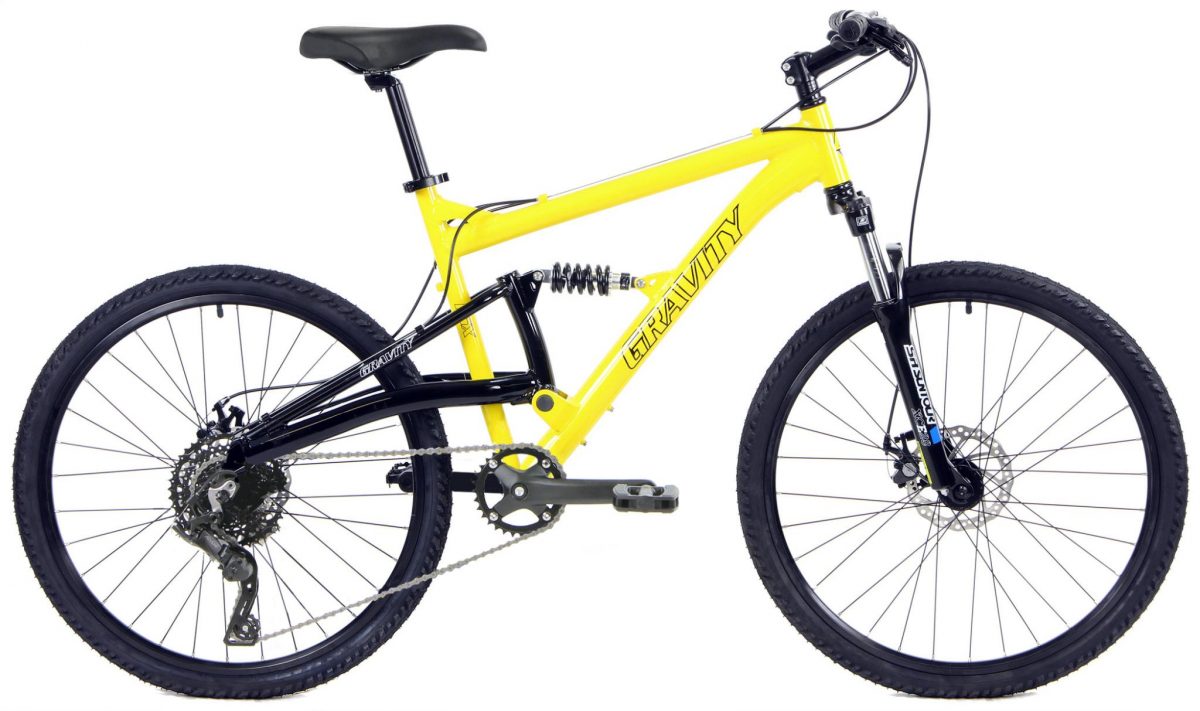
The Gravity FSX V is a classic example: a full-suspension aluminum bike priced at $299. It pairs a 6061 aluminum frame and rear coil-over shock with Shimano 21-speed and V-brakes.
If you’re newer to trails, full suspension can feel like magic—especially on roots, rocks, and choppy surfaces. But the “money math” matters: a rear shock, linkage, pivots, and extra frame structure cost real dollars, so other components tend to be more entry-level.
You get comfort and forgiveness. You give up some braking power, some precision, and typically add weight.
Option B: Hardtail performance upgrades that matter more
In this same general price zone, a hardtail with strong brakes often gives you a better mountain-bike experience—particularly if your trails are steep or your rides include long descents where heat and control matter.
Tier 3: $350–$600 — “Best long-term value lives here”
This is where bikes start to feel trail-serious for most riders because the component choices move from “works” to “works confidently.”
The standout upgrade at this level is usually hydraulic disc brakes—and that’s a big deal.
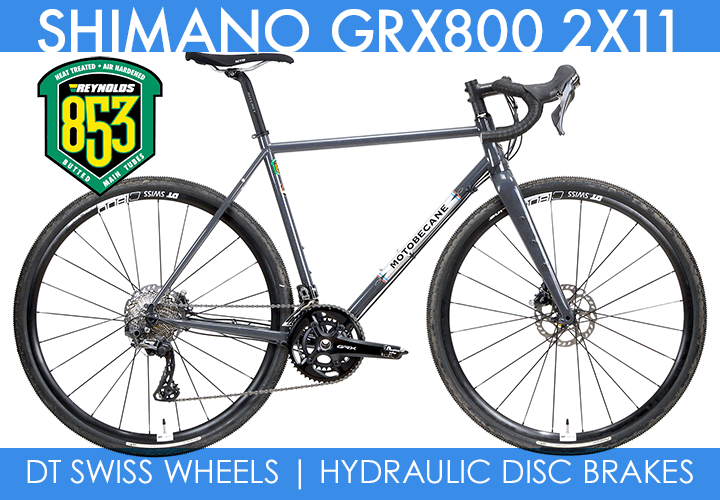
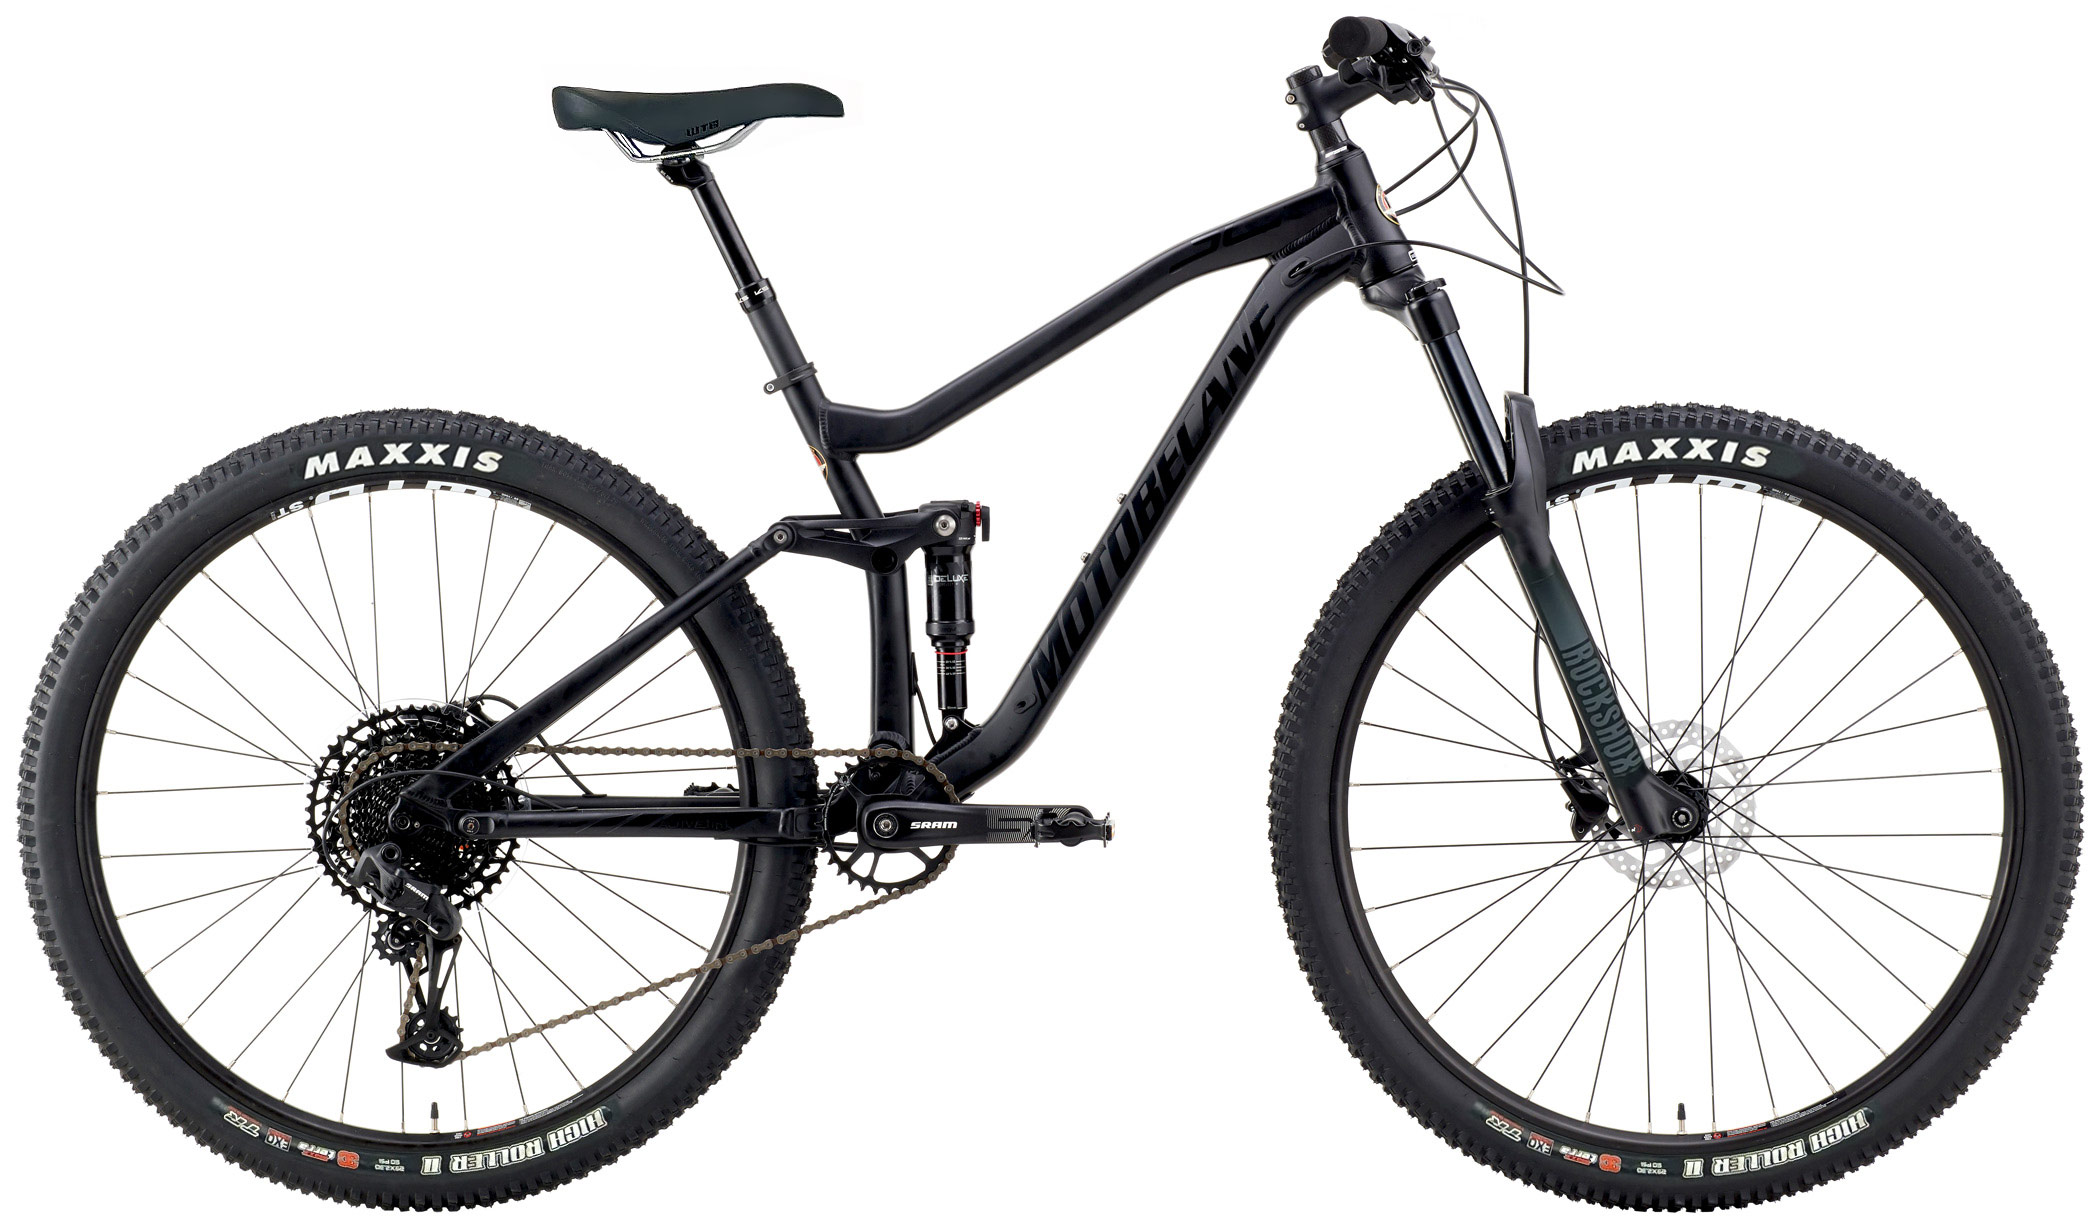
A strong example is the Gravity HD275 Trail at $359, built around an aluminum frame, a 27.5″ wheel platform, and Tektro M285 hydraulic disc brakes with 160mm rotors.
For many riders, hydraulic discs are the single biggest “this feels like a real mountain bike” jump you can make—because they improve control, reduce hand fatigue, and keep working in wet or dusty conditions.
Quick comparison: BaseCamp V vs FSX V vs HD275 Trail
Here’s how these three options stack up in the ways that actually change your ride.
Now let’s get into the parts—because that’s what your money really buys.
Frames under $600: the quiet hero of long-term value
At BikesDirect we’re big on frames because they’re the foundation you can’t easily upgrade later.
What to look for in a budget MTB frame
6061 aluminum (common, durable, and cost-effective)
Replaceable derailleur hanger (when—not if—you hit something)
Bottle mount points (small detail, huge quality-of-life improvement)
Reasonable geometry for stability (not twitchy, not stretched)
The BaseCamp V frame is explicitly 6061 aluminum with an integrated head tube design, and it includes a replaceable rear derailleur hanger. The HD275 Trail frame is also 6061 aluminum and calls out a reinforced/hydroformed downtube design, plus replaceable hanger and bottle mounts. The FSX V uses a 6061 aluminum front triangle and rear triangle, also with a replaceable hanger—important on a full suspension bike where alignment matters even more.
The truth about “full suspension frames” at entry prices
Full suspension adds:
Pivots/bearings (or bushings)
Hardware that needs torque checks
More places for creaks to develop if neglected
That doesn’t mean “don’t buy full suspension.” It means buy it with eyes open: you’re trading simplicity for comfort.
Suspension under $600: what “front suspension” actually means here
Coil forks: sturdy, affordable, not fancy
In this price bracket, forks are typically coil-sprung with basic adjustability. They do the job—especially for newer riders—but they’re heavier and less sensitive than an air fork.
BaseCamp V: listed as an MTB long travel suspension fork.
FSX V: 26″ suspension fork with preload adjustment.
HD275 Trail: 27.5″ suspension fork with preload adjustment.
Rear shocks at budget pricing: coil-over comfort with limits
On the FSX V, the rear is a coil-over shock. Coil shocks at this level are great for smoothing chatter and increasing confidence—but you won’t get the damping control of higher-end shocks. Think: comfortable, forgiving, and fun… but not precision race equipment.
Pro tip from the workshop: If you’re buying budget full suspension, set expectations and then protect your investment:
Keep pivot bolts snug (check occasionally)
Keep it clean
Listen for new noises early (small fixes stay small)
Drivetrains under $600: why “more speeds” isn’t always better
You’ll see a lot of 7-speed and 21-speed setups here, and that’s not a bad thing. They’re inexpensive to service and forgiving.
BaseCamp V: simple Shimano 7-speed
The BaseCamp V uses a Shimano 7-speed drivetrain (including Shimano rear derailleur, shifter, and 7-speed freewheel). This is a great “get on and ride” setup. Replacement parts are cheap. Adjustments are straightforward.
FSX V & HD275 Trail: 21-speed (3×7) for broader range
Both the FSX V and HD275 Trail use a 3×7/21-speed approach, giving you more climbing and cruising options.
What you gain:
More gear range for mixed terrain
Easier climbs for newer riders
What you give up:
More shifting complexity (front derailleur setup matters)
Slightly more maintenance
If you’re riding hilly areas or carrying gear, the wider range is a genuine benefit.
Brakes under $600: the most important difference you’ll feel on trail
If there’s one area where budget bikes can feel wildly different, it’s braking.
V-brakes: simple, effective, weather-dependent
Both BaseCamp V and FSX V use V-brakes. Properly adjusted V-brakes can work well on dry trails and paths. They’re easy to maintain and cheap to replace.
But they’re more affected by:
Wet rims
Mud/grit on the braking surface
Rim wear over time
Hydraulic disc brakes: the “this feels legit” upgrade
The HD275 Trail’s Tektro M285 hydraulic discs are a major step up in control and consistency, and it’s one reason this bike punches way above its price.
Hydraulic discs bring:
Better modulation (control between “off” and “locked”)
Stronger stopping power
Less hand fatigue on long descents
More consistent performance in wet conditions
If your local rides include real descents, or you’re a heavier rider, or you ride in mixed weather, hydraulic discs are often the best “value per dollar” feature you can buy.
Wheels and tires: why 27.5” often feels like the sweet spot here
Wheel size affects how a bike rolls over obstacles, how it accelerates, and how it corners.
BaseCamp V uses 26″ rims and 26×2.1 tires.
FSX V runs 26×2.1 tires as well.
HD275 Trail runs a 27.5″ wheel platform, and lists tire clearance up to roughly 27.5×2.3.
What does that mean on real trails
26″: quick acceleration, nimble handling, lots of tire availability, great for smaller riders and tighter paths
27.5″: a little more rollover confidence without feeling sluggish, great all-around trail size for many riders
If you’re shopping under $600 and want a modern-feeling trail ride without needing a 29er-specific build, 27.5″ is a strong balance point.
Long-term value: what holds up, what wears out, and what’s worth upgrading
Let’s talk about the part most buyers skip: what happens after the honeymoon. Entry-priced bikes can be outstanding long-term buys—if you maintain them smartly and upgrade selectively.
What typically lasts a long time under $600
The frame (if it’s a solid aluminum frame with a replaceable hanger)
Basic cranksets and bottom brackets (especially if kept clean and properly adjusted)
Double-wall rims (as long as spoke tension stays healthy)
What you should expect to replace eventually
Brake pads (disc) or pads (V-brake)
Chains (and eventually freewheel/cassette)
Tires (sooner than you think if you ride often)
Cables/housing (shifting gets “mushy” over time)
The best “bang for buck” upgrades (in order)
Tires Stock tires are often chosen to hit a price point. The right tire for your terrain can transform cornering and confidence more than almost anything else.
Pedals and grips Better contact points make the bike feel more controlled and less fatiguing.
Brake setup (pads + adjustment) Even without changing brake systems, proper setup matters. If you have hydraulics, keeping pads fresh and rotors clean is huge.
A basic tune-up Cable tension, derailleur alignment, and spoke tension can make an entry bike ride like a much more expensive one.
Model-specific value notes
BaseCamp V: the “simple wins” bike
The BaseCamp V is exactly the kind of bike that stays alive for years because it’s straightforward: fewer gears, fewer complex systems, simple brakes. It’s also priced so affordably that you can put some budget toward a helmet, basic tools, and maybe better tires—stuff that improves every ride.
Best for: casual trails, family rides, beginner singletrack, neighborhood adventures Not ideal for: long, steep descents or high-speed rocky terrain
FSX V: comfort-first, maintenance-aware
Full suspension at $299 is a ton of comfort for the money, and for many riders that’s the difference between riding often and letting the bike collect dust. Just remember: you’re responsible for a bit more upkeep.
Best for: rough paths, roots, comfort-seeking riders, “I want it smoother” buyers Not ideal for: riders who never want to check bolts or do basic maintenance
HD275 Trail: best “ride it hard” value
Hydraulic disc brakes plus a 27.5 platform is a recipe for confidence at a price that’s honestly difficult to beat. For many buyers, this is the sweet spot: simple drivetrain, strong braking, modern trail feel.
Best for: real trail riding, mixed weather, hilly terrain, confidence-building control Not ideal for: riders who specifically want rear suspension comfort
Fit and sizing: the cheapest way to get a better ride
I’ll say it plainly: a perfectly sized $350 bike will ride better than a poorly sized $1,500 bike.
Each of the bikes above includes sizing guidance on the product page (standover and height ranges). For example, the BaseCamp V page lists sizing ranges for men’s and women’s frames, and the FSX V provides standover figures by size.
Two practical sizing rules
If you’re between sizes and you value confidence on trails, size down for more standover and easier handling.
If you’re between sizes and you value seated pedaling efficiency, size up (but only if standover still works).
“Should I buy a mountain bike… or would gravel bikes make more sense?”
This comes up constantly, so let’s address it directly and honestly.
If most of your riding is:
pavement
packed dirt roads
rail trails
fast mixed-surface commuting
…then gravel bikes can be a better tool. They’re generally lighter, roll faster on smooth surfaces, and feel efficient when you’re pedaling for distance.
But if you plan to ride:
roots, rocks, real singletrack
trails with sharp turns and steep descents
loose or chunky surfaces where traction matters
…mountain bikes are the right choice. Bigger tires, more stable handling, and (on the right model) stronger braking make trail riding safer and more fun—especially for newer riders.
A lot of riders actually end up with both eventually: gravel for miles, MTB for trails. Under $600, the key is picking the bike that matches how you’ll really ride, not the bike you imagine yourself riding twice a year.
So… what does $600 really get you?
A smart under-$600 purchase can absolutely be a long-term win. Here’s the simple breakdown:
Under ~$300: expect a solid frame and functional parts—great for casual trails and building skills
Around ~$300–$400: you can choose either full suspension comfort (with simpler parts) or hardtail performance upgrades
$350–$600: you start getting the features that make trail riding feel confident—especially hydraulic disc brakes
If you want to browse what’s currently available across these tiers, start here:BikesDirect Mountain Bikes.
And if you want help choosing the best match for your height, terrain, and riding goals, reach out to us here:Contact BikesDirect.
The ride usually starts the same way. You roll out early, the pavement still damp from last night’s rain, traffic just beginning to wake up. A car slows suddenly ahead, a corner tightens more than expected, or a hill drops away faster than planned. In those moments, braking isn’t theoretical—it’s personal. That’s where the conversation around disc brakes on bikes becomes less about trends and more about trust.
For everyday cyclists, disc brakes aren’t about downhill racing or extreme terrain. They’re about consistency, confidence, and knowing your bike will respond the same way every single time, regardless of weather, speed, or load. Understanding what actually matters helps riders decide whether disc brakes make sense for their daily riding style.
Why Braking Matters More Than You Think
Most riders focus on frames, gears, and tires first. Brakes often come last—until they’re needed. Good brakes disappear into the background. Bad brakes demand attention at the worst possible moments.
Disc brakes changed everyday cycling because they deliver predictable stopping power. Instead of relying on rim contact, they clamp a rotor near the hub, away from road grime and water. That design difference reshapes how bikes behave in real-world conditions, not just ideal ones.
Consistency Is the Real Advantage
The biggest benefit of disc brakes on bikes isn’t raw stopping power. It’s consistency. Whether you’re riding dry pavement, wet roads, or gritty city streets, disc brakes perform the same way. That reliability reduces mental load. You stop thinking about whether your brakes will work and focus on the ride itself.
This matters enormously on a hybrid bike used for commuting or fitness riding. Traffic, intersections, and changing surfaces demand predictable braking. Disc brakes deliver that predictability without requiring perfect conditions.
Wet Weather Confidence Changes Everything
Rim brakes lose efficiency when rims get wet. Riders feel the delay immediately. Disc brakes don’t suffer the same drawback. Because the rotor stays cleaner and dries faster, braking response remains immediate.
For riders on a gravel bike, wet-weather performance is a game-changer. Gravel riding often means dust one minute and puddles the next. Disc brakes keep braking smoothly and controlled, even when surfaces change mid-ride.
Low Maintenance for Real Life Riding
Daily cyclists don’t want complicated upkeep. Disc brakes simplify maintenance in ways many riders don’t realize. Rim brakes wear down rims over time, gradually compromising wheel lifespan. Disc brakes remove that wear entirely.
Brake pads are easy to replace, and rotors last a long time under normal use. Cable-actuated mechanical disc brakes, common on value-focused bikes, offer straightforward adjustments without specialized tools. For everyday riders, that translates to fewer surprises and longer component life.
How Disc Brakes Fit Different Bike Styles
Disc brakes aren’t limited to one category. They’ve become common across nearly every type of bike because their advantages scale with riding conditions.
On a road bike, disc brakes offer controlled braking at higher speeds, especially on descents. Riders gain confidence knowing braking performance won’t fade during long rides or sudden weather changes.
A mountain bike almost demands disc brakes. Dirt, mud, and uneven terrain overwhelm rim brakes quickly. Disc brakes maintain modulation and power where it matters most.
Even relaxed categories benefit. A beach cruiser ridden near coastal environments faces moisture and corrosion. Disc brakes resist those elements better, keeping braking reliable with minimal attention.
For extreme conditions, a fat bike relies on disc brakes to manage oversized tires and loose surfaces like snow or sand. Rim brakes simply can’t deliver consistent performance in those environments.
Mechanical vs Hydraulic: What Everyday Riders Should Know
Hydraulic disc brakes often dominate discussions, but mechanical disc brakes deserve credit. Mechanical systems use cables instead of fluid, making them easier to service and adjust. For many everyday cyclists, that simplicity outweighs the slight performance difference.
Hydraulic brakes offer smoother modulation and a lighter lever feel, but they also introduce complexity. Daily riders who prioritize reliability and easy maintenance often find mechanical disc brakes strike the right balance.
Weight Isn’t the Dealbreaker It Once Was
Some riders hesitate because disc brakes add weight. While true in theory, the difference is small in practice. Modern disc-equipped bikes offset weight through improved frame design and components.
For everyday riding, that slight weight increase rarely matters. What matters more is control, especially when carrying bags, riding in traffic, or navigating unpredictable surfaces. Disc brakes deliver control without demanding athletic tradeoffs.
Rim Brakes Still Work—But Context Matters
Rim brakes haven’t disappeared because they’re bad. They remain effective in dry conditions and on lighter bikes. For riders who ride occasionally, avoid wet weather, and prefer simplicity, rim brakes still function well.
The shift toward disc brakes reflects changing riding habits. More people ride year-round, commute in mixed conditions, and expect consistent performance without constant adjustment. In that context, disc brakes simply make sense.
Disc brakes aren’t about pushing limits. They’re about removing uncertainty. For daily riders, that reliability transforms how a bike feels and how often it gets used. When brakes work the same way every time, riding becomes easier, safer, and more enjoyable.
Ready to Ride With Confidence?
Choose a bike that stops as confidently as it rolls. At Bikesdirect.com, you’ll find disc brake–equipped bikes across road, hybrid, gravel, mountain, and more—built for real-world riding, not ideal conditions. Ride through traffic, weather changes, and everyday challenges knowing your brakes respond instantly and predictably. Explore options that prioritize safety, consistency, and low maintenance so every ride feels smoother, calmer, and more controlled from start to stop.
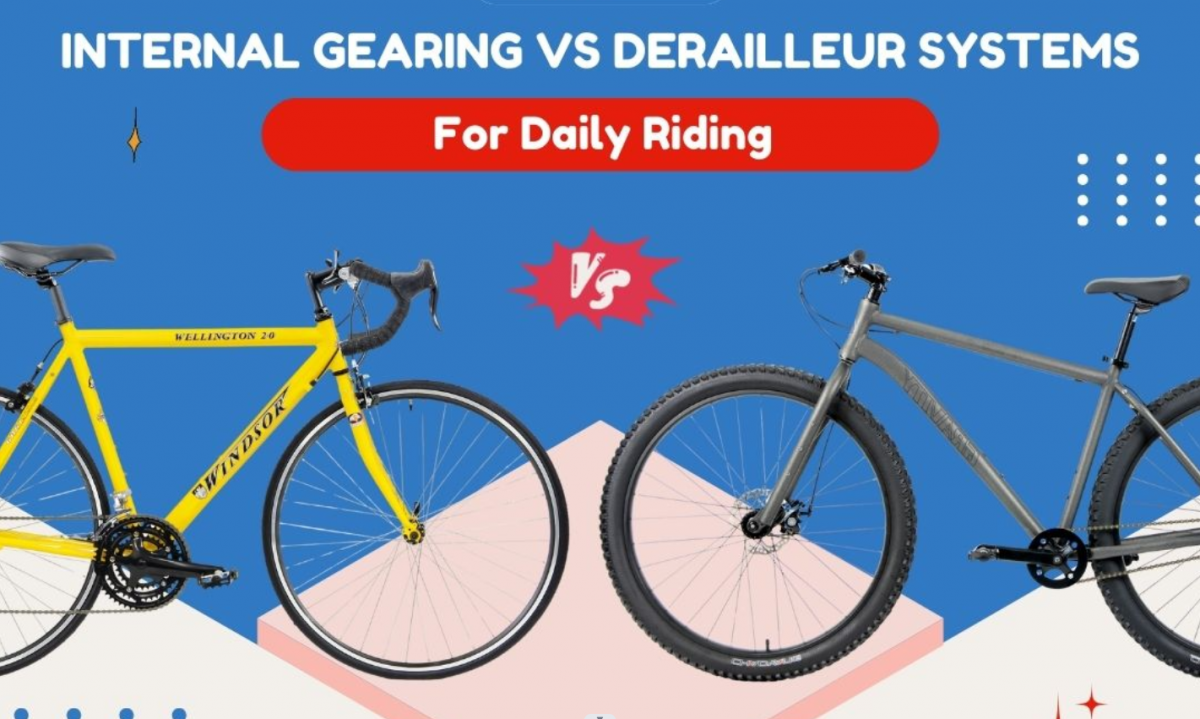
This infographic compares internal gear hubs and derailleur systems for daily riding. Learn how each option differs in maintenance, reliability, ride feel, and performance across terrain, load, and commuting conditions. Designed for everyday cyclists, it helps riders understand which gearing system fits their lifestyle, riding habits, and long-term maintenance expectations.
The morning commute rarely goes exactly as planned. A sudden red light forces a stop you didn’t expect. A hill sneaks up just as your coffee starts to slosh. You reach for a gear change and—if you’ve ridden long enough—you’ve probably wondered whether your drivetrain is helping you or quietly working against you. For daily riders, the debate around internal gear hub vs derailleur isn’t about racing or bragging rights. It’s about reliability, simplicity, and how a bike fits into real life.
Both systems have loyal fans for good reason. But understanding how they behave day in and day out can make the difference between loving your ride and merely tolerating it.
Understanding the Two Drivetrain Philosophies
At a glance, the difference seems obvious. A derailleur system shifts gears by moving a chain across multiple sprockets. An internal gear hub hides its gearing inside the rear hub, keeping everything sealed and compact. What’s less obvious is how those designs affect daily riding.
Derailleurs dominate the cycling world because they’re light, efficient, and versatile. Internal gear hubs exist for a different purpose: consistency, cleanliness, and ease of use. Neither approach is inherently better. The right choice depends on how, where, and how often you ride.
How Derailleur Systems Perform in Everyday Use
Derailleur drivetrains feel familiar to most riders. They offer a wide range of gears and crisp feedback when shifting under load. If your commute includes steep climbs or fast descents, that range matters.
On a road bike, derailleur systems excel because efficiency and cadence control are critical. Every watt feels direct. The same applies to a gravel bike, where mixed terrain demands quick, precise gear changes.
However, daily riding exposes derailleurs to their weak spots. Open components attract dirt, water, and road grime. Miss a cleaning or ride through winter weather, and performance can fade. Shifting while stopped is also impossible, which commuters notice immediately at traffic lights.
Why Internal Gear Hubs Appeal to Daily Riders
Internal gear hubs feel almost invisible when they work well. Shifting happens inside a sealed unit, protected from weather and debris. That makes them remarkably low maintenance.
One standout advantage is the ability to shift while stationary. When a light changes unexpectedly, you can downshift without pedaling. That alone can transform stop-and-go commuting.
Internal gearing pairs naturally with upright, comfort-focused bikes like a hybrid bike or a beach cruiser. These bikes prioritize smooth starts, relaxed cadence, and minimal fuss. Riders who want their bike to “just work” often gravitate here.
The tradeoff comes in weight and gear range. Internal hubs are heavier, and most offer fewer gears than modern derailleur systems. For flat or gently rolling routes, that limitation rarely matters. On steeper terrain, it can.
Maintenance: The Quiet Deciding Factor
Maintenance doesn’t sound exciting, but it defines daily riding satisfaction. Derailleurs reward attention. Clean chains, aligned hangers, and fresh cables keep them running beautifully. Ignore them, and performance degrades quickly.
Internal gear hubs demand far less routine care. Chains last longer because they stay aligned. The hub itself rarely needs attention beyond occasional servicing. For riders who commute year-round or store bikes outdoors, that reliability becomes priceless.
This difference often matters more than gear count or weight. Daily riders don’t want to think about their drivetrain every morning. They want confidence.
Terrain, Load, and Riding Style Matter More Than You Think
Choosing between an internal gear hub and a derailleur isn’t just about the drivetrain itself. It’s about how the bike is used.
A mountain bike almost always uses a derailleur for good reason. Trails demand quick changes and wide gear ranges. Internal hubs struggle under repeated high torque and aggressive riding.
On the opposite end, a fat bike used for snow or sand often benefits from the simplicity of a derailleur because weight and gear flexibility matter in extreme conditions.
Daily urban riding sits in the middle. If your route is predictable and moderate, internal gearing feels elegant. If it’s varied and demanding, derailleurs offer adaptability.
Ride Feel and Shifting Experience
Derailleur shifts feel mechanical and immediate. Riders feel the chain move and engage. Many enjoy that connection.
Internal gear hubs feel smoother but slightly muted. Some riders notice a momentary pause during shifts. For casual riding, that pause fades into the background. For performance-focused riders, it can feel unfamiliar.
Neither sensation is wrong. It’s about preference and expectations.
Cost and Long-Term Value
Upfront cost often favors derailleur systems, especially at entry and mid levels. Internal hubs tend to cost more initially. Over time, though, lower maintenance can offset that difference.
Value-focused riders often discover that paying slightly more upfront saves frustration later. This long-term perspective aligns perfectly with daily riding needs.
Which System Fits Your Daily Ride?
Ask how often you ride, where you ride, and how much maintenance you’re willing to do. A daily commuter who values simplicity may fall in love with internal gearing. A rider who enjoys tuning and wants maximum versatility may prefer a derailleur.
There’s no universal answer. There’s only the system that disappears beneath you and lets the ride take over.
Daily riding isn’t about extremes. It’s about consistency. The internal gear hub vs derailleur debate matters because your drivetrain shapes how your bike fits into your routine. Choose the system that supports your habits, not someone else’s riding style.
Ready to Choose the Right Drivetrain?
Find the drivetrain that matches how you actually ride. At Bikesdirect.com, explore commuter-friendly internal gear hub bikes and versatile derailleur-equipped options across road, hybrid, gravel, and more. Choose a bike that starts smoothly, shifts confidently, and fits your daily routine instead of fighting it. Ride to work, run errands, or cruise the neighborhood with confidence knowing your drivetrain works as hard as you do, mile after mile, season after season.
If you’ve ever compared two bikes online, similar-looking frames, similar category, similar promises, and then felt your eyebrows lift at the price difference, you’re not alone. The bike industry has a long history of pricing that can feel opaque from the outside. MSRP tags, seasonal sales, and brand positioning can make it hard to tell whether you’re paying for performance… or paying for layers.
At BikesDirect, we’ve built our business around a different approach; one that puts more of your money into the bike itself. Understanding factory-direct bikes isn’t about learning industry jargon; it’s about learning how pricing works so you can shop smarter, compare more confidently, and end up with a bike you genuinely enjoy riding.
In this deep dive, we’ll break down:
traditional bike pricing is built
here costs stack up (even when specs don’t)
to evaluate the real component value quickly
our model changes the math in your favor
By the end, you’ll have a practical checklist you can use in minutes, whether you’re shopping for a performance setup or a reliable everyday ride.
Brand and product development A brand designs a lineup, forecasts demand, and sets pricing strategy (including MSRP, promotions, and dealer margins).
Distribution and logistics Inventory is moved through warehouses, shipping networks, and regional distribution channels.
Retail overhead Bikes are stocked on showroom floors, assembled, serviced, and supported by staff. Retailers also carry inventory risk, especially with seasonal demand swings.
Consumer purchase The buyer ultimately pays for the bike and the system that brought it to the shop floor.
None of this is bad. Bike shops provide valuable services, community, fit help, and support. The point is simply that this structure carries costs that exist even when they don’t directly improve the ride experience. Two bikes can share a similar purpose, but the pricing can diverge dramatically based on how many layers are involved and how each layer needs to be funded.
Where the cost layers show up
Even before we talk about components, consider what gets priced in:
warehousing and freight handling
showroom space and staffing
inventory financing and seasonal risk
promotions and markdown cycles
brand marketing overhead (which can be significant)
When you see a higher price, it may reflect higher-end components and engineering. But it may also reflect the economics of the pipeline.
The spec gap problem: why price doesn’t always track performance
If we could give every buyer one simple shopping habit, it would be this:
Compare specs and purpose first; then compare price.
The most common trap is assuming that a higher price automatically means a higher-performing bike in real-world use. Sometimes it does. But often, pricing reflects brand positioning, distribution layers, and retail overhead rather than measurable performance gains.
What actually changes the way a bike rides
If you want to understand value, focus on the parts that directly change feel, control, and long-term satisfaction:
Drivetrain (gearing + shifting quality)
This isn’t just about having more gears. It’s about:
having a gear range that matches your terrain
shifting that feels consistent under load
durability and tune stability over time
A drivetrain that matches your routes can make riding more enjoyable immediately, especially if you have hills or long rides where cadence matters.
Brakes (confidence and control)
Braking is one of the most underappreciated value indicators for new buyers. Better braking consistency makes:
descents feel safer
wet conditions less stressful
stop-and-go riding more predictable
It’s hard to overstate how much brakes you trust can improve the overall experience.
Wheels and tires (comfort and traction live here)
Wheels affect durability and responsiveness. Tires affect comfort, grip, and rolling feel. Two bikes can have similar frames and totally different ride personalities based on tire width and quality alone.
Suspension (if you actually need it)
If you ride trails or rough terrain, suspension can be transformative. If you ride smooth pavement, suspension can be unnecessary complexity. The key is choosing what matches your riding; no more, no less.
A practical way to compare bikes without getting overwhelmed
If you’ve ever clicked into a product page and felt like you needed a translator, here’s a simpler approach. You don’t need to become a mechanic; you just need a short list of high-impact comparisons.
Step 1: Identify the bike’s true job
Before you compare parts, define the bike’s job:
commuting and errands
paved fitness rides
mixed-surface exploring
real trail riding
comfort-first casual riding
Once you know the job, it’s easier to know which specs matter and which are just noise.
Step 2: Look at the big four value indicators
drivetrain level and range
braking type and feel
wheel durability and tire quality
suspension type (only if relevant)
Step 3: Don’t overpay for the wrong kind of upgrade
A bike can have a premium price tag and still be the wrong tool for you. And the reverse is also true: a well-chosen, value-focused bike can feel better in daily use because it matches your routes and comfort preferences.
How our approach changes the value equation
At BikesDirect, our model is built to put more value into the bike itself. When you strip away unnecessary layers and keep the focus on specs and purpose, you create room for stronger component value at a given price point.
That’s the real advantage of factory-direct bikes: you’re not paying extra for a longer pipeline; you’re paying for the product.
We also know that value isn’t just a low number. Value is:
the right bike category for your routes
components that perform where it matters
durability and ride enjoyment over time
clear, honest specs that let you compare confidently
Our goal is to make it easier for you to understand what you’re getting, so your budget goes into ride quality rather than into layers you never asked for.
Real-world value is easier to see when you anchor it to purpose
To make this practical, let’s talk about how value looks in common buying scenarios, because the best deal means different things depending on how you ride.
Scenario A: You want a capable trail bike without paying for fluff
If your rides include real off-road terrain, you’ll feel the most value in:
suspension performance and suitability
braking confidence on descents
drivetrain range for climbing
wheel/tire setup for traction
This is where full-suspension mountain bikes can deliver huge ride-quality differences compared to budget setups that look similar but don’t perform as confidently when trails get rough.
A great example of a value-focused full-suspension starting point is the Gravity FSX 1.0 Advent26 1BY. The reason bikes like this matter in a pricing discussion is simple: full suspension can be a major comfort and control upgrade, and value often shows up in how accessible that upgrade becomes when the pricing model is efficient.
Scenario B: You want stability and confidence from bigger wheels
Wheel size can change ride feel, especially on rougher surfaces. Riders who want a more stable roll-over feel often gravitate toward 29er setups for trail and mixed off-road routes.
A model like the Gravity FSX 29LTDX is a useful reference point when you’re comparing what I get for the money, because it highlights a common shopper priority: stability and confidence, not just looks or branding.
A quick component-value checklist (the short version)
Here’s a simplified checklist you can use while shopping; no deep technical background required.
Drivetrain: ask Will this feel good where I ride?
Do you have hills? Make sure you have low gears you’ll actually use.
Do you want simplicity? A streamlined setup can be easier to live with.
Brakes: ask Will I feel confident stopping?
Consistency matters more than marketing terms.
If you ride in traffic or variable weather, don’t treat brakes as an afterthought.
Wheels and tires: ask Will this be comfortable and grippy?
Tire width and quality influence comfort and traction immediately.
If your roads are rough, tire volume can be a bigger upgrade than a tiny weight reduction.
Suspension: ask Do I need this, and will I use it?
Trails and rough terrain: suspension can be a major benefit.
Smooth pavement: You may prefer simplicity and efficiency.
The component-value checklist (the deeper version you can actually use)
When pricing feels confusing, it helps to stop asking Why is this bike cheaper? and start asking What am I getting for the money? Value becomes much clearer when you evaluate the parts that change ride feel, control, and long-term satisfaction.
Below is the same checklist we use internally when we’re helping riders compare options across brands, price points, and categories.
Drivetrain value: range, reliability, and real-world shifting
A drivetrain isn’t better just because it has more gears. What matters is how well it matches your terrain and how consistently it performs.
What to look for:
A range you’ll actually use: If your routes include hills, you’ll want low gears that keep climbing comfortable. If you ride mostly flat, you may prefer simplicity and clean shifting rather than chasing extremes.
Consistency under effort: Shifting that stays dependable when you’re pedaling hard is a quality-of-life upgrade you notice every ride.
Adjustment stability: Some drivetrains hold tune better over time, which means fewer little annoyances between rides.
Smart buyer move: Compare drivetrain level, gear range, and real-world intent; not just the number of gears. A well-matched setup often feels faster because you’re riding at your preferred cadence more of the time.
Braking value: confidence is the upgrade
Brakes are one of the most underrated value indicators in bike shopping. When brakes feel predictable, everything gets easier: traffic, descents, wet conditions, and tight turns.
What to look for:
Modulation: Smooth control matters more than instant grab.
Consistency: You want the same lever feel from the first mile to the last.
Confidence at speed: Better brakes don’t just stop you faster; they make you feel calmer.
Smart buyer move: If two bikes are close in price, braking quality is often the better tie-breaker than minor frame differences.
Wheels and tires: where comfort and traction really come from
If you want a bike that feels better than expected, wheels and tires are a huge part of that. The frame sets the foundation, but tires and wheels shape the day-to-day experience.
Tires:
Width and volume = comfort and control. Wider tires (within reason for your category) can reduce harshness and improve grip on imperfect surfaces.
Tread and casing quality matter. Two tires that look similar can ride very differently.
Wheels:
Durability is value. Especially for heavier riders, rough roads, or off-road use, a durable wheelset is worth more than a small weight drop.
Ride character changes here. Wheels can influence responsiveness and stability; subtle on paper, obvious on the road.
Smart buyer move: Choose the tire setup that matches your routes. If your city streets are rough, tire volume can be more meaningful than a lightweight frame upgrade.
Suspension value (when it’s relevant): comfort, traction, and control
Suspension is not a universal benefit. If you ride trails or consistently rough terrain, suspension can increase traction and reduce fatigue. If you ride smooth pavement, it can be unnecessary complexity.
What to look for (trail riders):
Appropriate travel for your terrain: More isn’t always better; match it to the trails you ride.
A balanced build: Suspension only shines when the rest of the bike supports it (brakes, wheels, tires, drivetrain range).
Smart buyer move: Buy suspension because it improves the rides you do weekly, not because it sounds like a premium feature.
Frame and fit value: the part that keeps you riding
We’re spec-forward for a reason, but fit is still the foundation. A bike that fits well and matches your posture preference can feel higher-end than a more expensive bike that doesn’t suit you.
What to look for:
Reach and posture that feel natural
Stable handling for your skill level
Mounting points if you need utility (commuting, racks, fenders, bags)
Smart buyer move: If you’re torn between two options, prioritize the one that fits your comfort and your routes. Most riders ride more when the bike feels easy to live with.
Where pricing gets distorted (and why it matters to your wallet)
If you’ve ever wondered why pricing feels inconsistent across the industry, you’re not imagining it. A lot of pricing isn’t just cost + fair margin. It’s influenced by how bikes are sold, stocked, and marketed.
MSRP signaling and sale cycles
In traditional retail, pricing often revolves around MSRP and promotions. That can make comparisons tricky:
model may look discounted heavily, but still be priced around what the pipeline requires
model may hold closer to MSRP because the brand strategy is to protect price perception
nd-of-season markdowns can be more about inventory and floor space than about the intrinsic value of the bike
Inventory risk and overhead
Stocking bikes costs money. Warehousing, shipping, showroom space, staffing, and seasonal swings all create pressure to build margin into the retail price. That doesn’t automatically mean a retail-priced bike is bad, but it does mean you’re often paying for the system that supports that in-store experience.
Why spec-first shopping protects you
When you shop based on specs and purpose, you protect yourself from pricing noise. You don’t get pulled into paying more for paint, brand aura, or marketing language that doesn’t change the ride.
This is also why factory-direct bikes tend to shine in spec-to-price comparisons: when fewer cost layers sit between production and the rider, it becomes easier for your budget to show up where it matters: drivetrain level, braking confidence, and ride-ready capability.
Value looks different by bike category (so shop the right way for your riding)
One mistake we see often is comparing value across the wrong category. A bike can be a great value and still be the wrong tool for your rides. So here’s how to think about value depending on what you ride, and where it makes sense to start browsing.
Road: value is efficiency, gearing, and braking feel
If your riding is mostly pavement and you want speed and distance efficiency, value comes from a build that feels smooth, fast, and reliable over long miles. Start here:Road bike.
Value cues: gearing that matches your terrain, confident braking, wheels/tires that feel lively without beating you up.
Mountain: value is control, traction, and durability
Off-road riding puts real demands on a bike. Value shows up in control on descents, traction in loose corners, and reliability after repeated hits. Start here:Mountain bike.
Value cues: a balanced build (brakes + drivetrain range + tires), wheels that hold up, suspension that matches your trails.
Gravel: value is versatility and comfort on mixed surfaces
Gravel riders often want one bike that can do a lot. Value is stability, tire clearance, and comfort across changing surfaces. Start here:Gravel bike.
Value cues: tire volume potential, confident handling, useful gearing for rolling routes, practical mounting options if you want adventure or commuting capability.
Hybrid: value is practicality, comfort, and easy daily use
Hybrids win because they fit real life: commuting, fitness, errands, paths, and imperfect pavement. Start here:Hybrid bike.
Value cues: upright comfort, stable handling, brakes you trust in stop-and-go riding, and a build that doesn’t demand constant tinkering.
Cruiser: value is comfort and simplicity
Cruisers are about easy fun. Value is a relaxed ride feel that makes you want to hop on more often. Start here:Beach cruiser.
Value cues: comfort-first geometry, straightforward components, easy miles posture.
Fat: value is traction and float, where other bikes struggle
If you ride sand, snow, or consistently loose terrain, fat bikes can unlock rides that other categories can’t handle comfortably. Start here:Fat bike.
Value cues: tire setup that matches your conditions and a build that stays stable and confident on soft surfaces.
Spec-to-price spotlights from our lineup (how to compare with purpose)
To make the pricing discussion real, let’s look at two performance-focused examples and how we recommend comparing them to similarly positioned bikes elsewhere. The goal here isn’t to overwhelm you with jargon; it’s to show you how to identify value with a clear process.
Motobecane HAL29 SLX: a practical benchmark for trail/XC value
The Motobecane HAL29 SLX is a great reference point for riders who want a bike that’s ready for real off-road riding and meaningful trail mileage.
How we suggest evaluating it:
Look at the intent: This is designed for riders who want confident trail capability and efficiency, not a toy bike that looks the part but fades when terrain gets demanding.
Compare drivetrain and braking level at the same price: This is where value often shows up most clearly. A bike can look similar at a glance, but the ride experience changes dramatically when the component level steps up.
Check the whole package, not a single highlight: A good value bike feels balanced. If one competitor has a flashy headline spec but compromises on wheels or tires, it may not deliver the same real-world satisfaction.
Who it tends to fit best: Riders who want to progress; longer trail rides, more technical terrain over time, and a bike that won’t immediately feel outgrown as skills improve.
Motobecane HAL29 Comp Eagle LTD: when drivetrain range and ride-readiness matter
The Motobecane HAL29 Comp Eagle LTD is a strong example of why spec-to-price shopping beats brand-to-price shopping. When you’re comparing bikes in the same category, drivetrain range and consistency can be the difference between that climb being miserable and that climb being part of the fun.
How we suggest comparing it:
Focus on climbing comfort: Useful low gearing is one of the biggest ride-quality advantages, especially on longer routes or steeper terrain.
Evaluate braking confidence as a priority, not a footnote: Mountain riding rewards control. If you’re choosing between two similarly priced bikes, brakes are often the wiser place to prioritize.
Think about fatigue: A build that stays composed and predictable tends to keep you riding longer, and that’s where value becomes obvious over months, not just minutes.
Who it tends to fit best: Riders who want a bike that feels ready for bigger rides; more elevation, more distance, and a wider range of terrain without feeling underbiked.
How do these relate to the earlier examples
We used the Gravity FSX 1.0 Advent26 1BY and the Gravity FSX 29LTDX to illustrate another side of value: making full-suspension comfort and confidence more accessible. That’s important because many riders don’t need a top-tier build to have a great experience; they need a bike that matches their routes and skill level and delivers real comfort/control for the money.
Taken together, these four bikes show the two most common value paths:
Accessible capability: get the category advantage (like full suspension) without a price leap that stops you from riding now
Spec-forward performance: get meaningful component-level information where it impacts ride feel long-term
What you trade off in a direct-to-rider model (and how we make it a win)
No value model is magic. It’s worth being honest about what changes when you buy online and how to make the experience smooth.
Assembly and initial setup
Most bikes require some assembly and adjustment. For many riders, it’s straightforward with basic tools and a little patience. If you’d rather not handle it yourself, a local shop can do a quick build and safety check, especially if that gives you peace of mind.
How we recommend approaching it:
plan for a short first ride and a quick follow-up adjustment (this is normal)
prioritize the basics: brakes, tire pressure, shifting, and saddle height
Sizing confidence
Fit matters. If you’re between sizes or unsure, the right move is to choose based on your comfort preference and intended posture. A slightly more comfortable fit often leads to more consistent riding, especially for new riders or returning riders.
Support and clarity
We focus on clear specs and clear positioning so you can compare intelligently. The goal is to make it easier to choose with confidence, not to bury you in fluff. When you shop spec-first, you end up with a bike that feels like a smart buy every time you ride it.
How to shop smarter (and why our pricing model changes the outcome)
If you want to cut through the noise, here’s the simplest framework:
Pick the right category for your routes
Compare the ride-feel parts first: drivetrain, brakes, wheels/tires, and (if relevant) suspension
Then compare prices only after you’ve matched purpose and specs
When you do that, the differences between pricing models become obvious. You stop paying extra for layers that don’t improve the ride, and you start paying for the parts that make every mile smoother, safer, and more enjoyable.
That’s why factory-direct bikes are such a strong option for riders who care about value in a practical sense, not just the lowest number, but the most ride quality per dollar. And it’s exactly why we’ve built BikesDirect around spec-forward choices, clear comparisons, and a lineup designed to deliver real capability at prices that make sense.
If you’re ready to shop with confidence, factory-direct bikes give you a clear advantage: less noise, more substance, and a bike that feels like you spent wisely long after the checkout screen is gone.
If you’d like help comparing models or choosing the right size, pleasecontact us here.
Walk into any bike shop—or browse online long enough—and a pattern quickly emerges. Across price-conscious performance bikes, one material keeps showing up again and again: aluminum. From first-time riders upgrading from entry-level models to experienced cyclists looking for dependable daily machines, aluminum bike frames have become the backbone of value-focused cycling. That didn’t happen by accident.
Many riders remember their first “real” bike: lighter than expected, responsive under power, and tough enough to survive missed shifts, curb hops, and years of weekend rides. More often than not, that bike was aluminum. The material quietly solved the biggest problem in cycling—how to balance weight, durability, and affordability—without asking riders to compromise where it matters most.
How Aluminum Earned Its Place in Modern Cycling
Aluminum frames weren’t always the obvious choice. Early versions felt harsh, and manufacturing limitations made them less refined than steel. Over time, though, advances in alloy composition, tube shaping, and welding transformed aluminum into a high-performing material capable of competing with far more expensive options.
Modern aluminum frames use carefully engineered tube profiles that place strength where it’s needed and remove material where it isn’t. That means bikes accelerate quickly, feel stable at speed, and maintain predictable handling across varied terrain. For riders focused on real-world performance instead of marketing buzzwords, this evolution matters.
The Sweet Spot Between Weight and Strength
Weight influences everything from climbing efficiency to how lively a bike feels when you accelerate. Aluminum naturally offers an excellent strength-to-weight ratio, allowing manufacturers to build frames that are significantly lighter than steel without approaching the price of carbon.
This balance becomes obvious on longer rides. Whether you’re spinning through rolling terrain or navigating stop-and-go city streets, aluminum frames respond immediately to pedal input. They feel eager rather than sluggish, which keeps rides engaging without demanding race-level fitness.
Durability plays an equally important role. Aluminum resists corrosion, stands up well to weather exposure, and handles repeated stress cycles reliably. Riders who commute daily, travel with their bikes, or simply ride hard appreciate a frame that doesn’t feel fragile or precious.
Why Aluminum Makes Sense Across Every Riding Style
One of aluminum’s biggest advantages is versatility. Its properties adapt beautifully across multiple bike categories, which is why it dominates so many segments on Bikesdirect.com.
A hybrid bike benefits from aluminum’s balance of comfort and efficiency, making it ideal for mixed pavement, fitness rides, and commuting. The frame feels light enough for speed yet sturdy enough for everyday use.
On rougher terrain, aluminum shines in the gravel bike category. Gravel riding demands resilience, stability, and predictable handling, especially when surfaces change without warning. Aluminum frames deliver consistent performance without inflating the cost of adventure.
Speed-focused riders gravitate toward aluminum road bike frames for training, group rides, and long-distance efforts. While carbon grabs headlines, aluminum remains a favorite for riders who want responsive handling and efficient power transfer without worrying about damage or price.
Even niche categories rely on aluminum. A fat bike needs a frame strong enough to support oversized tires while keeping overall weight reasonable. Aluminum delivers that strength without making these bikes unwieldy.
Comfort-oriented riders find aluminum equally compelling. A beach cruiser built with aluminum stays easy to maneuver, rust-resistant near coastal environments, and light enough to handle casually.
Trail riders trust aluminum for the same reasons. A mountain bike frame must endure impacts, torsional stress, and unpredictable forces. Aluminum’s toughness and forgiving failure characteristics make it a dependable choice on the dirt.
Ride Quality: The Myth of Harshness
One lingering misconception is that aluminum frames ride harshly. That reputation came from older designs, not modern engineering. Today’s aluminum bikes incorporate shaped tubing, carbon forks, wider tires, and refined geometry that collectively smooth out road buzz and trail chatter.
Manufacturers now tune frames for vertical compliance while preserving lateral stiffness. The result is a ride that feels controlled and comfortable, especially when paired with modern components. For most riders, the difference between aluminum and higher-priced materials becomes negligible outside of racing scenarios.
Value That Extends Beyond the Price Tag
Value-focused cycling isn’t just about spending less upfront. It’s about long-term satisfaction. Aluminum frames require minimal maintenance, hold alignment well, and don’t demand specialized care. Riders can focus on riding instead of worrying about frame damage, insurance, or resale anxiety.
This practical reliability is why aluminum dominates rental fleets, training bikes, and everyday riders’ garages. It’s a material that works quietly in the background, letting performance and enjoyment take center stage.
Why Aluminum Continues to Lead the Market
Cycling trends come and go, but fundamentals remain. Riders want bikes that feel fast, handle predictably, and last for years without draining their wallets. Aluminum bike frames meet those expectations consistently across disciplines and riding styles.
As manufacturing continues to improve, aluminum frames only get better—lighter, more refined, and more capable. That steady progress keeps aluminum firmly planted as the smartest choice for riders who value substance over hype.
Ready to Ride Smarter?
If you want performance that makes sense in the real world, aluminum is where confidence meets value. At Bikesdirect.com, you’ll find expertly engineered aluminum bikes across every category—road, mountain, hybrid, gravel, fat, and cruiser—without inflated retail markups. Choose a bike that accelerates eagerly, handles reliably, and stands up to years of riding without hesitation. Ride more, worry less, and invest in a frame material that’s proven itself on roads, trails, and everywhere in between.
The first time most riders see a fat bike in person, they react the same way: a quick laugh, a double-take, and then a hand reaches out to squeeze the tire like it’s a novelty. Those massive wheels look overbuilt for “just riding.” Then the rider points it toward soft sand, a rutted trail, or a snowy side street and something clicks. Suddenly, the bike doesn’t feel like a gimmick. It feels like permission. Permission to roll past the point where traction usually quits. Permission to stay relaxed when the surface turns unpredictable. Permission to ride more days of the year, on more types of terrain, with less second-guessing.
That’s the real story behind the fat bike advantages: stability, comfort, and confidence that show up in the moments when a standard setup would have you dabbing a foot down or walking.
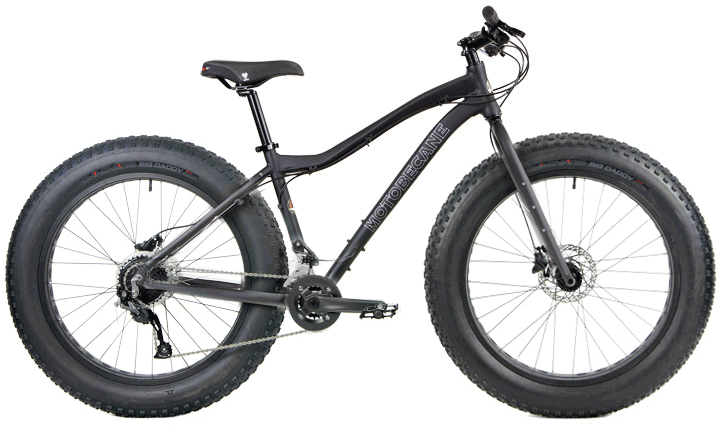
What Exactly Is A Fat Bike?
A fat bike is built around oversized tires—typically around 3.8 inches wide and up, often mounted on wide rims. That width changes everything. Instead of cutting into soft surfaces, the tire “floats.” Instead of bouncing off roots and ripples, it smooths them out. And instead of feeling twitchy on loose gravel or slush, it plants you in a steady, predictable line.
Fat bikes also tend to have frame geometry designed to handle those big tires and keep the ride stable. Many use mountain-bike-inspired frames and components, but the experience is its own category. You can think of a fat bike as the all-terrain specialist that makes low-traction riding feel surprisingly approachable.
If you’re browsing options, start with Bikesdirect’s fat bike category to see the range of builds and tire setups.
The Traction Advantage: Why “More Rubber” Matters
Traction is the foundation of control. It determines how confidently you can steer, brake, and climb. Fat tires increase traction in two important ways: contact patch and pressure.
A wider tire naturally creates a larger contact patch—the portion of rubber actually touching the ground. That contact patch gets even more impressive when you lower tire pressure. With lower PSI, the tire conforms to the surface instead of fighting it. It wraps around small bumps, sinks slightly into sand or snow for grip, and stays engaged on loose gravel where narrower tires can skate.
That’s why one of the biggest fat bike advantages is how calm the bike feels when the terrain is chaotic. Instead of feeling like you’re balancing on a knife-edge, you feel like you’re rolling on rails.
Comfort Is Not A Luxury—It’s A Performance Feature
A lot of riders shop based on components first. Better drivetrain, better brakes, better suspension. But on varied terrain, comfort can be the biggest performance unlock because it keeps you riding smoothly and longer.
Fat tires act like natural suspension. When you run them at appropriate pressure, they absorb vibrations and soften sharp impacts. That matters on washboard gravel, chunky trails, pothole-riddled streets, or frozen ruts where a rigid setup would rattle your hands and shoulders. Less chatter means less fatigue. Less fatigue means better control. Better control means you ride more confidently—and confidence is the difference between enjoying the ride and simply surviving it.
If you’ve ever finished a ride thinking, “My body tapped out before my legs did,” there’s a good chance you’d appreciate how forgiving a fat bike feels.
Stability You Can Feel: Why Fat Bikes Boost Confidence
Confidence isn’t just mental. It’s physical feedback. A stable bike gives you time to react and makes small mistakes feel recoverable. Fat bikes tend to deliver that stability through a few traits: wide tires, steady steering, and predictable grip at lower speeds.
This makes fat bikes especially appealing to riders who want to explore without feeling pressured to “perform.” Not every ride needs to be a speed test. Sometimes you want to wander, take a new route, cross a sandy shoulder, or roll down a rough trail that looked intimidating on a narrower setup.
And here’s the underrated part: fat bikes can make learning off-pavement riding less stressful. If you’re new to loose surfaces, a fat bike’s grip and stability can feel like training wheels for terrain—except you’re still having a real adventure.
Where Fat Bikes Shine: Sand, Snow, And Everything In Between
Fat bikes earned their reputation on snow and sand, and those are still the headline surfaces for good reason. Wide tires at lower pressure float and grip where other bikes bog down. If you live near beaches, dunes, snowy paths, or winter-packed trails, a fat bike isn’t just “nice to have.” It can be the difference between riding year-round and storing the bike half the year.
But fat bikes also excel on mixed terrain. Think forest service roads, chunky gravel, rooty trails, muddy connectors, and urban routes with rough pavement. They’re not limited to extreme conditions. They’re simply better than most bikes when the surface stops cooperating.
If your typical ride includes surprises—construction detours, gravel shortcuts, sandy shoulders, or icy patches—a fat bike turns those “maybe not” moments into “let’s go.”
Fat Bike Vs. Mountain Bike: What’s The Real Difference?
A mountain bike is typically designed for technical trails, offering faster handling and improved climbing efficiency, often with suspension systems optimized for absorbing impacts at high speeds. Fat bikes can overlap with that world, but their specialty is traction and float, especially at lower speeds and on soft terrain.
If you ride mostly hard-packed singletrack and want quick acceleration and nimble cornering, a traditional mountain bike might feel more responsive. If you ride in loose, soft, or inconsistent conditions—and want maximum stability—fat bikes often win.
Many riders keep both, but if you’re choosing one for “worst-case terrain,” fat bikes are hard to beat.
Fat Bike Vs. Gravel Bike: Comfort And Confidence Vs. Speed
A gravel bike is great when you want efficiency on pavement, plus the ability to handle dirt roads. It’s faster, lighter, and more aerodynamic for long mixed-surface miles. But gravel bikes typically run much narrower tires than fat bikes, which means they demand more precision when the surface gets loose or soft.
Fat bikes are the opposite: they trade some speed for comfort and traction. If your rides are about exploring, stability, and low-traction confidence, fat bikes feel like the safer, more forgiving choice. If your rides are about covering distance quickly on predictable surfaces, gravel bikes may make more sense.
Fat Bike Vs. Road Bike: Different Goals, Different Joy
A road bike is all about speed and efficiency on smooth pavement. If you want fast group rides and clean asphalt performance, road bikes are the tool. But if your environment includes broken roads, grit, snow, sand, or uneven paths, a fat bike delivers a different kind of freedom—less about pace, more about possibility.
Think of it as choosing between a sports car and a 4×4. Both are fun. They’re just fun in different places.
Are Fat Bikes Only For Winter?
Not at all. Winter is simply when the advantages become obvious. But plenty of riders use fat bikes year-round because they prefer the ride quality and stability. Summer trail riding, beach cruising, gravel exploring, and urban pothole dodging all benefit from the plushness and traction.
If you want a more casual, comfort-forward experience on flatter terrain, you might also look at a beach cruiser or a hybrid bike—both are approachable, comfortable choices for relaxed rides. The difference is that fat bikes keep that comfort while expanding where you can ride.
If you’re ready to experience the stability, comfort, and confidence that make fat bikes so addictive, start exploring options at Bikesdirect. Explore our full fat bike selection, compare tire setups and frame styles, and select the build that best suits your terrain and goals. Whether you want to keep riding through winter, explore sand and loose trails, or simply enjoy a smoother, more forgiving ride, you’ll find a bike that fits your budget and your curiosity. Your next favorite route might be the one you used to avoid.